
How do I add where a person works?
Short answer
In Stakeholders, search and select the person, press + Add Information, choose Employment, search and select the organisation, and type the job title.
Before you start
You need to be signed in to GilbApp on a computer, with the person's card and the card of the organisation they work for in one vault you can write to, such as your own vault. The answer on adding a person as a stakeholder shows how to make them. The pictures show a made-up person on a test site; your screen shows your own name and address.
Words used here (6)
- Employment
- An Employment is a person's work for one organisation, with the one or more job titles they hold there.
- GilbApp
- GilbApp is the app, opened in a web browser at https://gilb.com/app, where you open, fill and share your vaults.
- record
- A record is one piece of data with its own address, such as a person, a place, a thing or a note.
- online card
- An online card is the card a person keeps about themselves on GilbPlatform; others see only what the person shares with them.
- GilbPlatform
- GilbPlatform is the service that keeps people's and organisations' data in vaults, each at its own web address.
- field
- A field is one named fact on a record, such as its title or a due date; its name comes from GilbVeda.
Steps
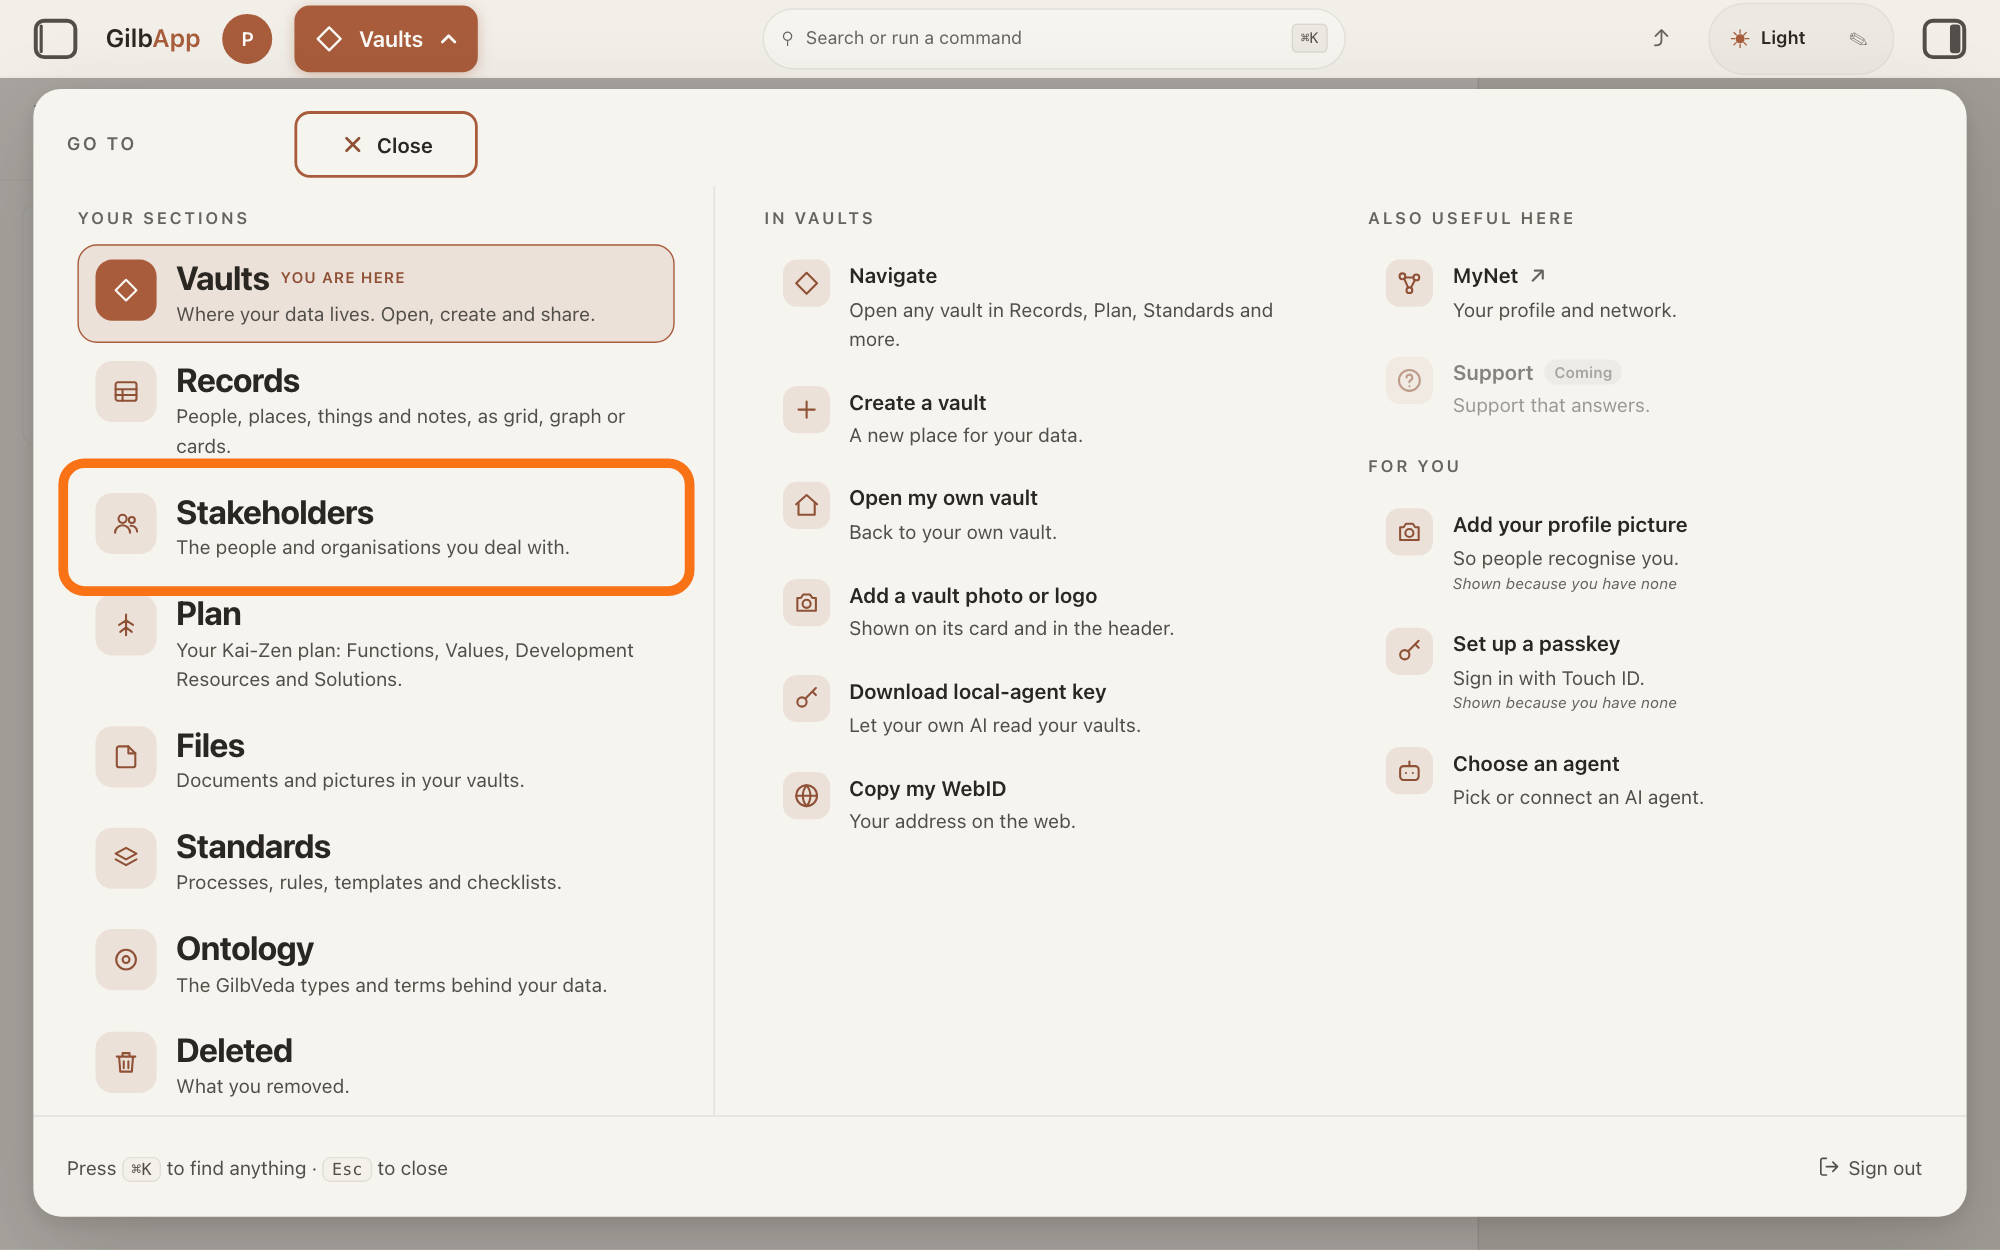
Press Main menu at the top left and choose Stakeholders.
Press Main menu, next to your profile picture at the top left, and under YOUR SECTIONS choose Stakeholders. A stakeholder is a person, group or system that cares whether a Value goes up or down.
Show as text
At the top left, press "Main menu" (it shows the name of the section you are in). In the panel headed "GO TO", look under "YOUR SECTIONS" and press "Stakeholders", "The people and organisations you deal with.", outlined in orange.
More about this
The button shows the name of the section you are in, such as Vaults. A panel headed GO TO opens; Stakeholders reads The people and organisations you deal with. You can also press the Stakeholders button on the card of a vault (the place where a person or a group keeps their records) in Vaults. The screen lists your stakeholders and has the views Grid, Graph, Both and Card. The list also holds organisations, systems and groups; the TYPE column says which are Person.
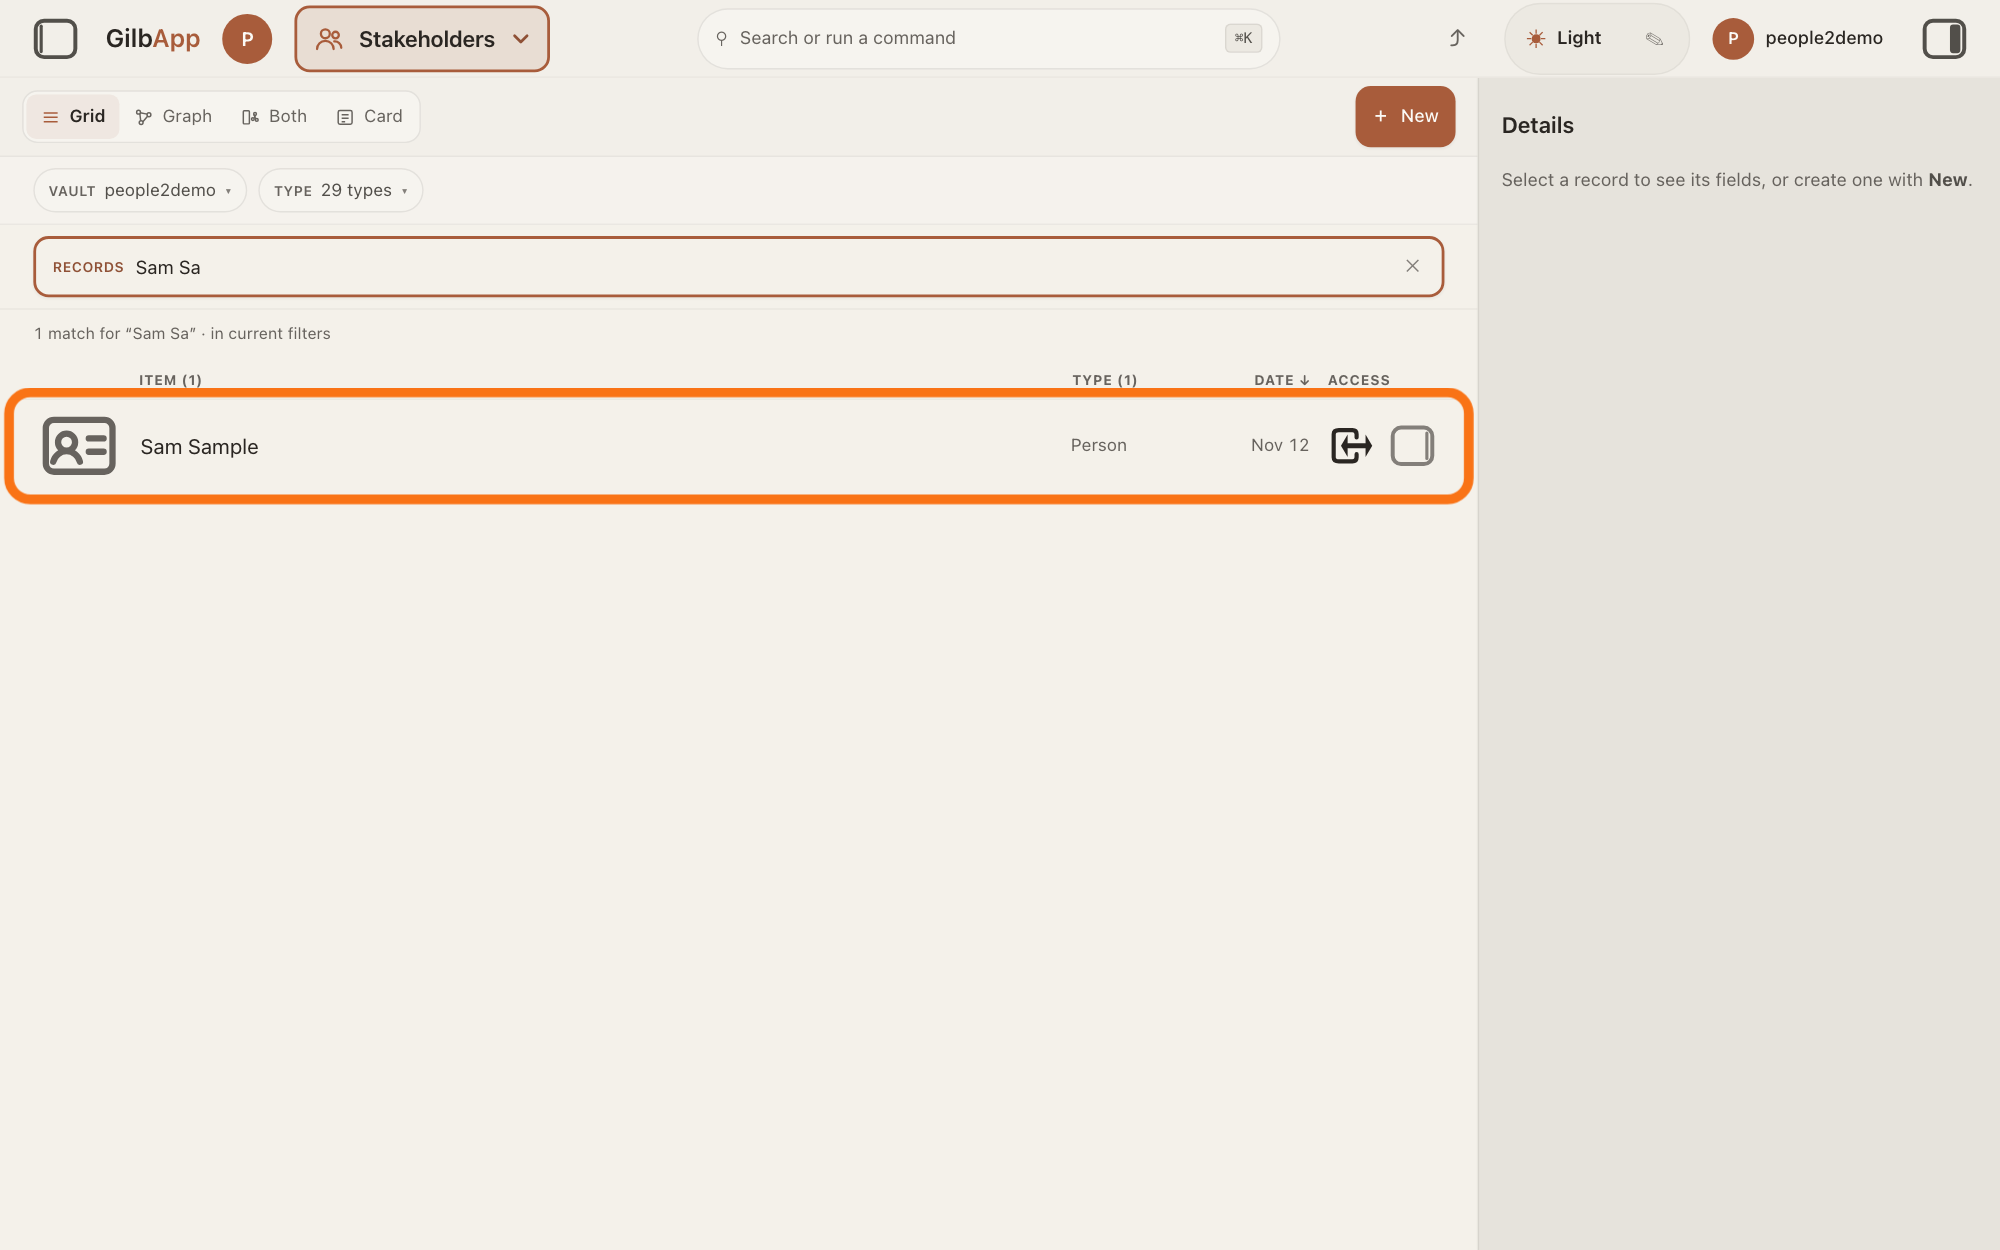
Search and select the person in the list.
Type a word of the person's name in the search box marked RECORDS above the list, and click the person in the list. The person's card opens in the middle of the screen, and the right pane, headed Actions, holds what you can do with it.
Show as text
In the box marked "RECORDS" above the list, type the person's name or its first letters until the line under the box reads "1 match" and only their row is left. Press that row, outlined in orange, to open their card.
More about this
The box shows Search in current filters…, because the list holds only stakeholders; the answer on avoiding adding the same person twice shows more about the search. GilbApp shows only the kinds of information the card already holds; a kind with nothing in it is not drawn. If you can only read the vault that holds the card, the card has no Edit and no + Add Information, and nothing on it can be changed. You do not need the right pane here.
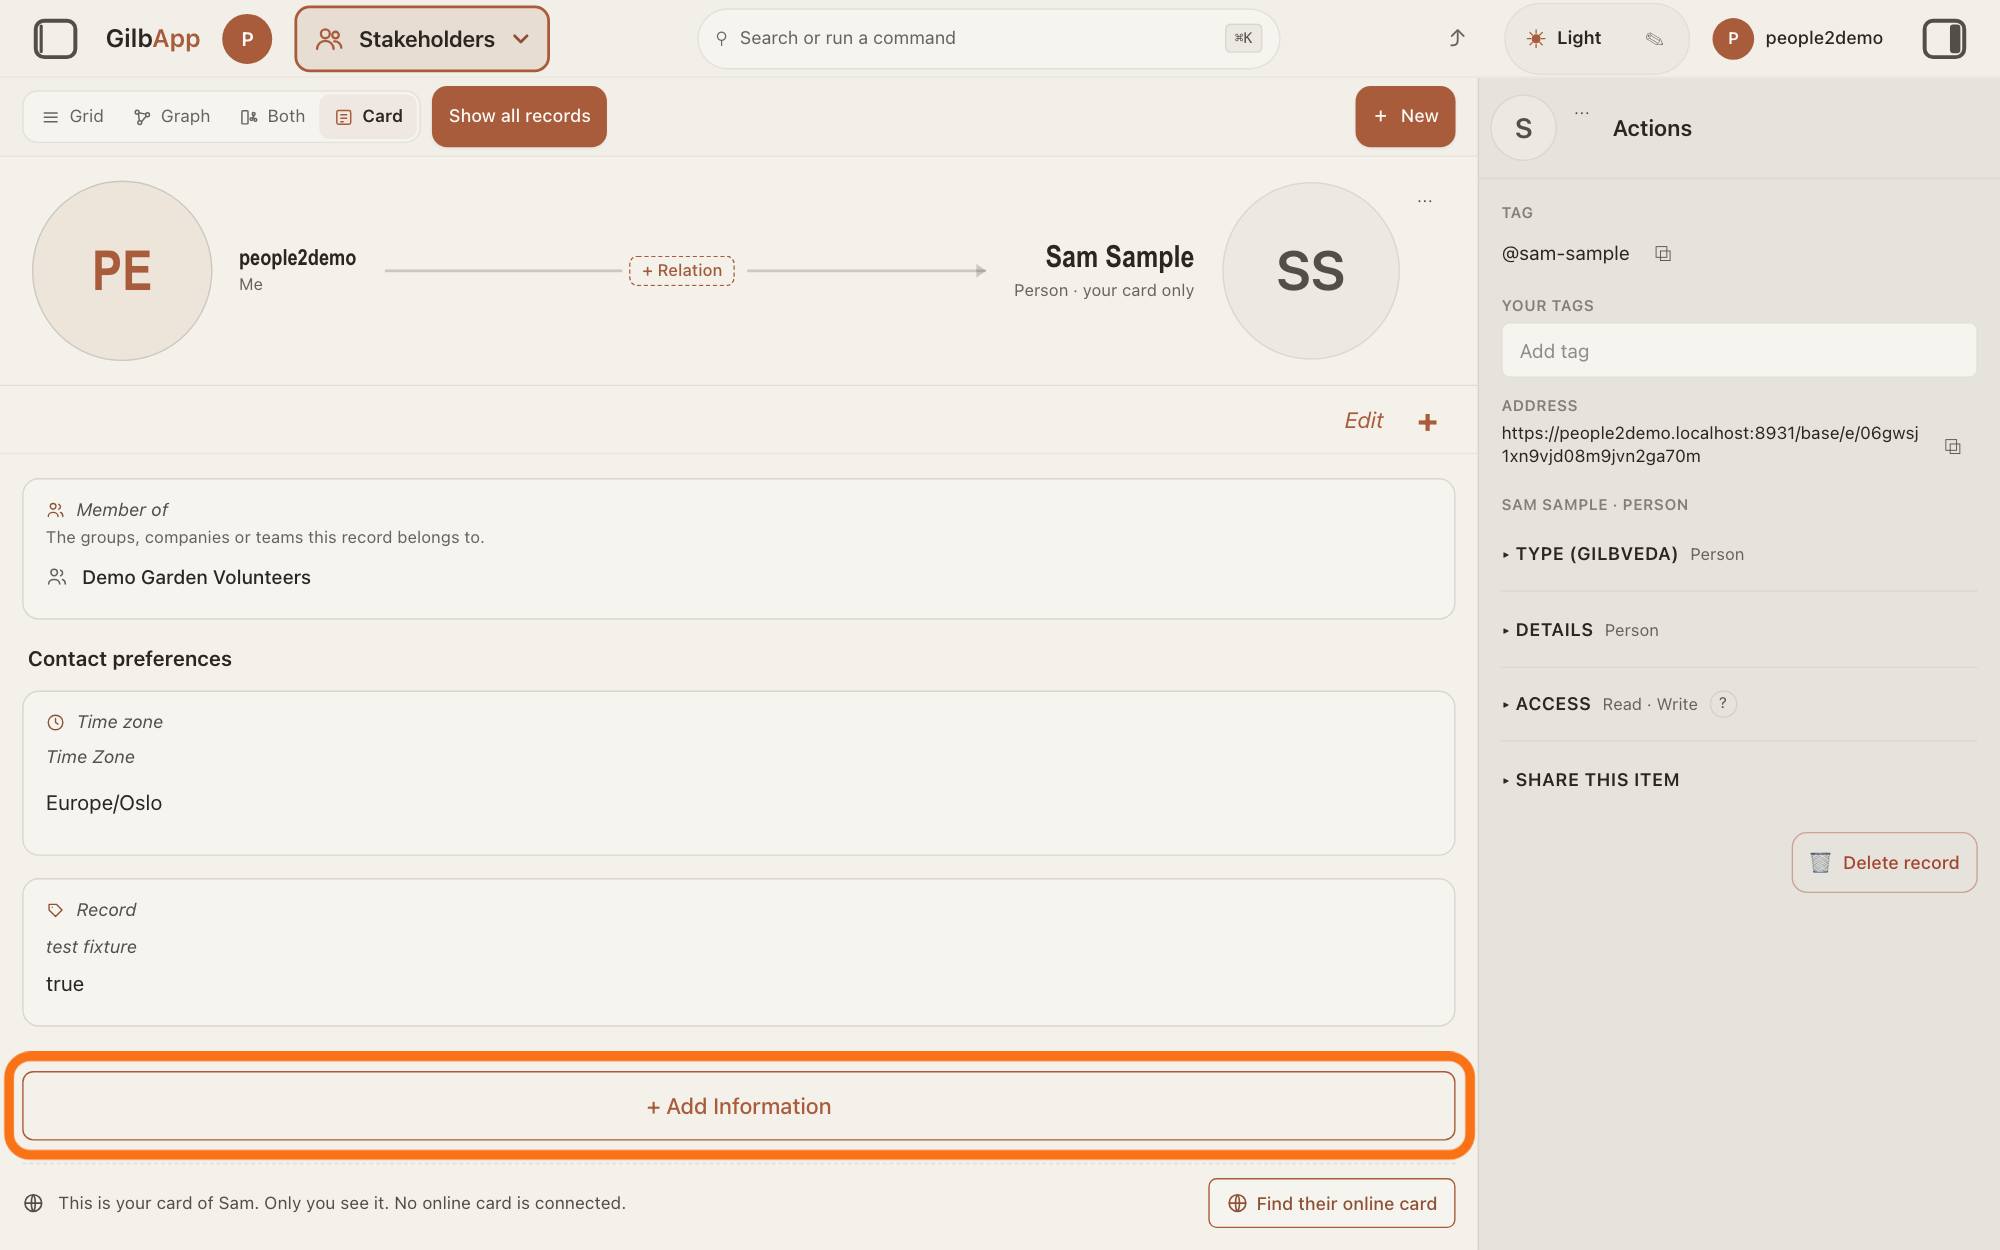
Press + Add Information.
Scroll down to the foot of the person's card and press + Add Information. A list headed Add information opens over the whole window.
Show as text
The person's card opens in the middle. Scroll to the foot of the card and press the wide button "+ Add Information", outlined in orange. Under it, a line says the card is yours only, with "Find their online card" at its right.
More about this
The list holds only the kinds of information the card does not show yet, under headings such as Connection points and Companies. The + beside Edit at the top right of the card opens the same list; its Search box narrows the list, and Cancel closes it. Below the button, a card not yet connected to the person's own online card, the card a person keeps about themselves on GilbPlatform, has Find their online card; you do not need it here.
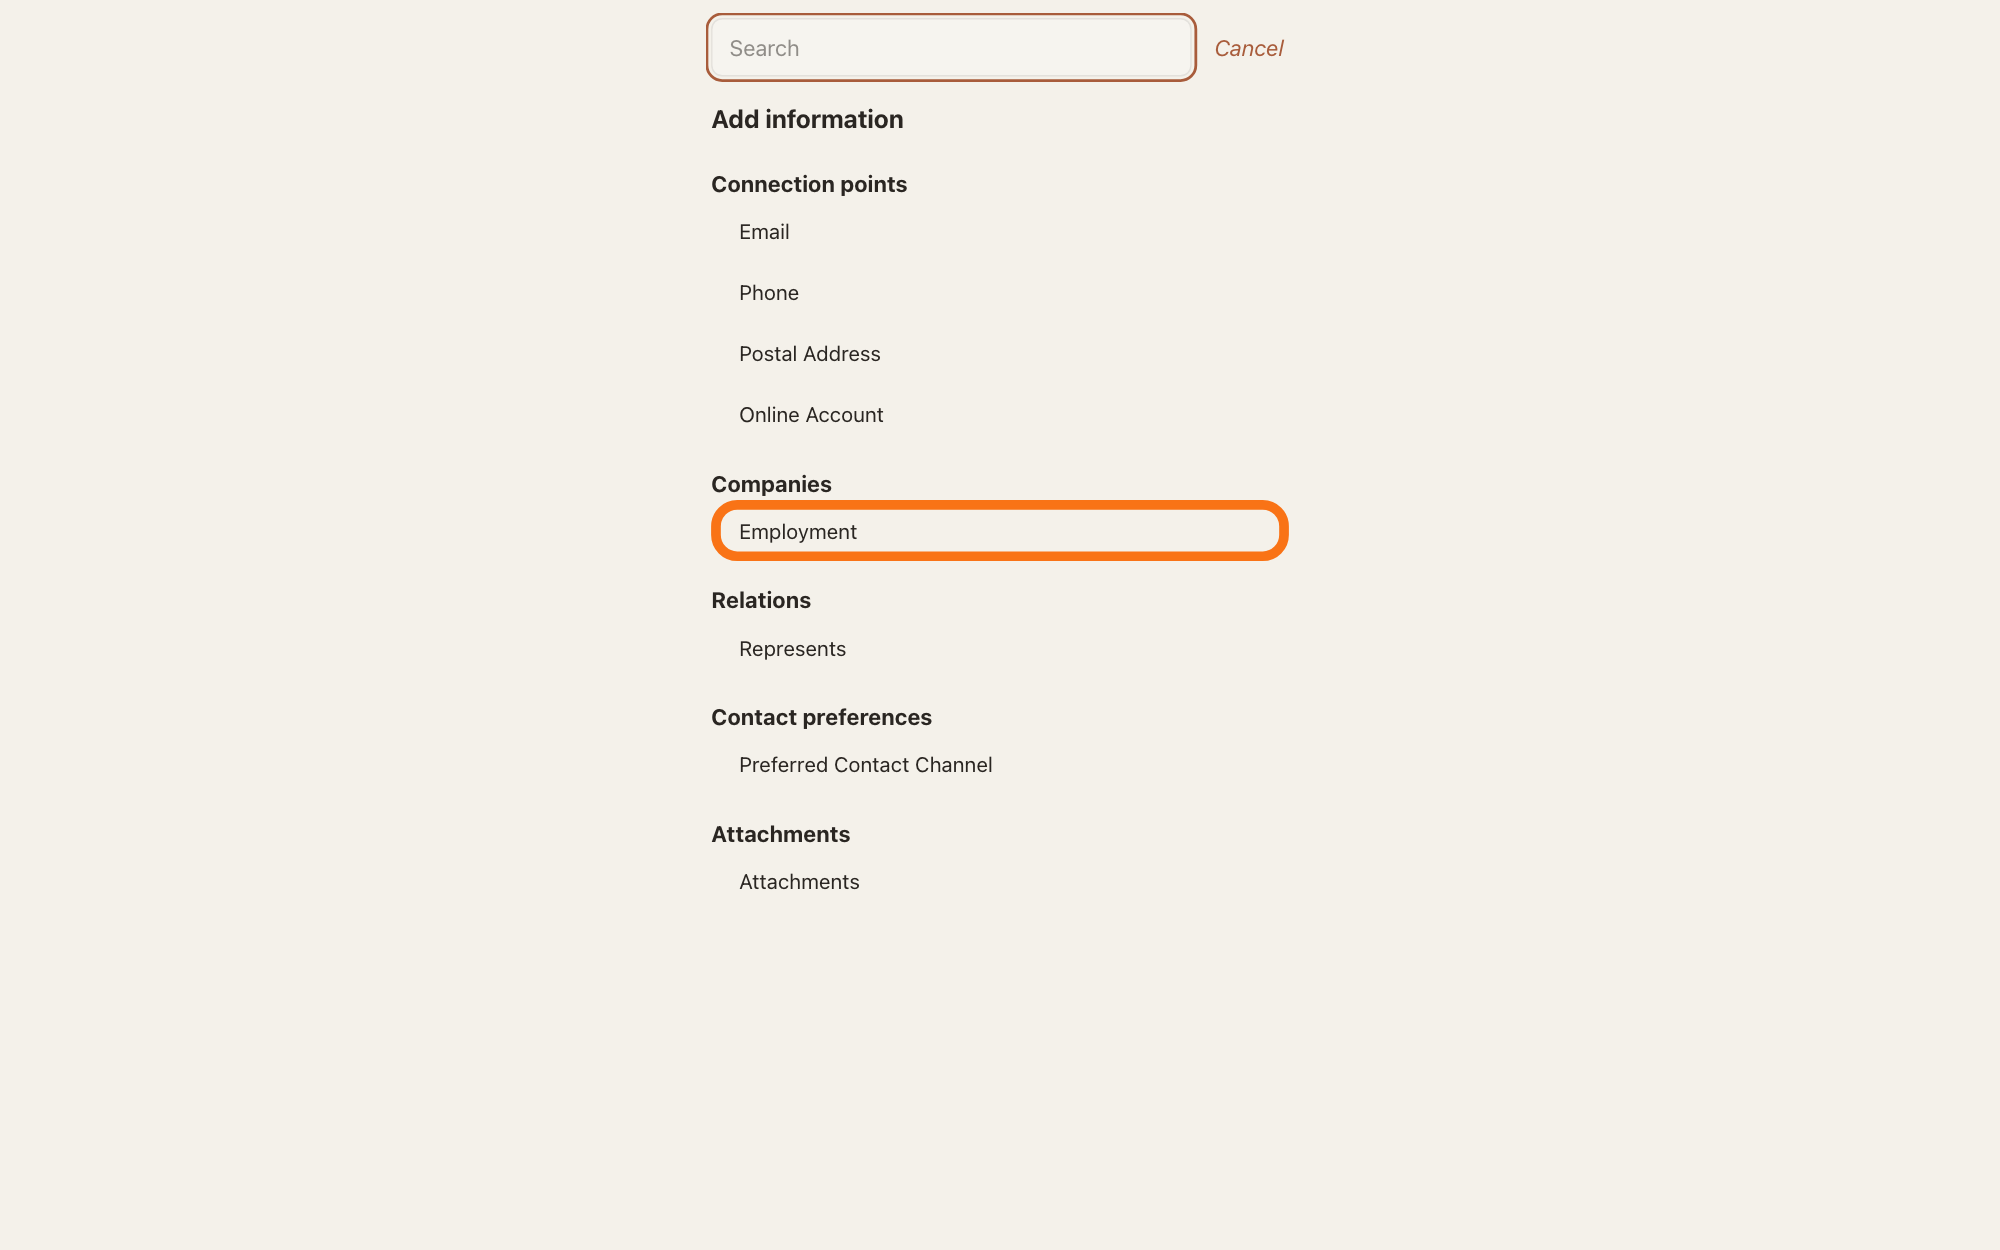
Under Companies, choose Employment.
In the list, under Companies, choose Employment. The card shows a frame headed Employment with a Company line that reads Add company, and the cursor is in it.
Show as text
In the list headed "Add information", look under "Companies" and press "Employment", outlined in orange.
More about this
The card is now in edit mode: Edit at the top right reads Done, and the card says Editing. Changes save as you leave a field. The name Employment comes from GilbVeda, the shared list of terms, so it can change. If Employment is not in the list, the card already shows an employment, or it offers none: press Edit, then press ⊕ add employment under the employments.
Under Company, search and select the organisation.
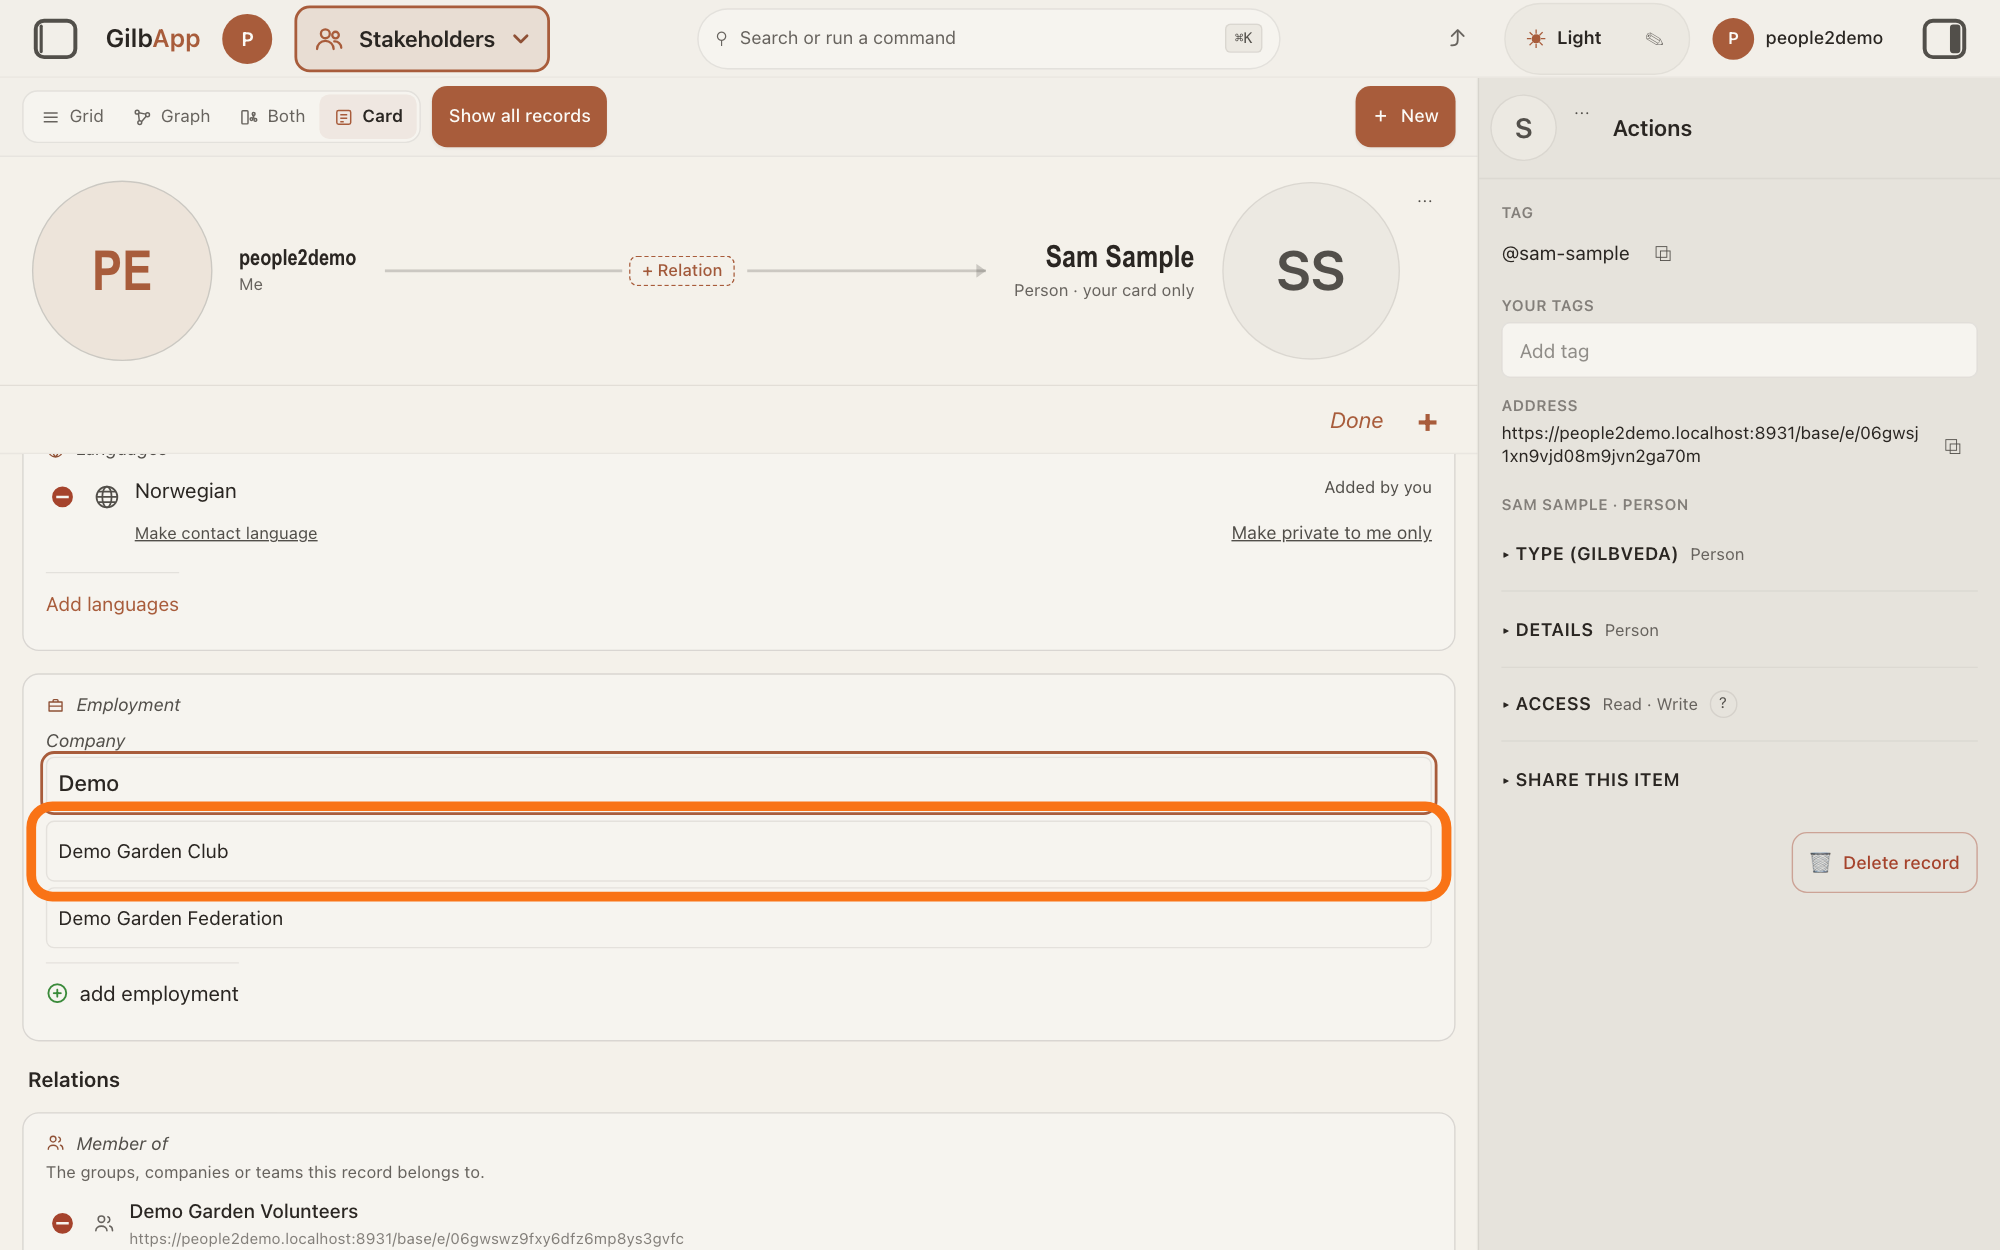
Type the organisation's name under Company and select it in the list, which holds the organisations kept in the same vault as the person's card. The employment is saved at once, linked to that organisation.
Show as text
The "Employment" frame opens on the card with a box under "Company". Type part of the organisation's name and press the right one in the list below, outlined in orange.
More about this
While it looks, the box says Searching companies…. If none matches, it offers No company named and what you typed, then Use and the same name; that keeps the name as text only, not linked, so the organisation's card does not list the person. To make the organisation's card first, use the answer on adding a person as a stakeholder and choose Organization instead of Person. Escape closes the box and keeps what was there.
Type the job title under Title.
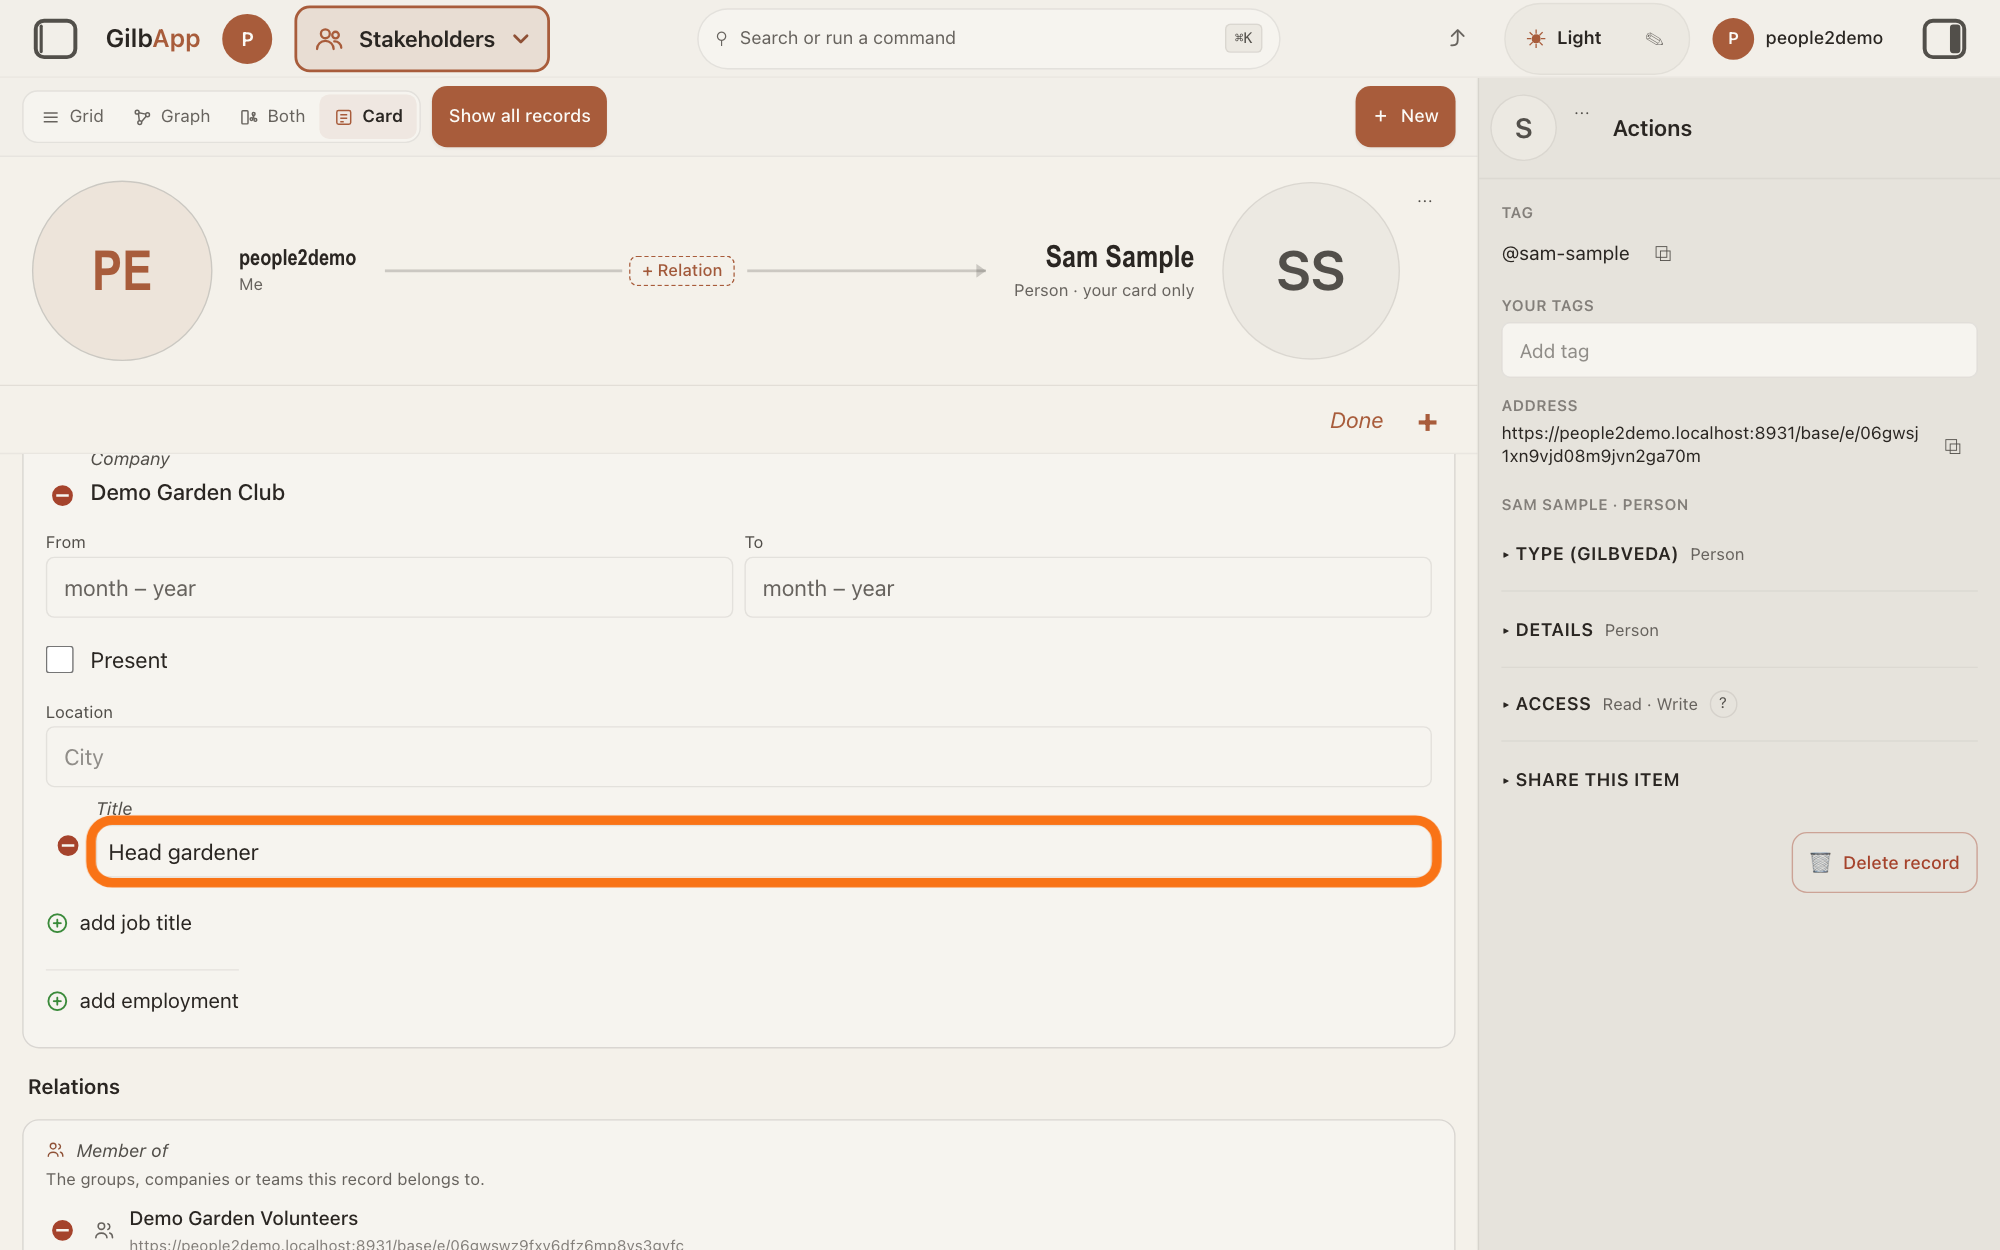
Under Title, click Add title and type the person's job title, such as Head gardener. Press Return, or click outside the box, to save it.
Show as text
The organisation now shows under "Company", with "From", "To", "Present" and "Location" below it. Type the job title in the box under "Title", outlined in orange, and press Return to save it.
More about this
A small word beside the title says saving, then saved; not saved · retry means it was not saved, and pressing it tries again. ⊕ add job title adds another title at the same organisation. In edit mode a red round minus sign at the left of a title removes that title, and the one at the left of Company takes the whole employment off the card, at once and with no question. ⊕ add employment adds another organisation the person works for.
If you want, choose the months under From and To.
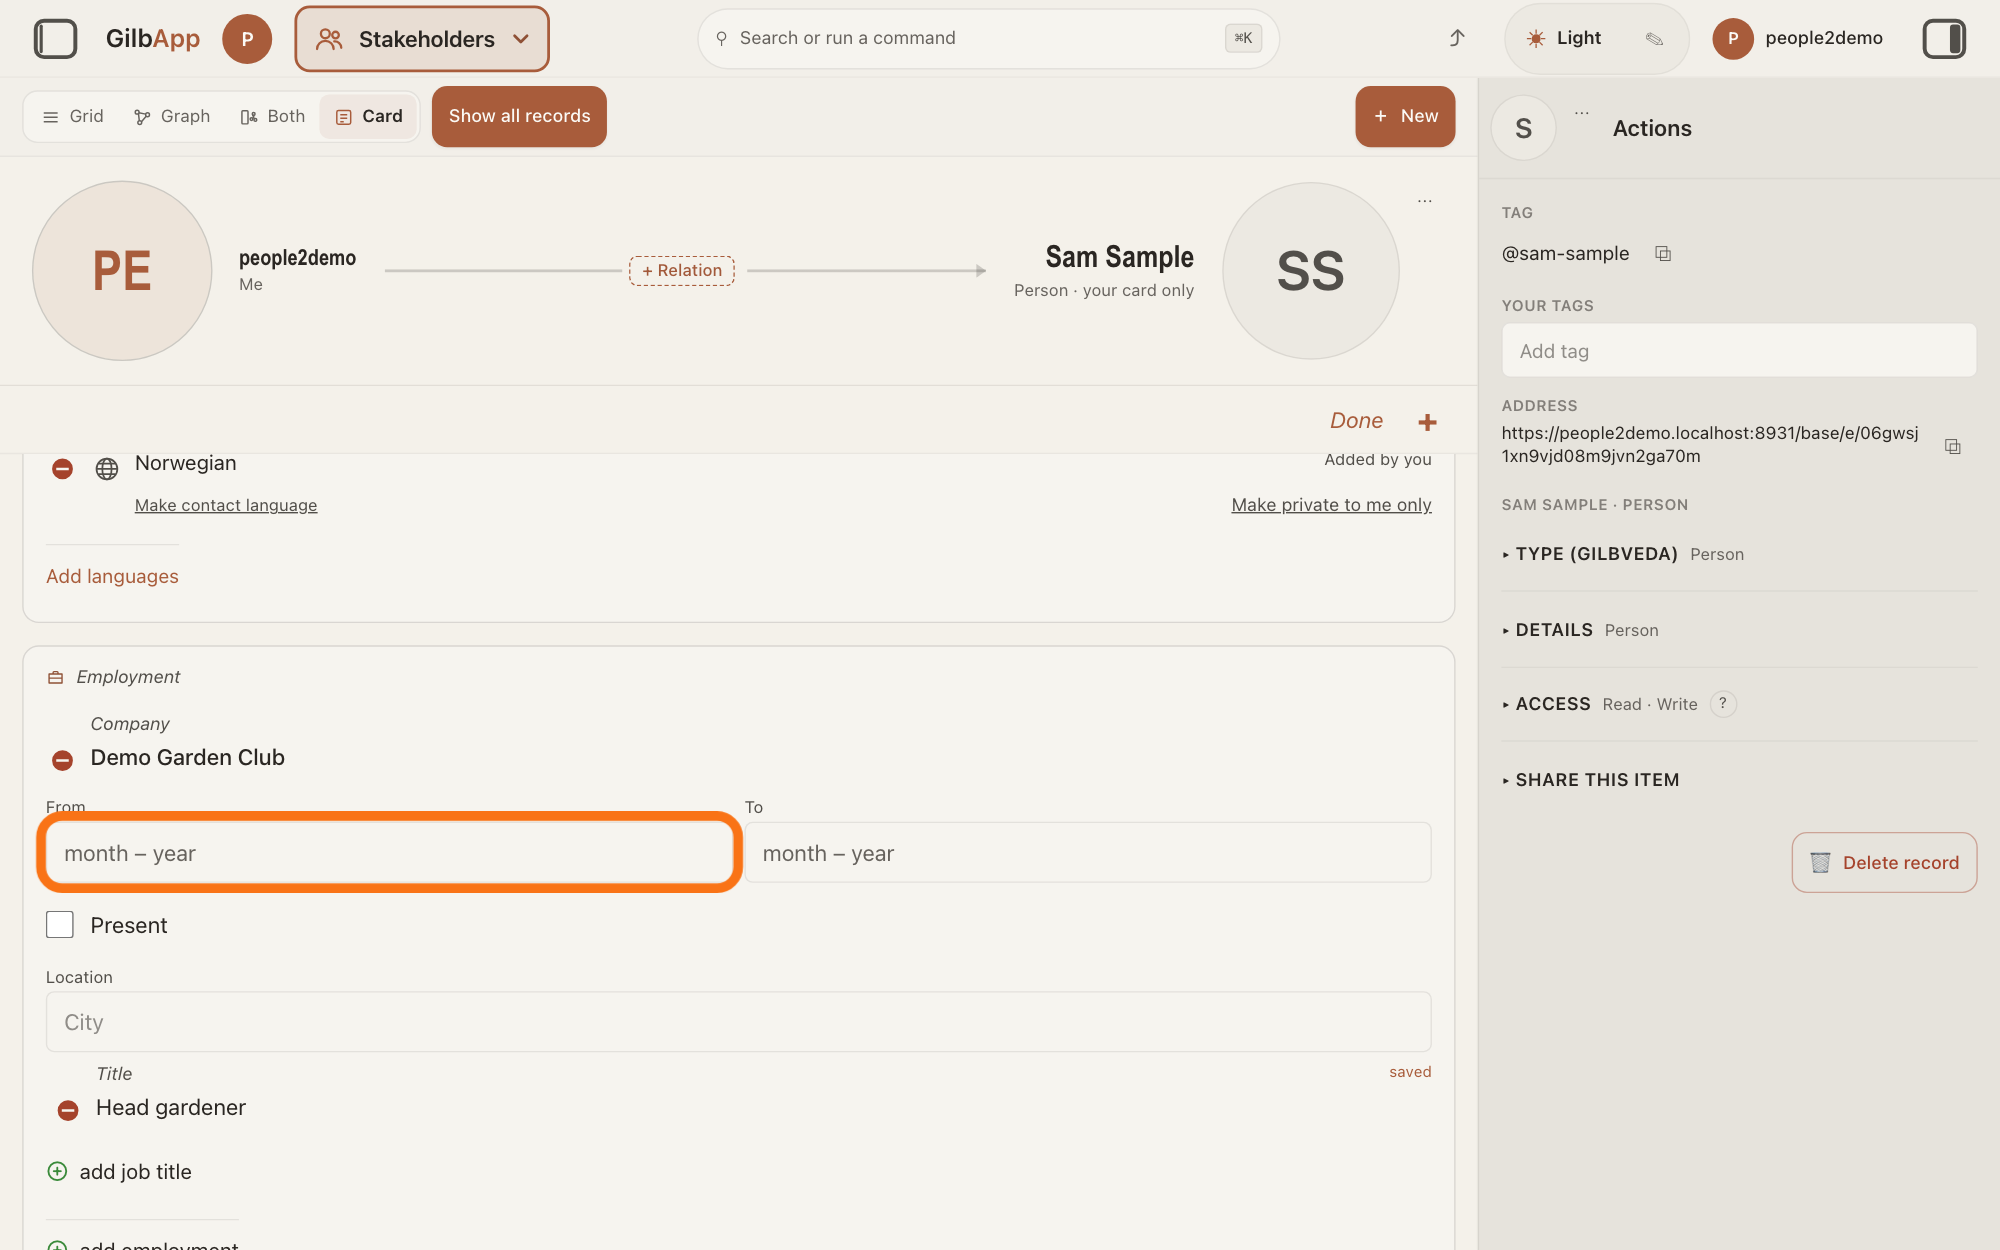
If you want, click the box under From and choose the month and year the job started, and under To the month it ended. Your browser's own month picker opens; the box shows month – year until you choose.
Show as text
The title is saved ("saved" shows at its right). To add dates, press the box under "From", which reads "month – year" and is outlined in orange; the box under "To" works the same way.
More about this
Tick Present while the job goes on; To then cannot be chosen. The box under it, which shows City, is where the person works: type the city's name and select it in the list. Each choice is saved at once. None of these is needed.
If you want, search and select the organisation to see its people.
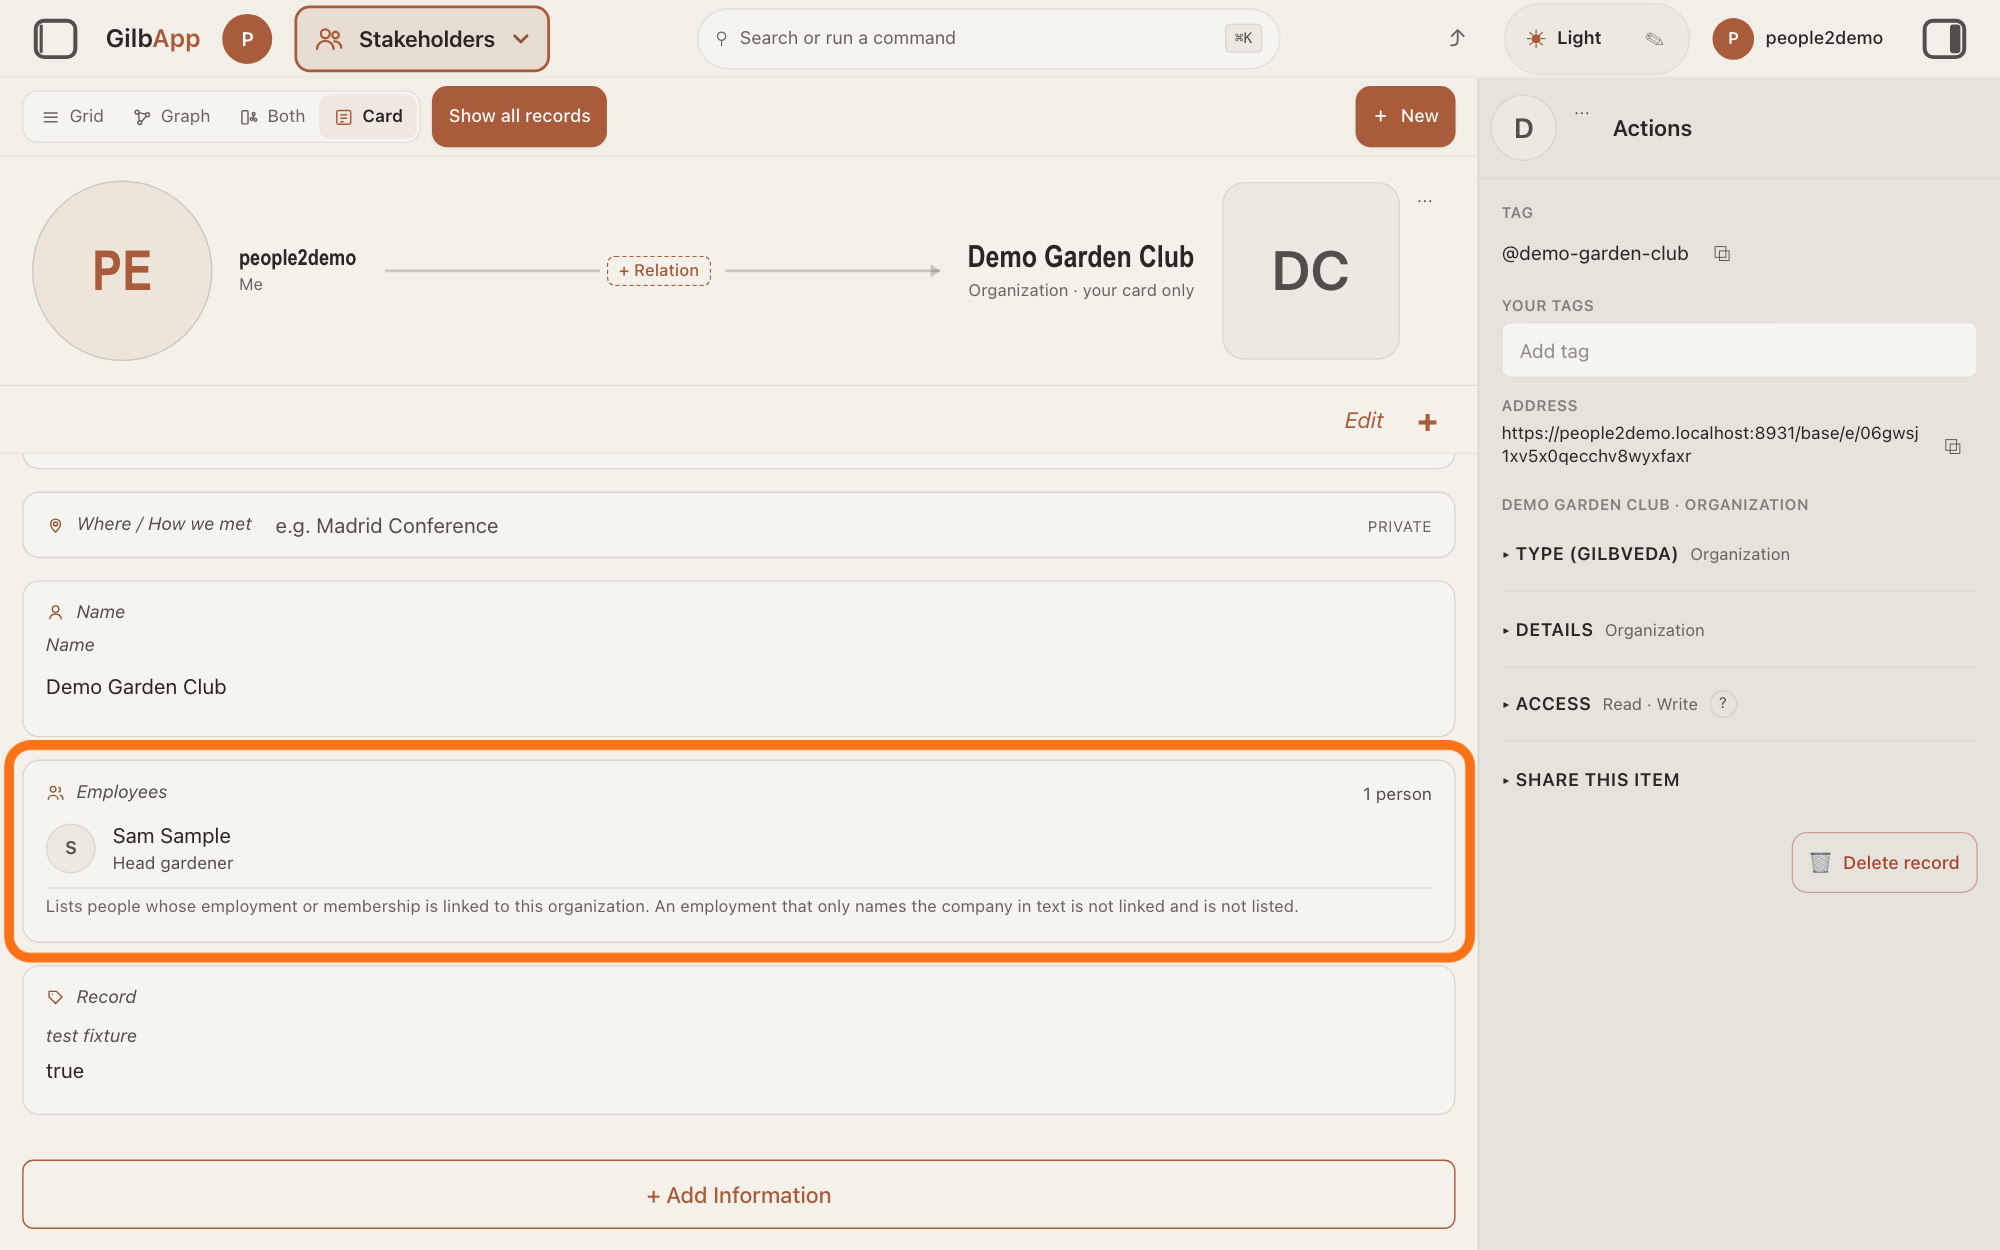
Press Main menu at the top left, choose Stakeholders and search and select the organisation in the list. Its card lists the person under Employees, with the job title under the name.
Show as text
Open the organisation from the Stakeholders list. On its card, the group "Employees", outlined in orange, says "1 person" and lists the person with the job title, then "Lists people whose employment or membership is linked to this organization."
More about this
Under the list the card says "Lists people whose employment or membership is linked to this organization. An employment that only names the company in text is not linked and is not listed." Beside the heading a count says how many people are listed. With more than ten, a box that shows Search people and a button that starts with Show all are there; Show all opens the whole list, and ‹ Back closes it. Click a person to open their card.
Deeper
Each employment is kept as its own record, in the vault that holds the person's card. Everyone who may read that vault sees them; GilbApp has no setting for who sees each one. What you add here does not change anything the person keeps about themselves on GilbPlatform. A person can have several employments, and several titles at one organisation.
Text typed under PENDING EMPLOYMENT ORGANISATION or PENDING EMPLOYMENT TITLE when the card was made is not an employment. The card shows it under Record, as Pending Employment Organisation and Pending Employment Title, and the organisation's card does not list the person for it. Add the employment as above.
Which kinds of information a person's card offers, and their names, come from GilbVeda, the shared list of terms, so they can change without a change to GilbApp.
This answer is written for a computer screen.
Source: GilbApp af0f04ee838a4d55887d2ff1f72edd49a4ff7ca0 (https://gilb.com/app/version.json, built 2026-11-09, read 2026-11-10). Steps 1-3 (gilbAppMenuRows.ts:144-151; RegisterScopedSearch.tsx:56-75; AddInformation.tsx:21-147; cardMode.tsx:243-304; OneCardFind.tsx:200-282). RecordDetail.tsx:736-760 (Employment found by the GilbVeda term a:employment), :1558-1580 (EmploymentRows, recordsVaultId = the vault that holds the card), :2102-2114 (plain fields under Record); CardGroup.tsx:23 (employment under Companies); EmploymentRows.tsx:1-53 (each employment its own t:Employment in the vault that holds the record); mynet/EmploymentCard.tsx:13-60 (month boxes, 'month – year'), :133-215 (From, To, Present, Role start/end), :217-300 (title box, Add title, Return and blur save, Escape), :312-322 (saving, saved, not saved · retry), :333-347 (red minus, ⊕ add …), :355-525 (Company, Title, add job title, add employment, remove); mynet/CompanySearch.tsx (Add company, organisation records of the vault, Searching companies…, Could not search companies…, No company named … Use …, Escape); lib/base/orgCard/orgRecords.ts:86-143 (prefix search over t:Organization records in the vault); mynet/WorkLocationField.tsx:81-130 (City, place list); lib/mynet/employment/useEmployments.ts:10-13 (a company picked on the empty card adds and saves in one act), :82-85 (one empty title). orgCard/OrgEmployeesSection.tsx (Employees, count, the linked-only sentence, errors), OrgShortList.tsx:55-147 (Search people, Show all …), OrgListSheet.tsx:120-135 (‹ Back), OrgEmployeeRow.tsx (name, titles); lib/base/orgCard/orgEmployees.ts:1-25 (people from a:employer and a:memberOf; a text-only company is not listed); orgEmployeeSearch.ts:14 (ten on the card). GilbVeda read publicly 2026-11-10: a:employment 'Employment' (reference-edge, multi, a:fieldOf t:Person); a:jobTitle a:fieldOf t:Employment; a:pendingEmploymentOrg 'Pending Employment Organisation' and a:pendingEmploymentTitle 'Pending Employment Title' fields of t:Person (inline text).
Checked against GilbApp d529620.