
← Back to My AI changed things I did not ask for. What now?
How do I connect my AI to GilbApp chat?
Short answer
Press Connect and Claude Code, paste a line in Terminal, press I've started it — enter code, paste another, type the code, press Pair.
Before you start
You need to be signed in to GilbApp on a computer, and either your own SuperGrok subscription from xAI or, on a Mac, Claude Code signed in and Node.js 18 or newer (a free program, from https://nodejs.org). The pictures show a made-up person on a test site; your screen shows your own name and address.
Words used here (4)
- GilbApp
- GilbApp is the app, opened in a web browser at https://gilb.com/app, where you open, fill and share your vaults.
- agent
- An agent is your AI following one written procedure, its standing instructions, for one kind of work.
- GilbPlatform
- GilbPlatform is the service that keeps people's and organisations' data in vaults, each at its own web address.
- pairing code
- A pairing code is the short code your computer's program shows; type it once in GilbApp's chat so that browser can use your Claude Code.
Steps
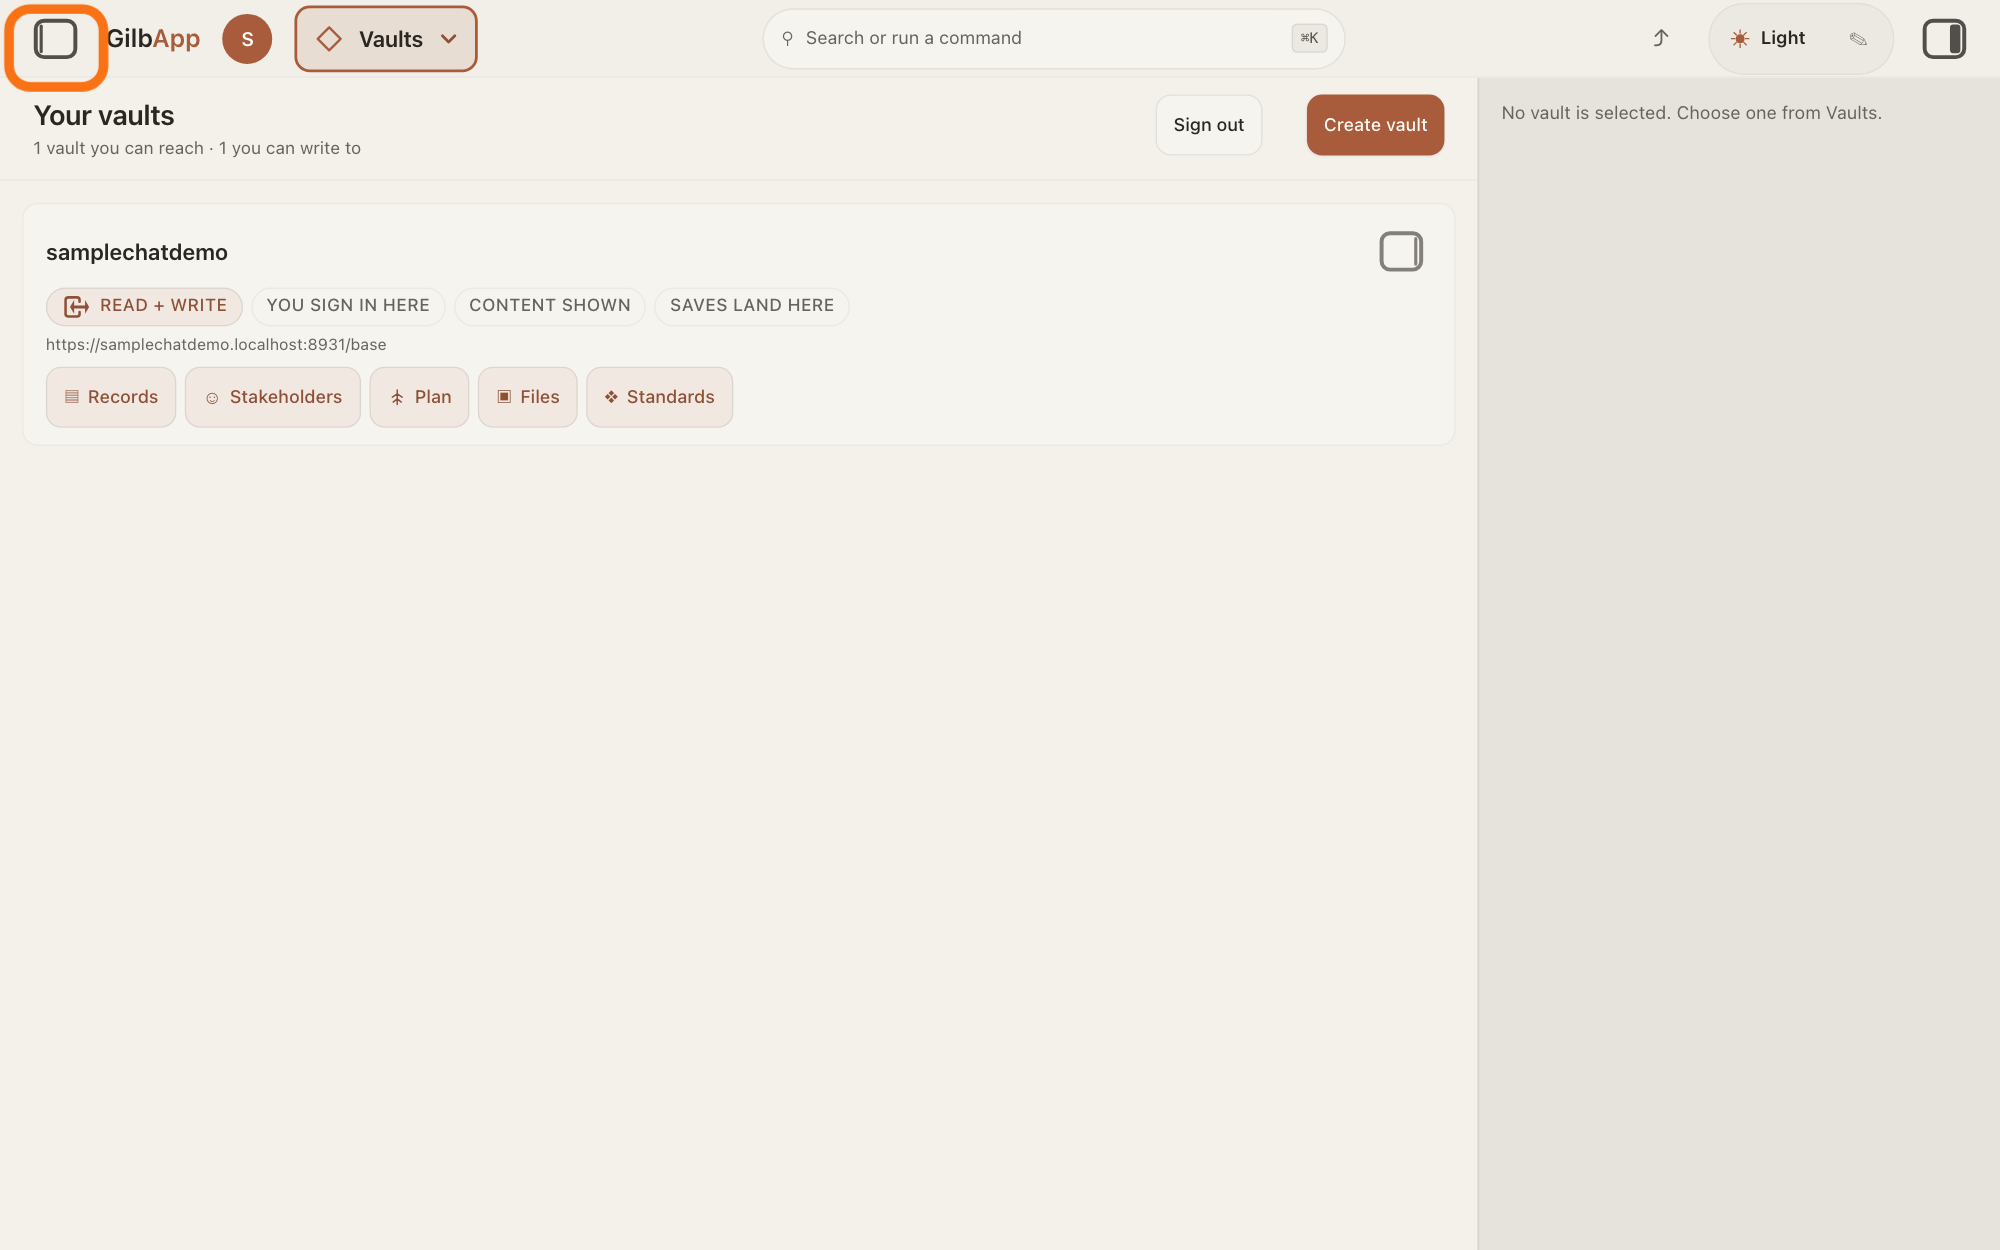
Press the square button at the far left of the top bar.
If the chat is not showing on the left, press the square button at the far left of the top bar. The left pane opens with the chat: the agent list at its top, Connect to the right of it.
Show as text
Look at the top bar, at its far left, before the word "GilbApp". The square button there is outlined in orange: click it to open the chat on the left. Before you do, the screen shows only "Your vaults" with your vault card in the middle and, on the right, "No vault is selected. Choose one from Vaults."
More about this
The same button hides the pane again. Main menu at the top left opens it too: under FOR YOU, choose Choose an agent.
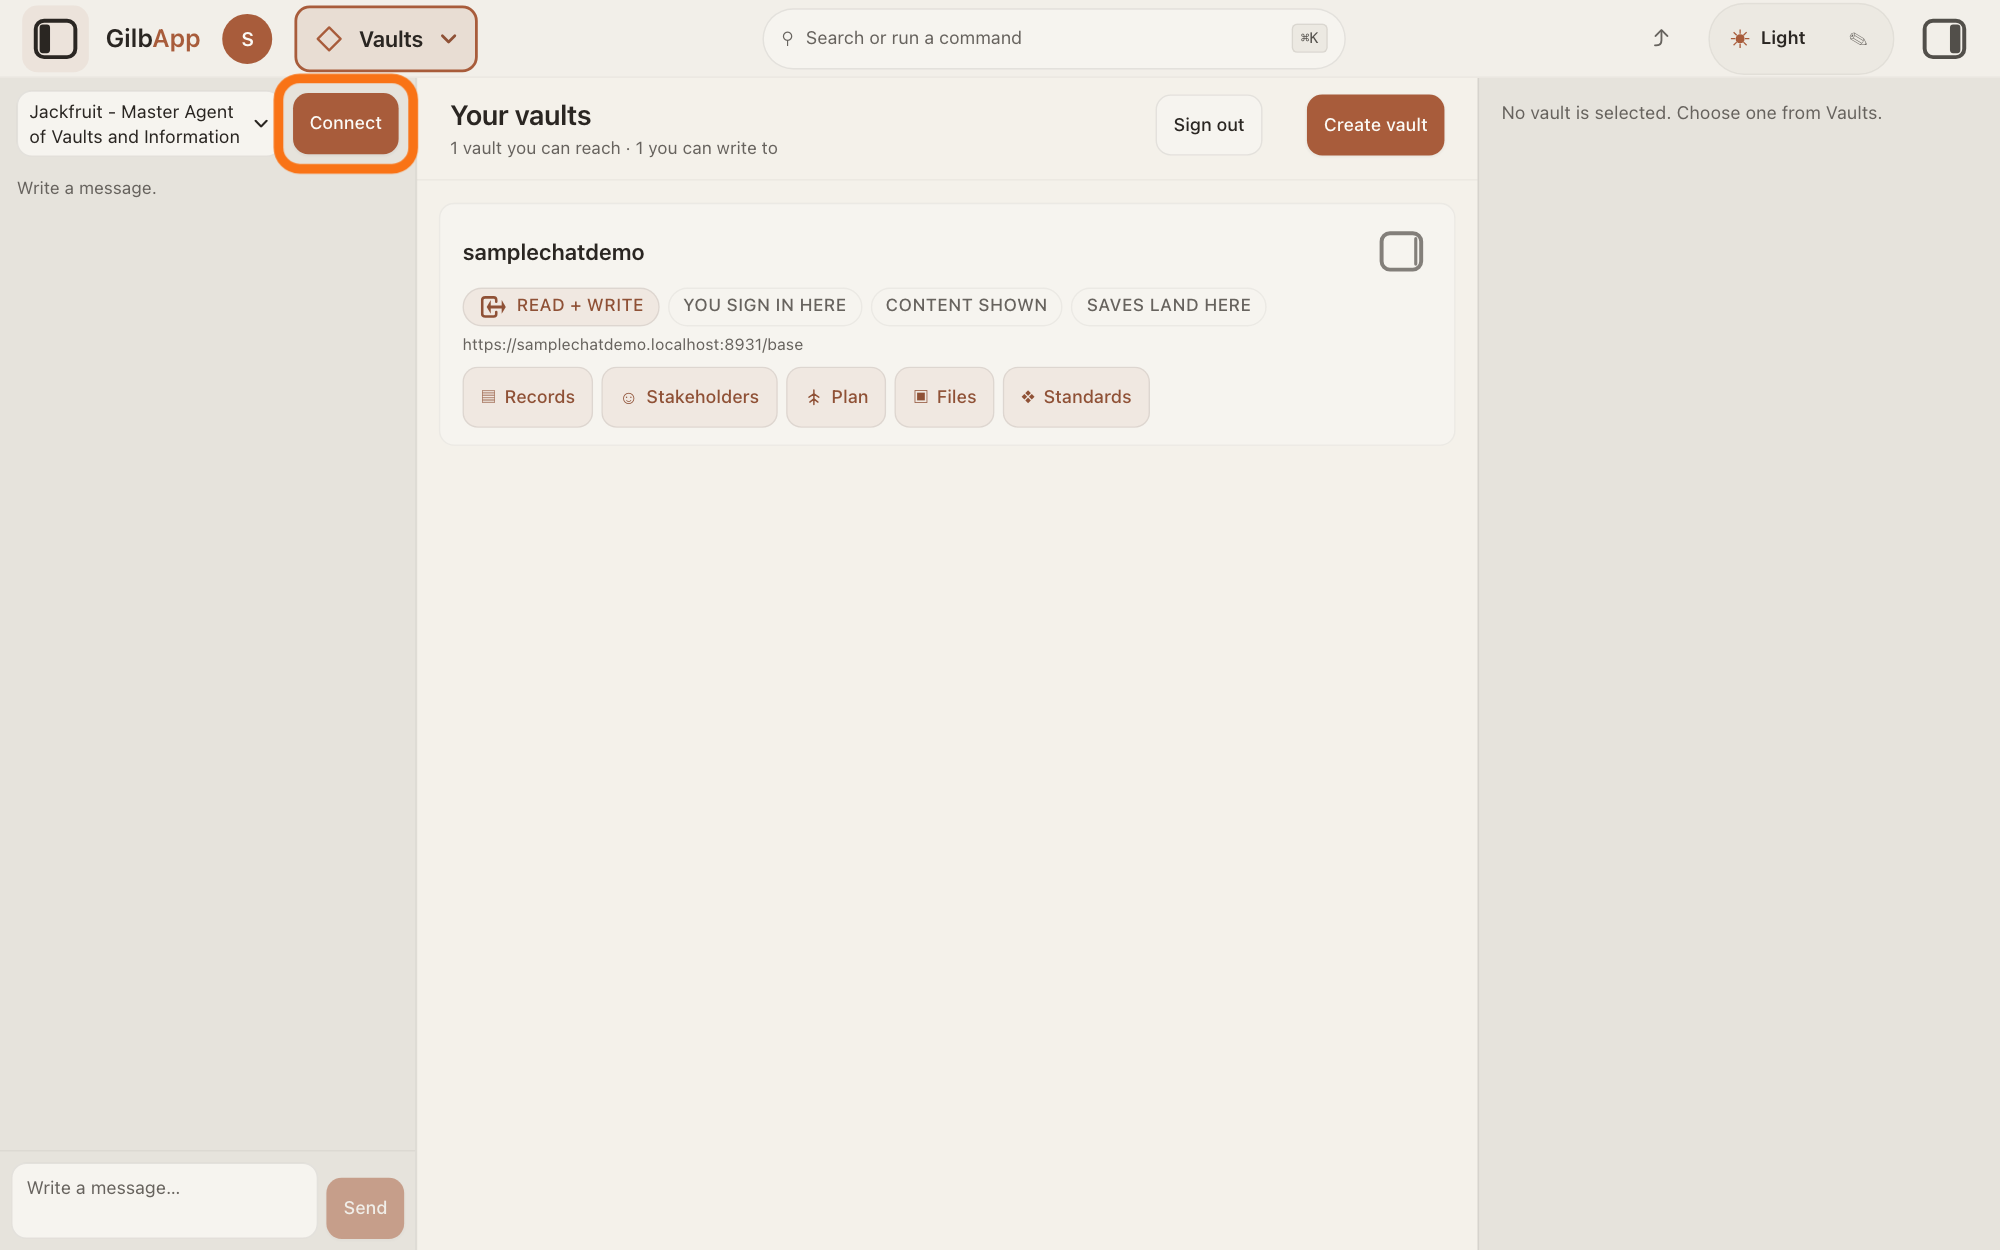
Press Connect.
At the top of the chat, to the right of the agent list, press Connect. Two buttons show below it: Grok and Claude Code.
Show as text
A new pane is now open on the left. At its top is the agent list (here "Jackfruit - Master Agent of Vaults and Information"), and to its right the button "Connect", outlined in orange: click it. At the bottom of the pane are the box "Write a message..." and "Send". Your vaults still show in the middle.
More about this
Connect shows only while none of your AIs is connected: the chat uses one at a time. While the choice is open, Cancel stands in its place and closes it.
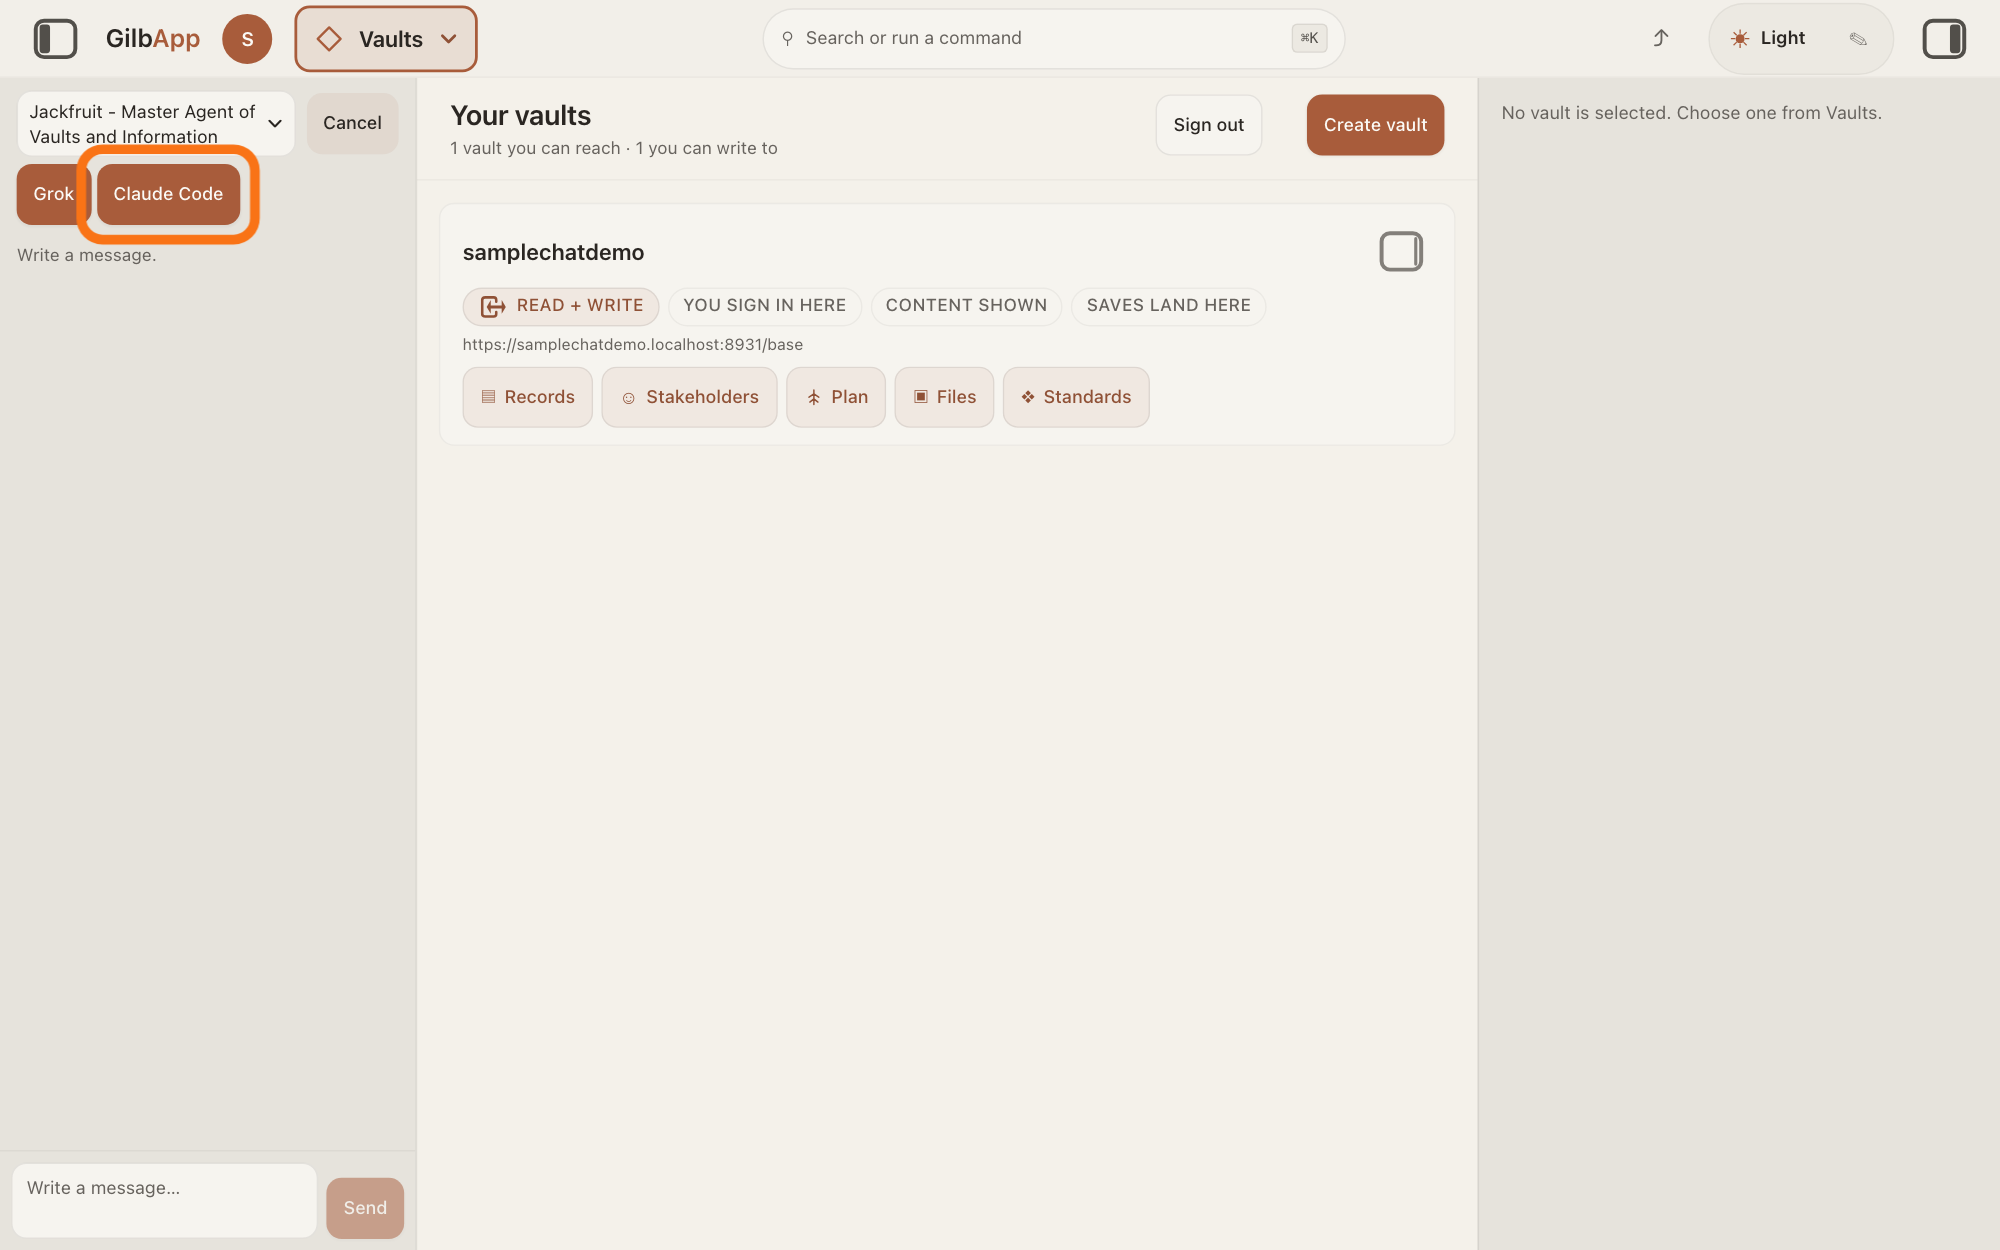
Press Claude Code.
Press Claude Code. The window Connect Claude Code opens on the tab for your computer, Mac, Windows or Linux (these steps are for Mac); it sets up the bridge, a small GilbPlatform program that lets the chat use the Claude Code on your Mac.
Show as text
At the top of the left pane, "Cancel" now stands where "Connect" was. Just below the agent list are two new buttons, "Grok" and "Claude Code". "Claude Code" is outlined in orange: click it for Claude Code on your Mac. Press "Grok" instead only if you use Grok.
More about this
The ✕ at the top right of the window, or Esc, closes the window without connecting. For Grok, the AI of the company xAI, press Grok instead: GilbApp opens xAI's page in a new tab and shows a code beside Cancel and Open xAI; Open xAI opens that page again. Finish the connection there; where it asks for a code, type the one GilbApp shows. When the top of the chat shows Grok with Disconnect under it, you are done.
Paste the line under Option Always On in Terminal and press Return.
Under 2 · Start the bridge on your computer, press Copy beside the line under Option Always On (it then reads Copied), paste it in Terminal and press Return. The line is:
curl -fsSL https://gilb.com/app/claude-code-bridge.mjs -o ~/.gilb-claude-code-bridge.mjs && node ~/.gilb-claude-code-bridge.mjs --install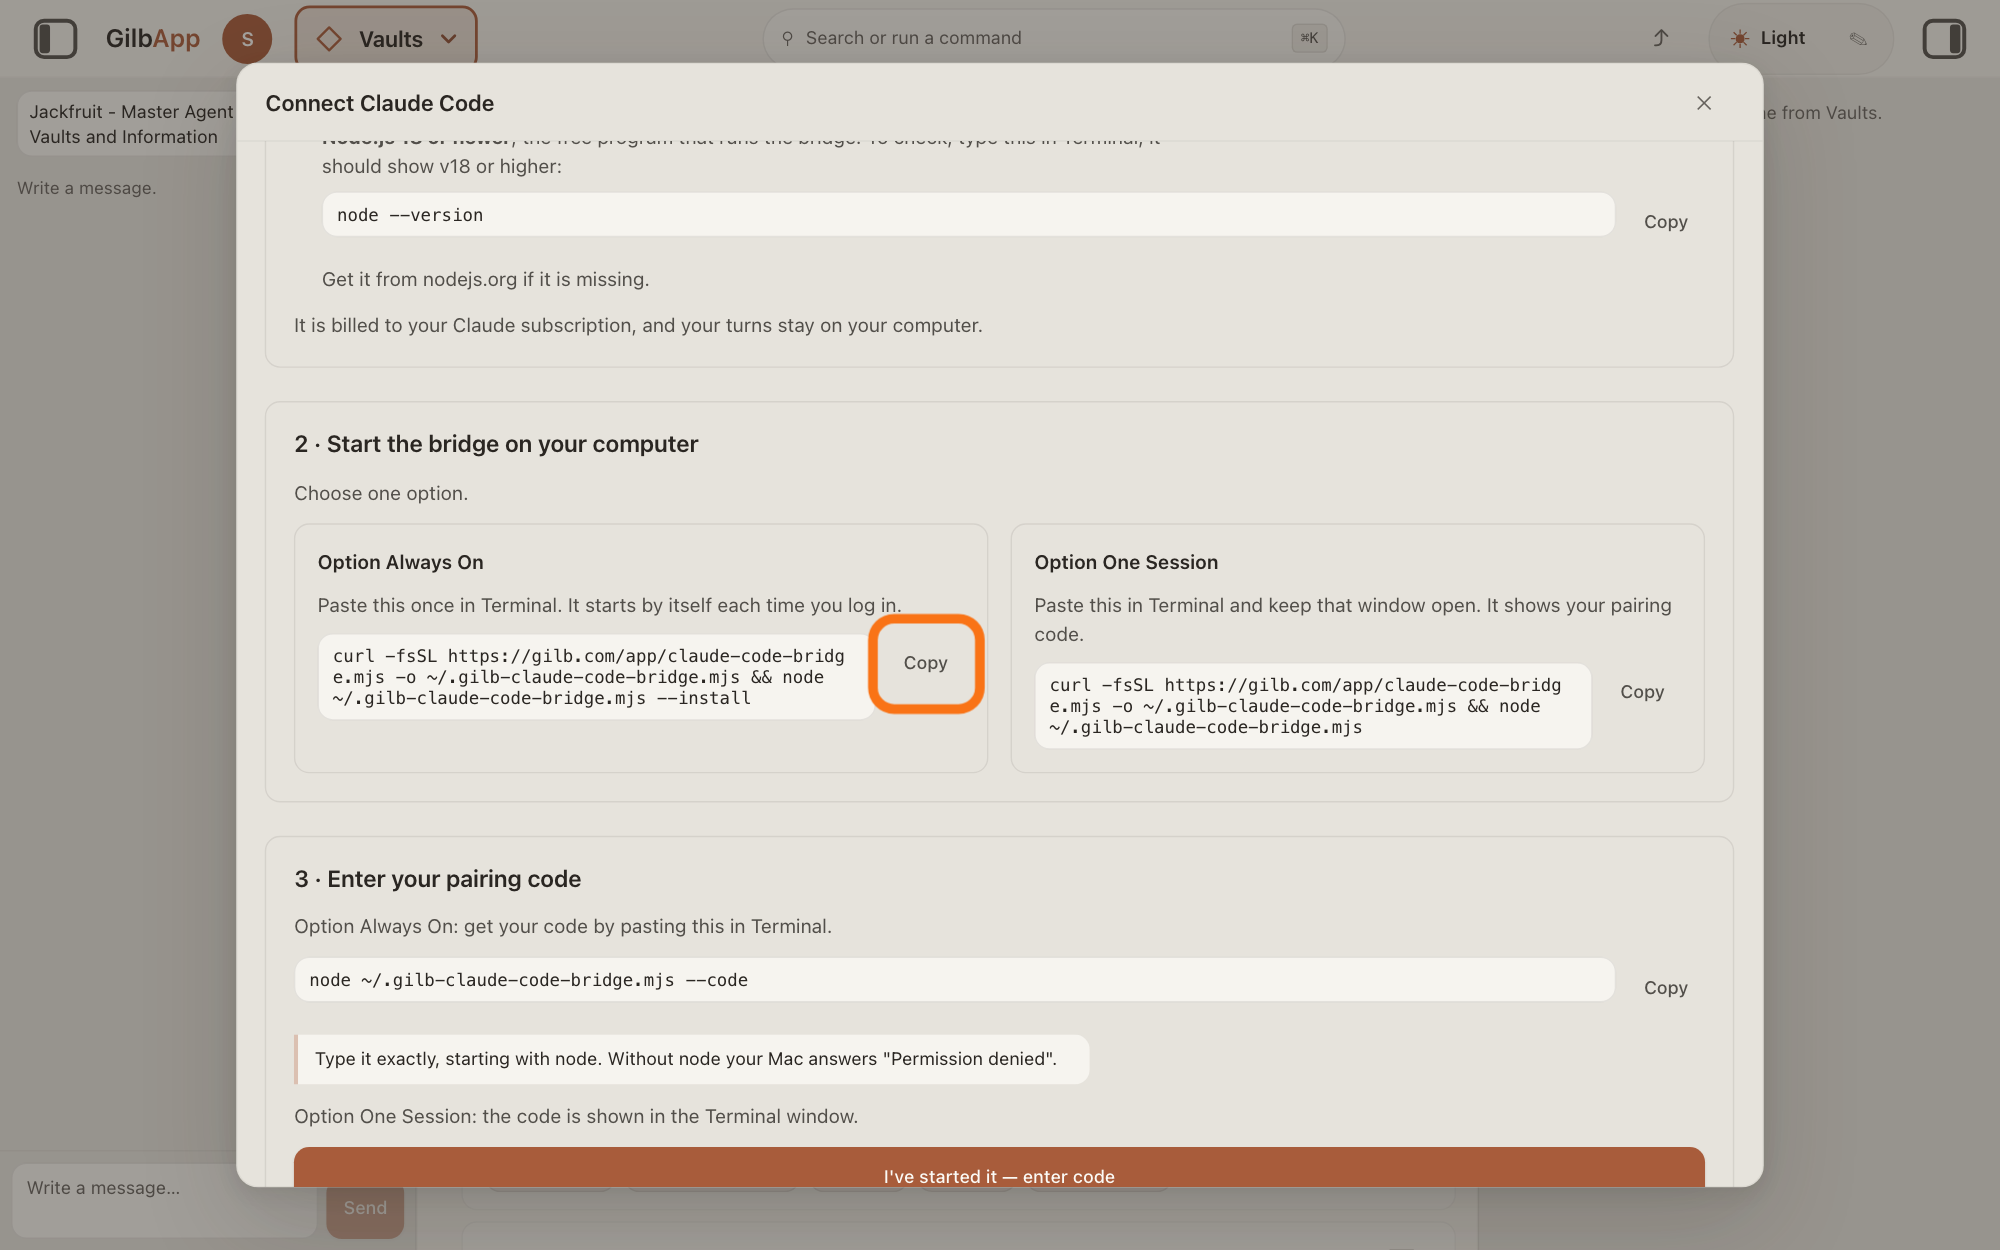
Show as text
A window "Connect Claude Code" covers the middle of the screen, with "✕" at its top right. Scroll to "2 · Start the bridge on your computer". It shows two boxes, "Option Always On" on the left and "Option One Session" on the right. In the left box, under "Paste this once in Terminal. It starts by itself each time you log in.", the button "Copy" beside the line ending "--install" is outlined in orange: click it, then paste in Terminal.
More about this
Terminal is the Mac's window for typing commands; opening it has its own answer. The line downloads the bridge from gilb.com and starts it each time you log in. Terminal answers Always-on bridge installed (com.gilb.claude-code-bridge). It installs only when Claude Code is signed in with your Claude subscription; the window's 1 · Before you start gives the sign-in line, claude auth login (not needed if you signed in at install), and the check for Node.js, node --version, each with Copy. Option One Session is the other way: its line runs the bridge only while that Terminal window stays open, and shows the code there.
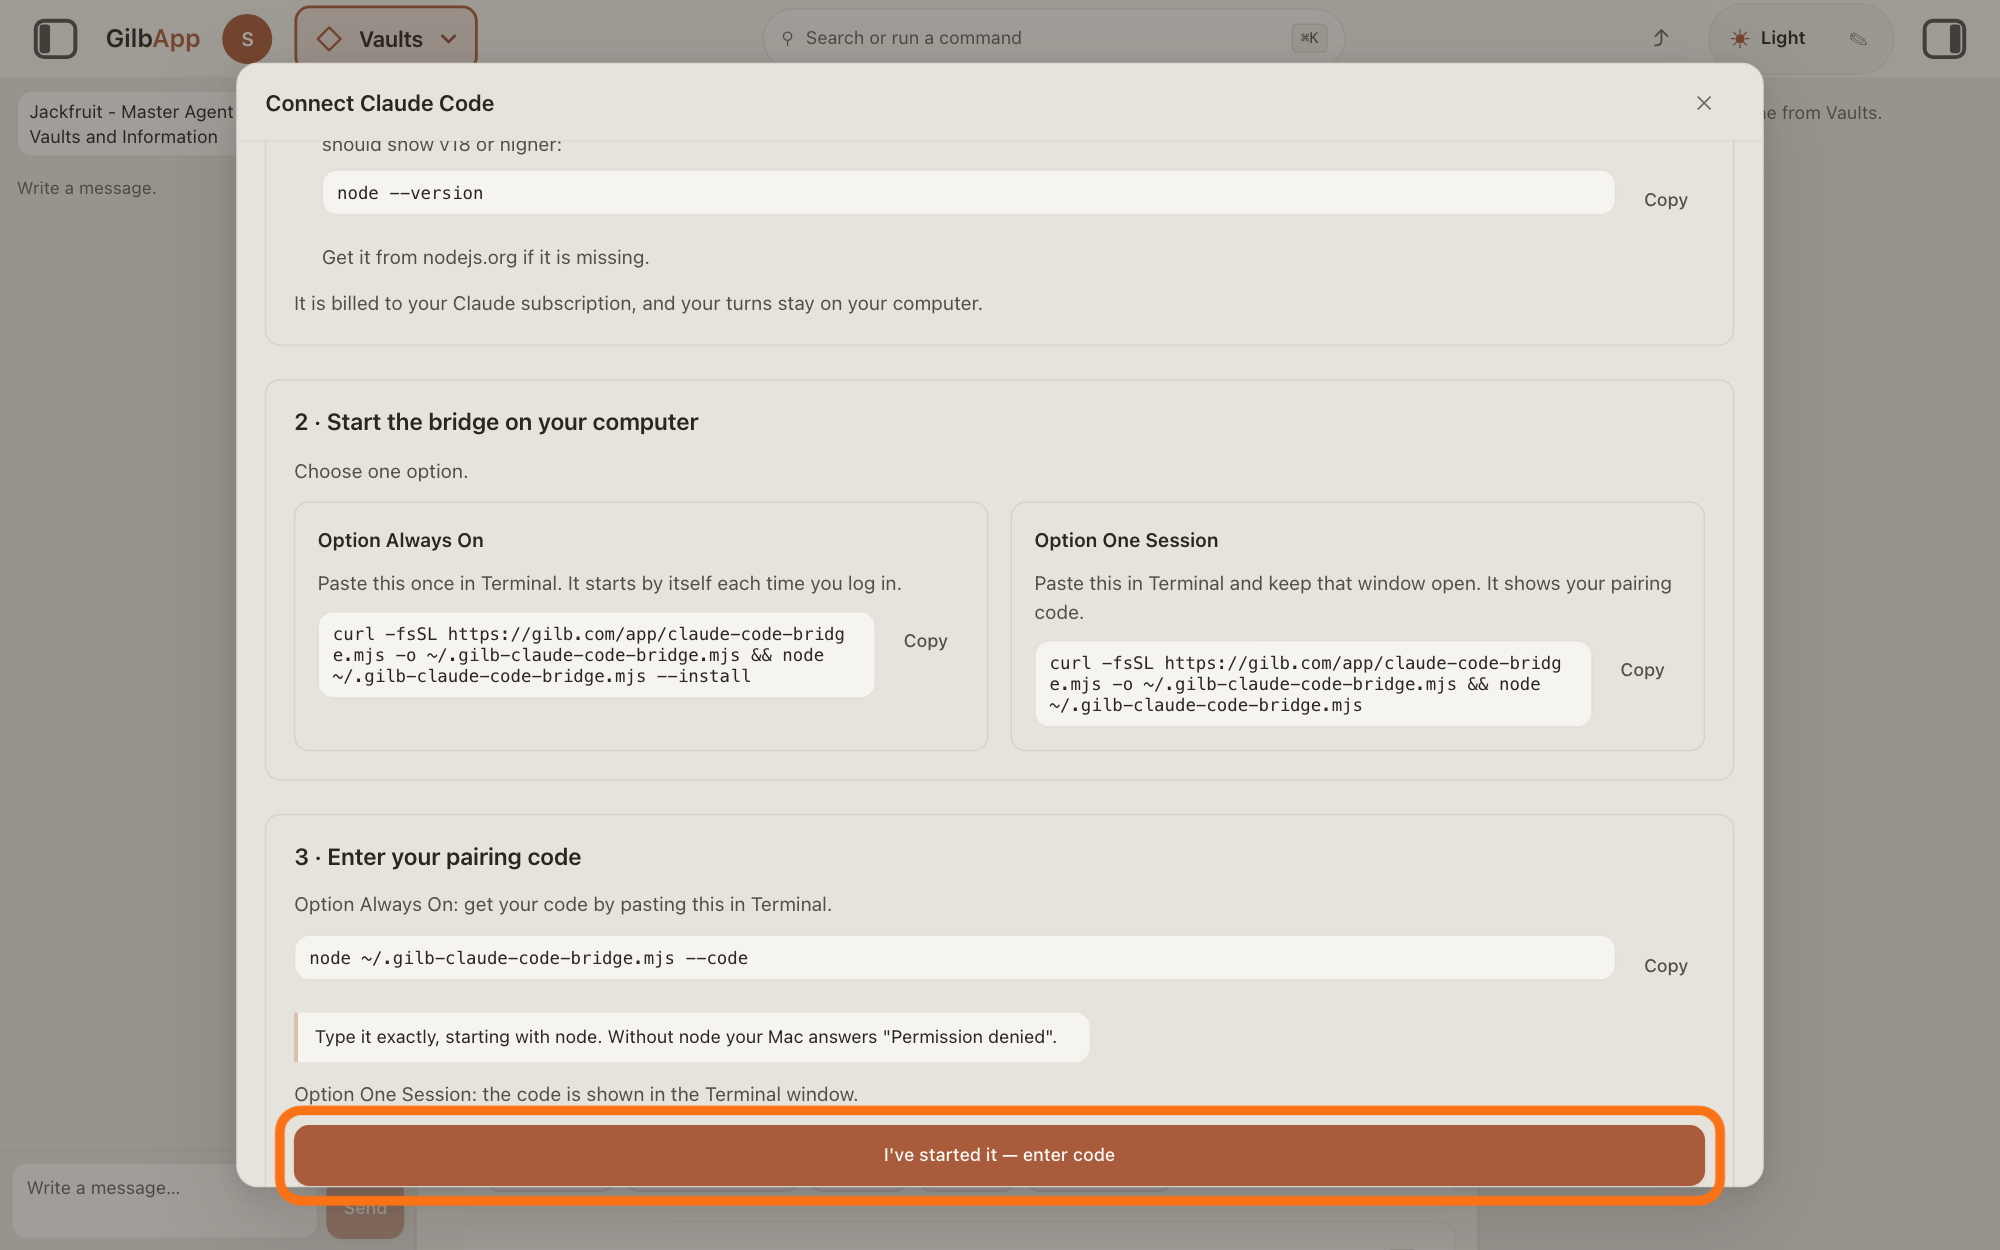
Press I've started it — enter code.
Under 3 · Enter your pairing code, press I've started it — enter code. The window keeps only part 3: the code line, and the box Code from the terminal with Pair.
Show as text
In the window "Connect Claude Code", below part 2, is "3 · Enter your pairing code" with the line "node ~/.gilb-claude-code-bridge.mjs --code", the note "Type it exactly, starting with node." and "Option One Session: the code is shown in the Terminal window." At the bottom of the window the wide button "I've started it — enter code" is outlined in orange: click it.
More about this
GilbApp now looks for the bridge. If it is not found, it says Not reachable on this computer yet. with Check again. In Safari, Open bridge window shows in place of that sentence: press it and keep the small window open while you chat (you may minimise it). In Brave, the window lists the steps to set Apps on device to Allow.
Paste the code line in Terminal and press Return.
Press Copy beside the line under Option Always On: get your code by pasting this in Terminal., paste it in Terminal and press Return:
node ~/.gilb-claude-code-bridge.mjs --code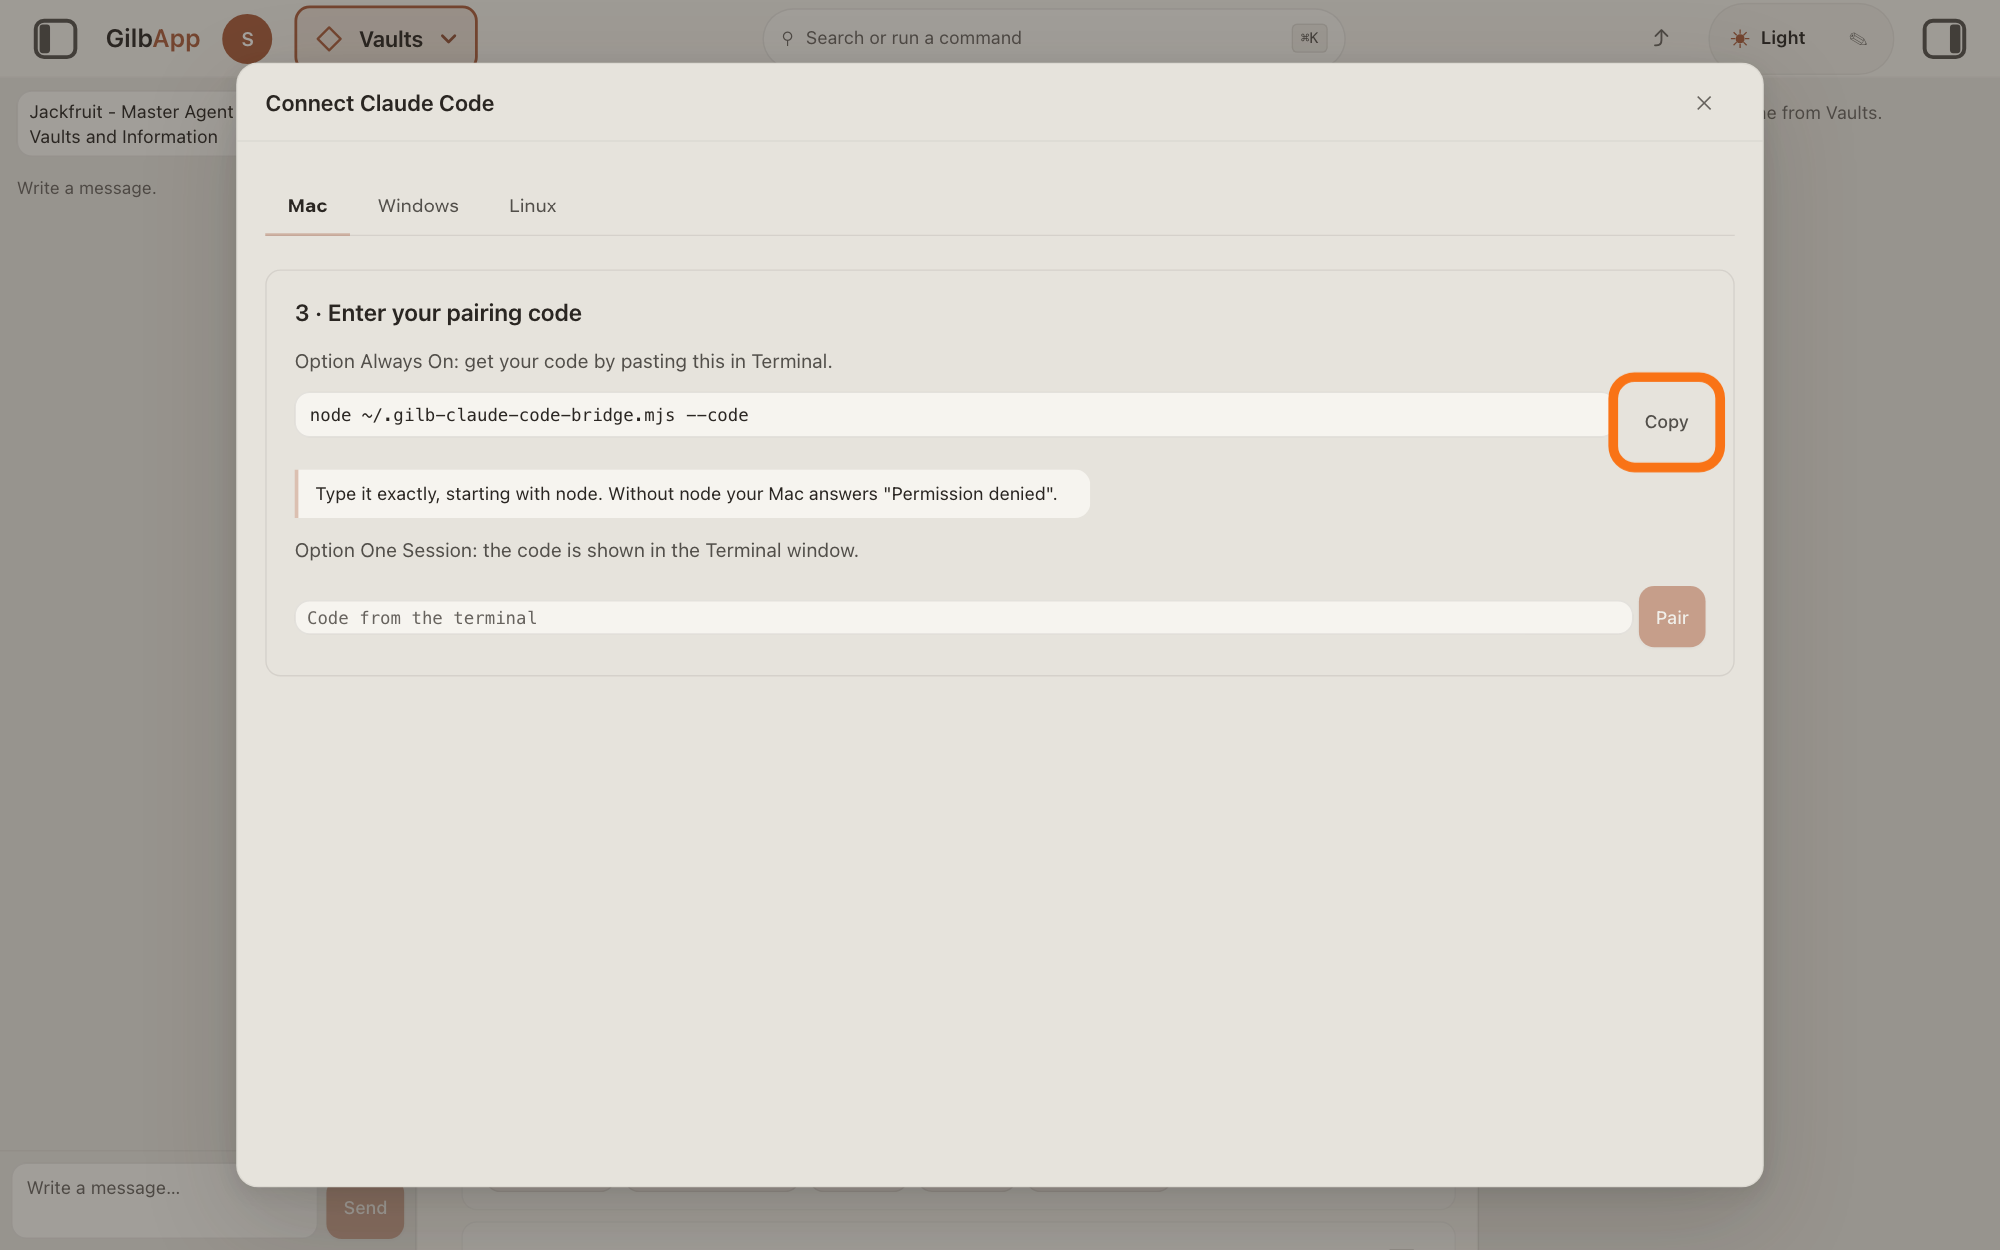
Show as text
The window "Connect Claude Code" now shows the tabs "Mac", "Windows" and "Linux" and only "3 · Enter your pairing code". Under "Option Always On: get your code by pasting this in Terminal." is the line "node ~/.gilb-claude-code-bridge.mjs --code". The "Copy" button at its right is outlined in orange: click it, then paste in Terminal. Lower down is the empty box "Code from the terminal" with "Pair".
More about this
Terminal answers Pairing code: and the code, two groups of three letters and digits joined by a hyphen. If you type it instead, type it exactly, starting with node: without node your Mac answers Permission denied.
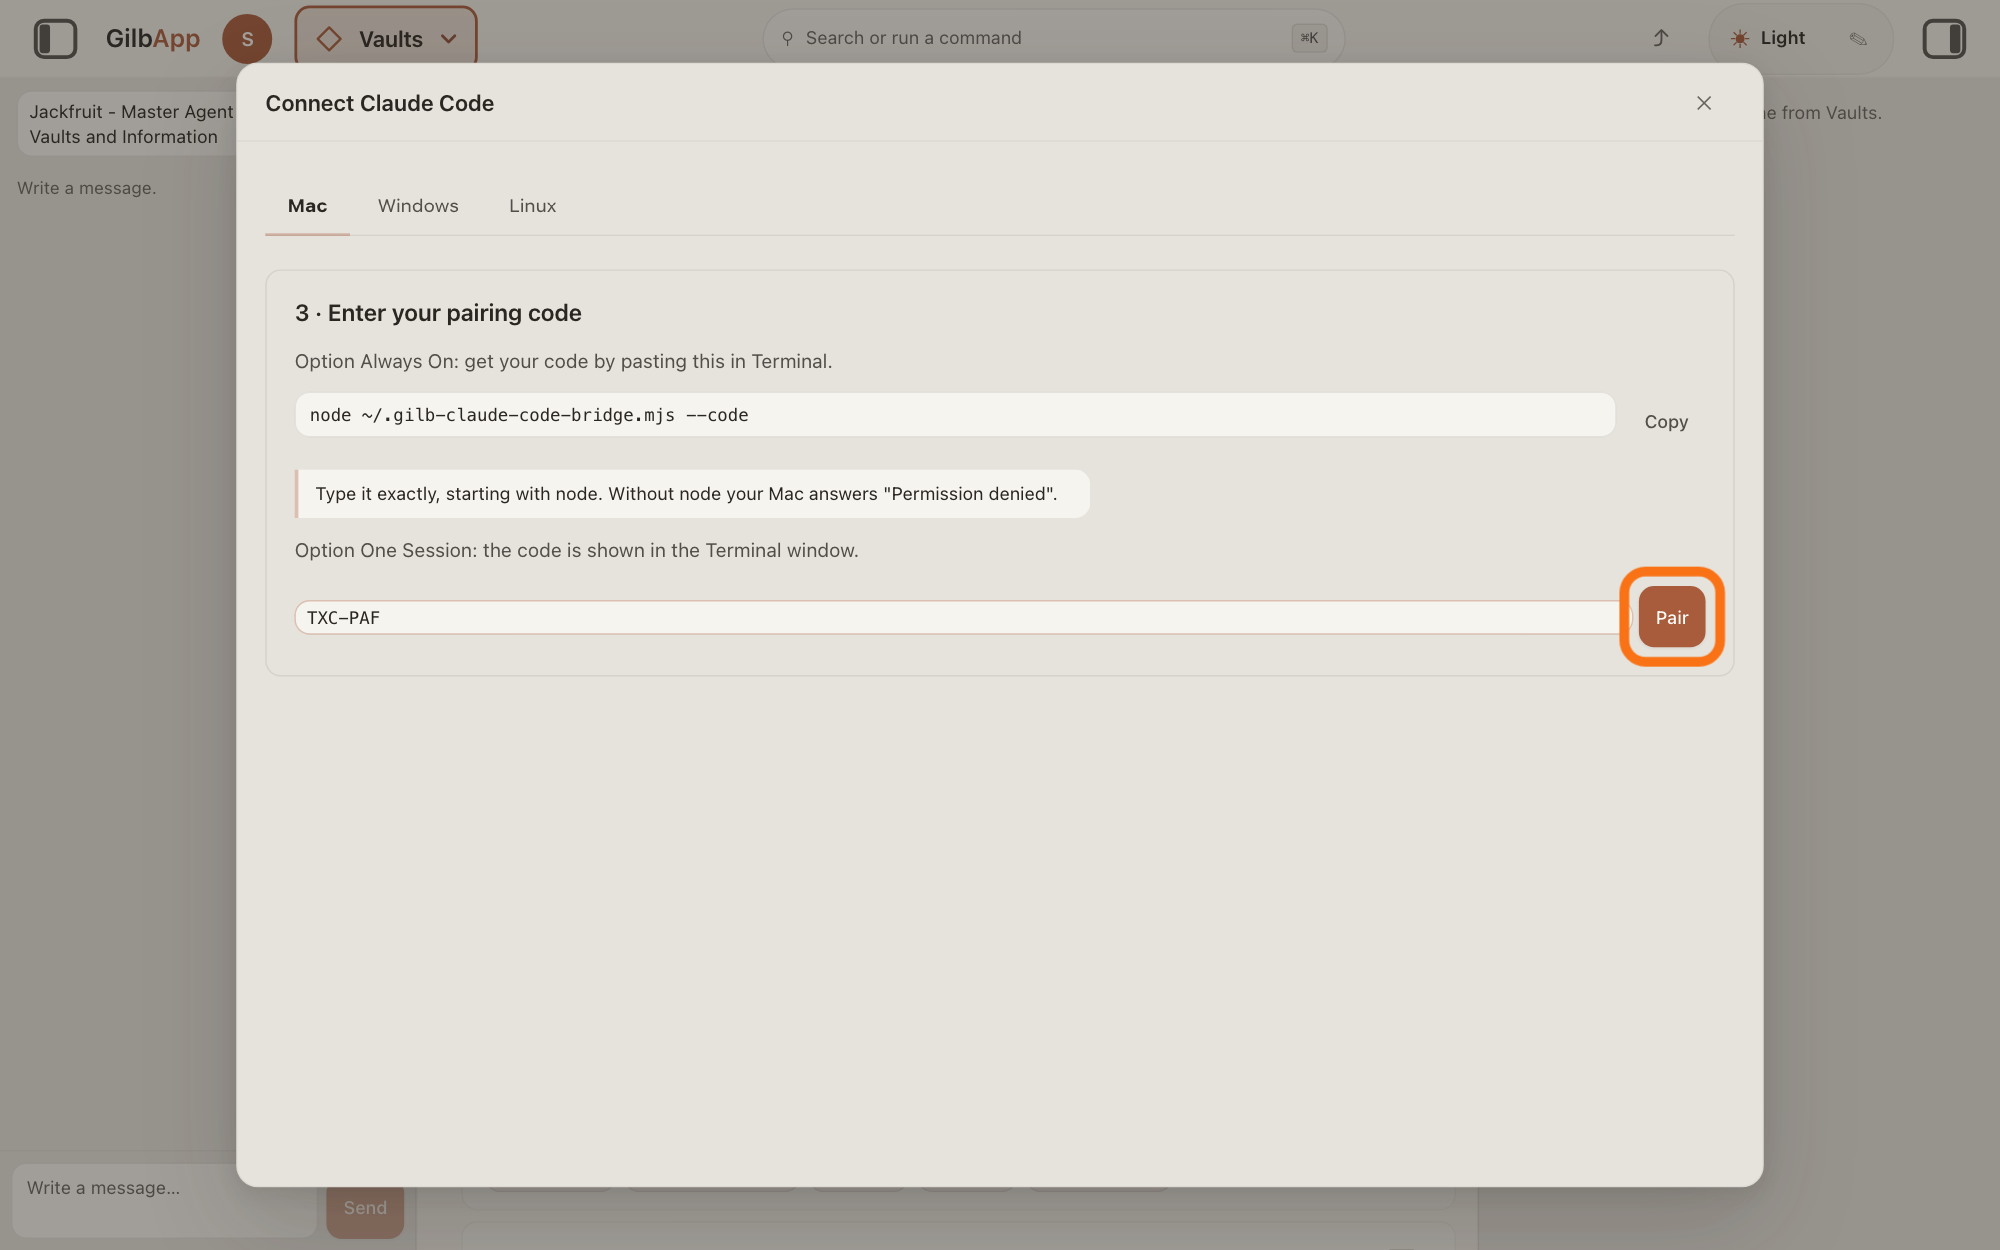
Type the code in Code from the terminal and press Pair.
Type the code in the box Code from the terminal and press Pair. The window closes, and the top of the chat shows Claude Code with Disconnect under it.
Show as text
In the window, at the bottom of "3 · Enter your pairing code", the box "Code from the terminal" now holds a pairing code: three letters or digits, a hyphen, and three more. The button "Pair" at the right end of that box is outlined in orange: click it. Type the code that your own Terminal shows, not the one in the picture.
More about this
If your browser asks to let this page use apps on this device, choose Allow. Capitals and the hyphen do not matter. A wrong code gives That code is not right. Look at the code in the terminal where the bridge runs.; after five wrong tries the bridge makes a new code, so paste the code line again. A code works once: another browser needs a new one. In Safari, if the top of the chat shows Safari needs the bridge window for Claude Code., press Open bridge window.
Deeper
Also asked:
What does Connect in the chat do? It connects your own AI to the chat, so the chat's agents answer with it, on your own subscription. Press it and choose Grok or Claude Code; it shows only while none of your AIs is connected.
What is the Claude Code bridge? A small GilbPlatform program on your computer that lets the chat use your Claude Code. You start it with a line in Terminal and pair it with a code; the steps show how.
How do I connect Grok or Claude Code to the chat? Press Connect, then Claude Code and follow the steps, or Grok: GilbApp opens xAI's page, where you type the code GilbApp shows. When the top of the chat shows your AI with Disconnect under it, you are done.
Can an agent in the chat work on files in a folder on my computer? Only with Claude Code: choose a code folder and approve, and it works in that folder only. Grok in the chat does not reach the files on your computer.
Connecting SuperGrok says could not start or could not finish. What now? GilbApp could not begin, or complete, the link with xAI. Press Connect and Grok again; if it fails again, copy the red line and write to [email protected].
Once connected, the chat's agents answer with your own AI, on your own subscription. The window says Claude Code is billed to your Claude subscription, and your turns stay on your computer. In the chat your AI works in your vaults as you, with your own access, through GilbApp. The bridge runs Claude Code with its own tools off (no shell, no files, no web), so it does not reach the files on your Mac, unless you choose a code folder and approve: then it works in that folder only. The answer How do I let my AI build in a folder on my computer from GilbApp's chat? shows how. This is not the AI vault from the answers on connecting your computer: the chat needs no Client ID and no AI vault.
Claude Code stays connected in every GilbApp tab of this browser, also after a restart, until you press Disconnect or the pairing goes unused for 30 days; with Option Always On the bridge starts again each time you log in. Grok stays connected only in the browser tab where you connected it: in another tab, connect again. To change AI, disconnect first; that has its own answer.
Without your own AI, the chat answers only if GilbPlatform has switched on its shared AI; otherwise it says Connect your own AI first — press Connect. Your AI works only for you.
If the chat says Your Claude Code bridge is out of date., press Copy there, paste the line in Terminal and press Return, then send your message again.
On a Mac the window names the supported browsers: Chrome, Edge, Safari and Brave. Under Windows it says "Windows is new. It works on Windows test machines but has not yet been tried by a person on their own PC." and "Use Chrome on Windows. Edge and Brave use the same engine as Chrome but have not been tried on Windows yet.", with PowerShell in place of Terminal. Under Linux there is only Option One Session.
Grok and SuperGrok are xAI's, Claude Code is Anthropic's; their sign-in pages and plans are theirs and may change.
This answer is written for a computer screen.
Checked against GilbApp d529620.