
← Back to The Terminal says "command not found". What now?
How do I connect my computer to my vault?
Short answer
Open ▸ CONNECT AI on your vault, type a short name, paste its first five lines in Terminal and Claude Code, copy the Client ID.
Before you start
A Mac signed in to GilbApp, with Terminal, Claude Code, and Node.js 18 or newer, the free program the connector runs on (from https://nodejs.org; ▸ CONNECT AI does not install it).
A vault of your own: the one you made when you signed up will do. The pictures show a made-up person on a test site; your screen shows your own name and address.
Words used here (5)
- short name
- A short name is the one word you give one AI on one computer, such as gilb-example; it keeps that AI's key and tools apart.
- Client ID
- A Client ID is your AI's fixed name on GilbPlatform; find it by pasting GilbApp's line in a new Terminal window, then bind the AI.
- GilbApp
- GilbApp is the app, opened in a web browser at https://gilb.com/app, where you open, fill and share your vaults.
- GilbPlatform
- GilbPlatform is the service that keeps people's and organisations' data in vaults, each at its own web address.
- AI vault
- An AI vault is a small vault that stands for your AI; your AI reaches only the vaults you grant it.
Steps
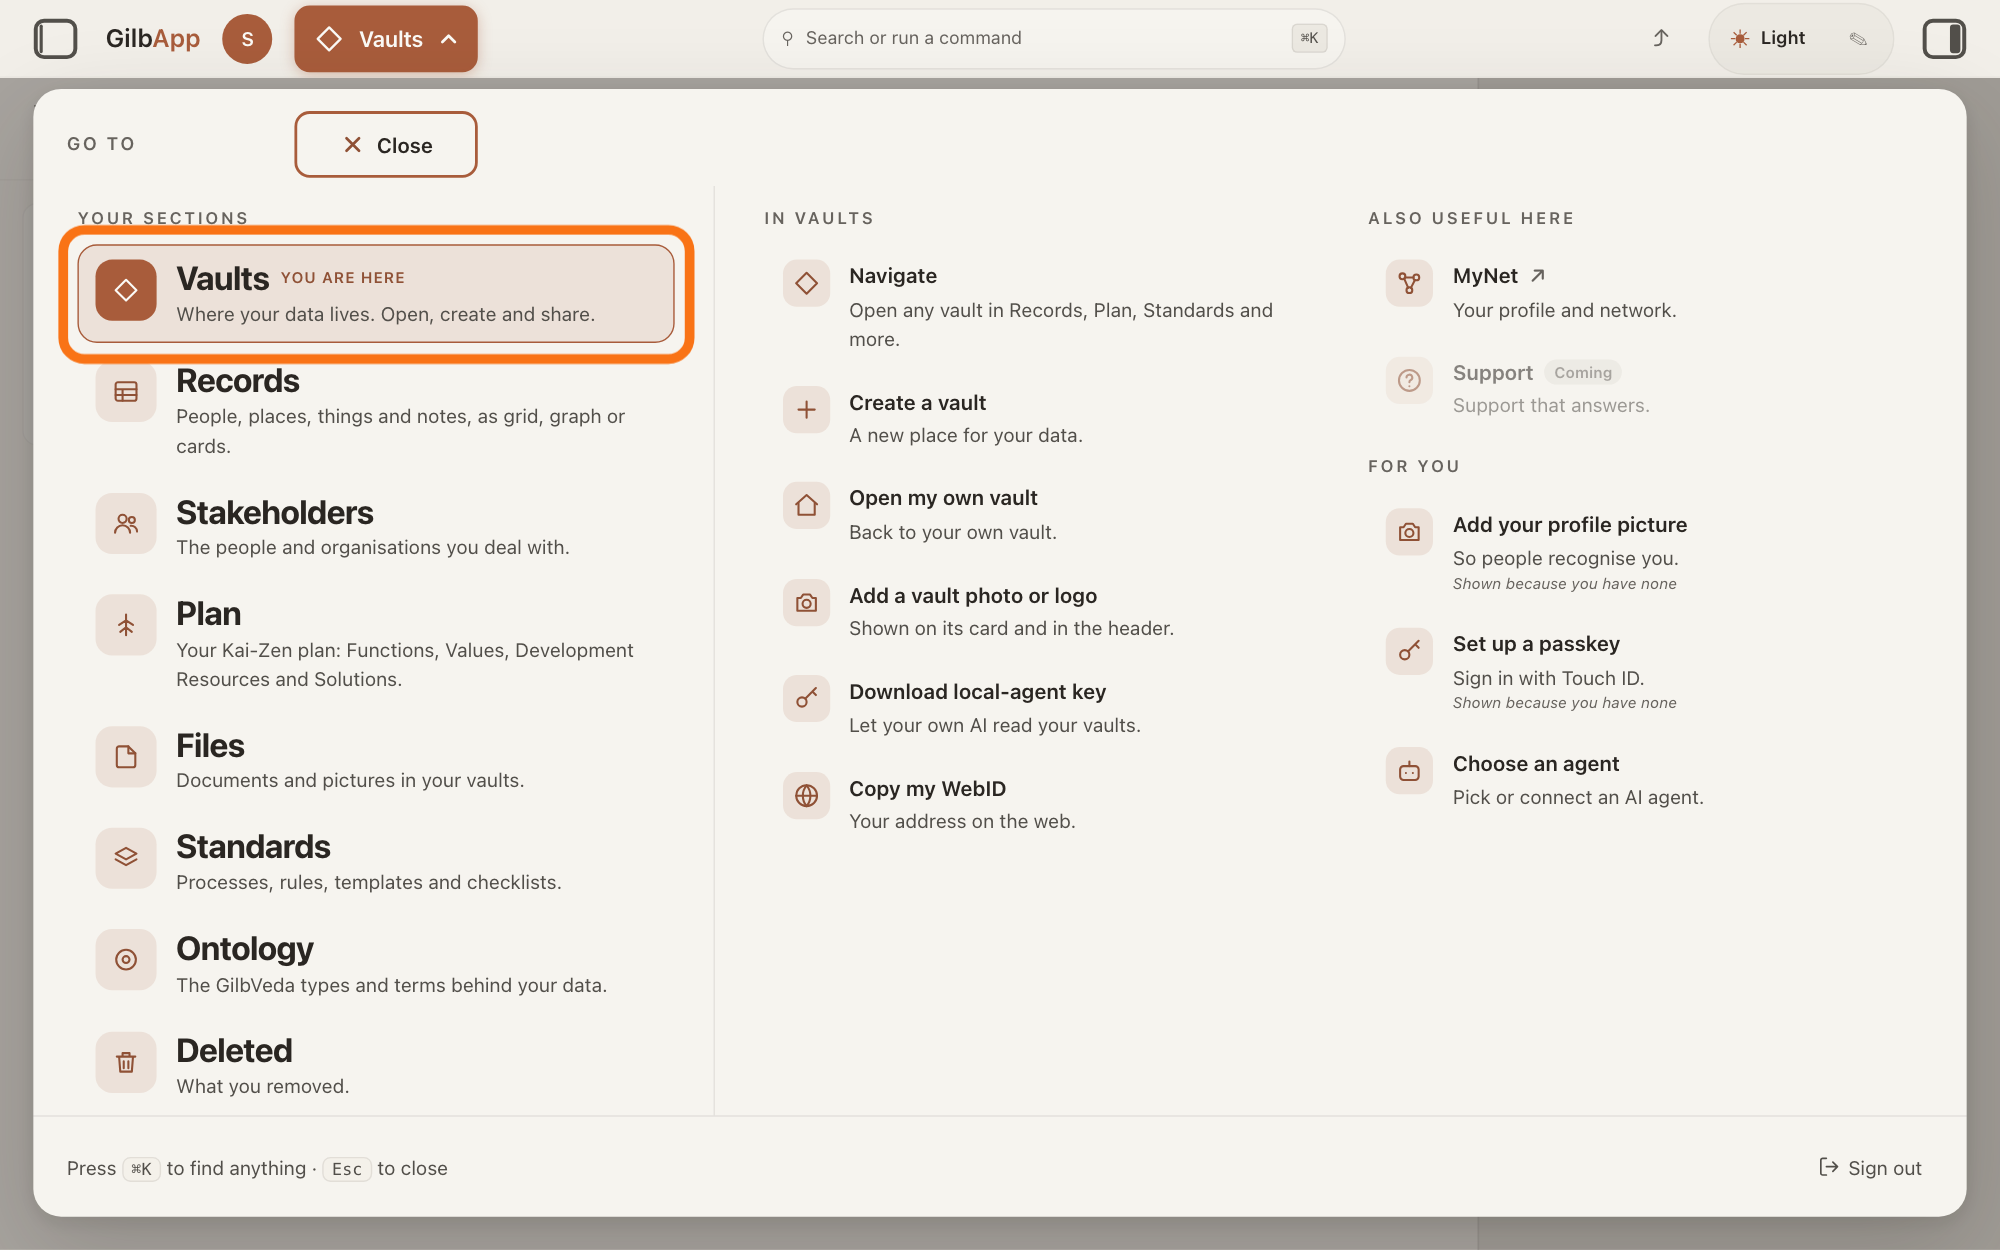
Press Main menu at the top left and choose Vaults.
Press Main menu, next to your profile picture at the top left, and under YOUR SECTIONS choose Vaults. The button shows the name of the section you are in, such as Vaults.
Show as text
At the top left, next to your profile picture, is "Main menu", the button that shows the name of the section you are in; here it reads "Vaults" with a small arrow. Pressing it opens a large panel headed "GO TO". In its left column, under "YOUR SECTIONS", the first row is "Vaults", "Where your data lives. Open, create and share." That row has the orange outline: click it. The panel closes with "Close" at its top or the Esc key.
More about this
The Vaults screen lists your vaults as cards. Use the vault you made when you signed up, or another vault of your own.
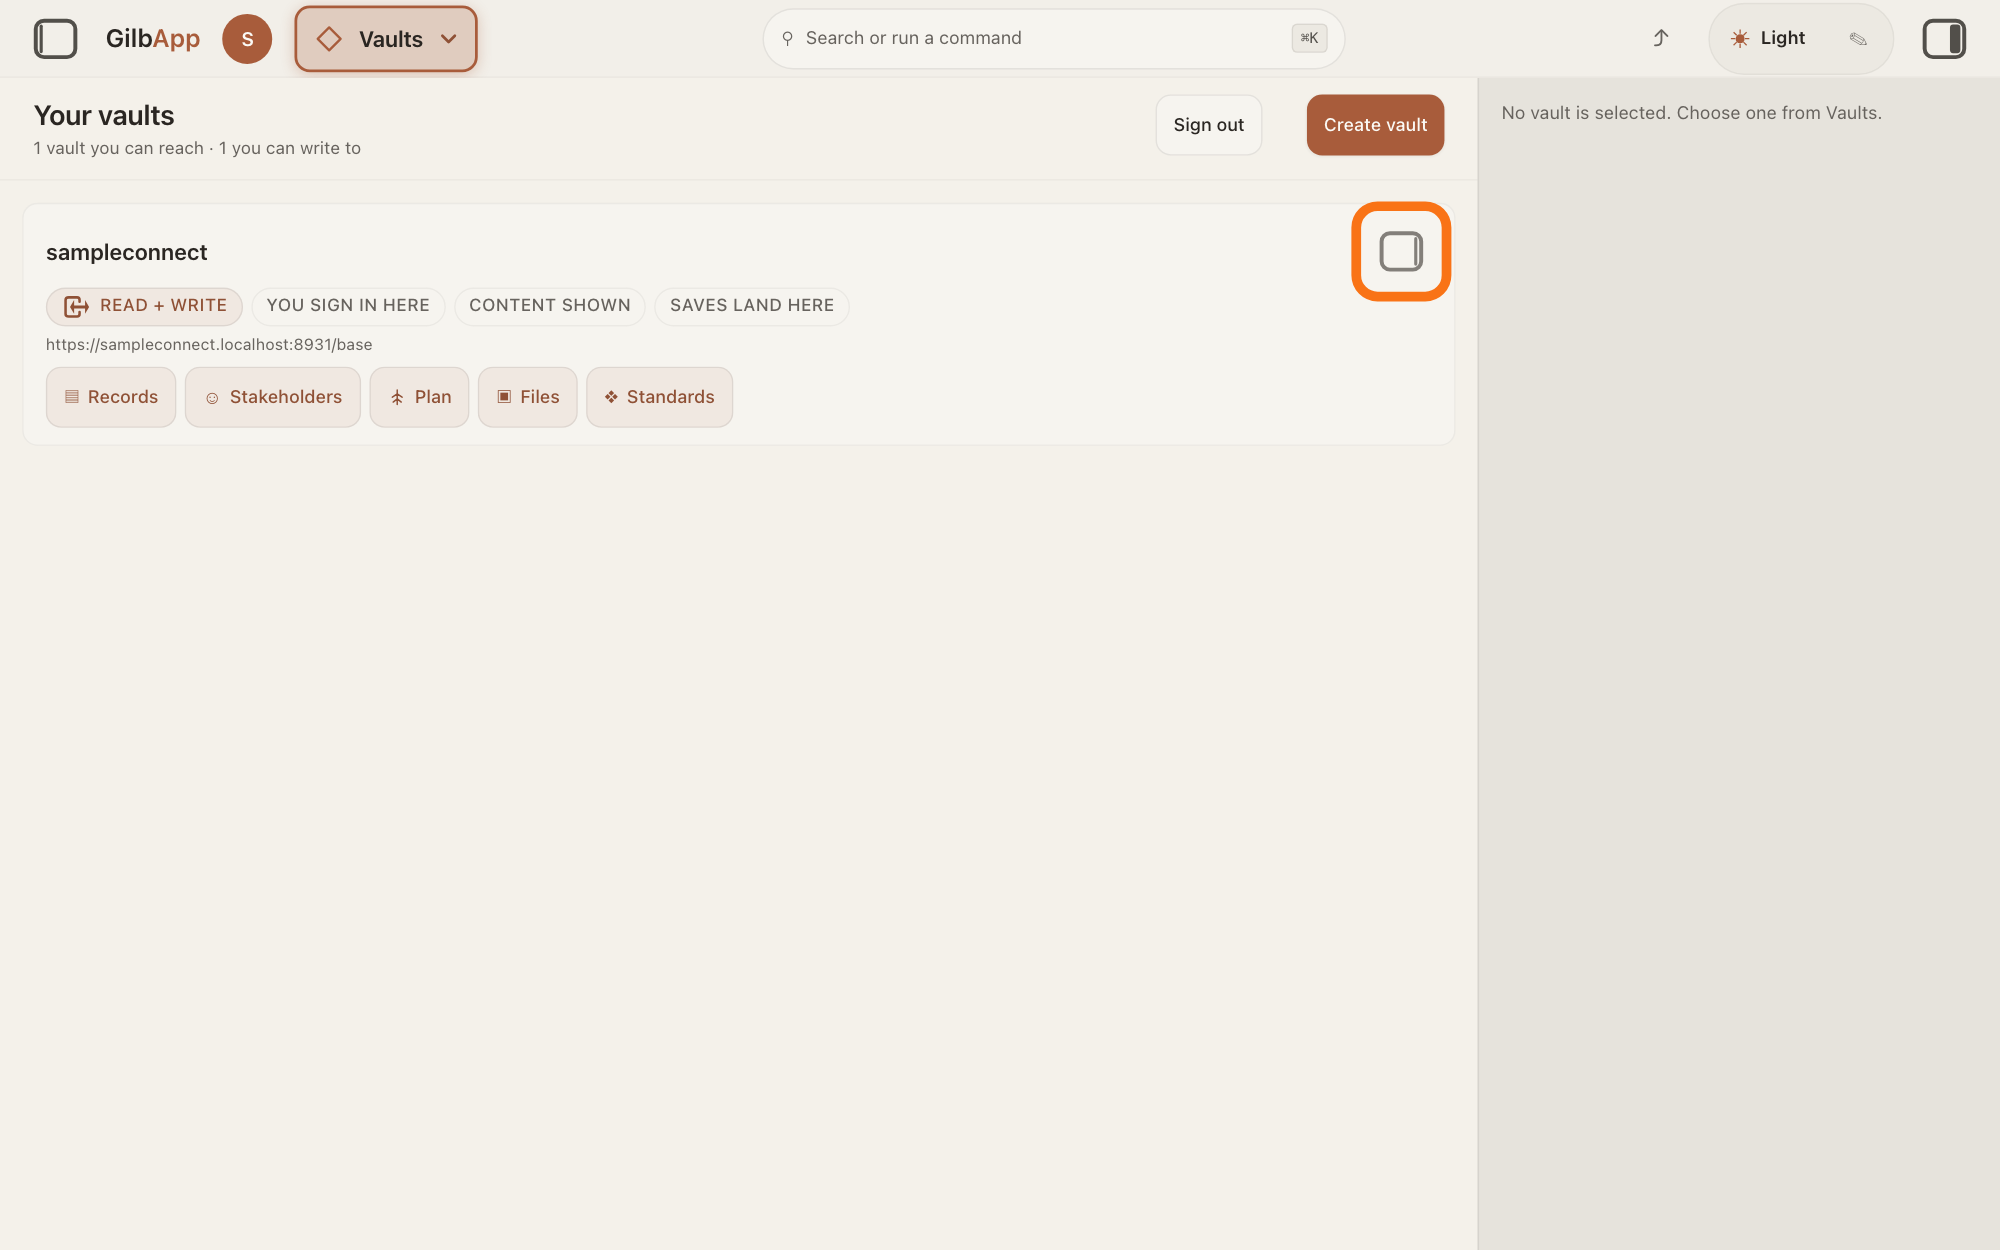
Press the panel button at the top right of your vault's card.
On Your vaults, press the small square button at the top right of your vault's card; its hover text is Show vault info. The pane on the right shows that vault's details.
Show as text
The middle of the screen is headed "Your vaults" and shows your vault as a card with your vault name, its tags such as "READ + WRITE", its address and buttons such as "Records" and "Plan". Click the small square button at the top right corner of that card, outlined in orange. The grey pane on the right still says "No vault is selected. Choose one from Vaults." until you do.
More about this
Before this, the pane says No vault is selected. Choose one from Vaults. Clicking the card itself only selects the vault; it never opens the pane. At the top of Your vaults, Create vault makes a new vault, Sign out signs you out, and Clear selection, shown once a vault is picked, clears the pick; you need none of them here.
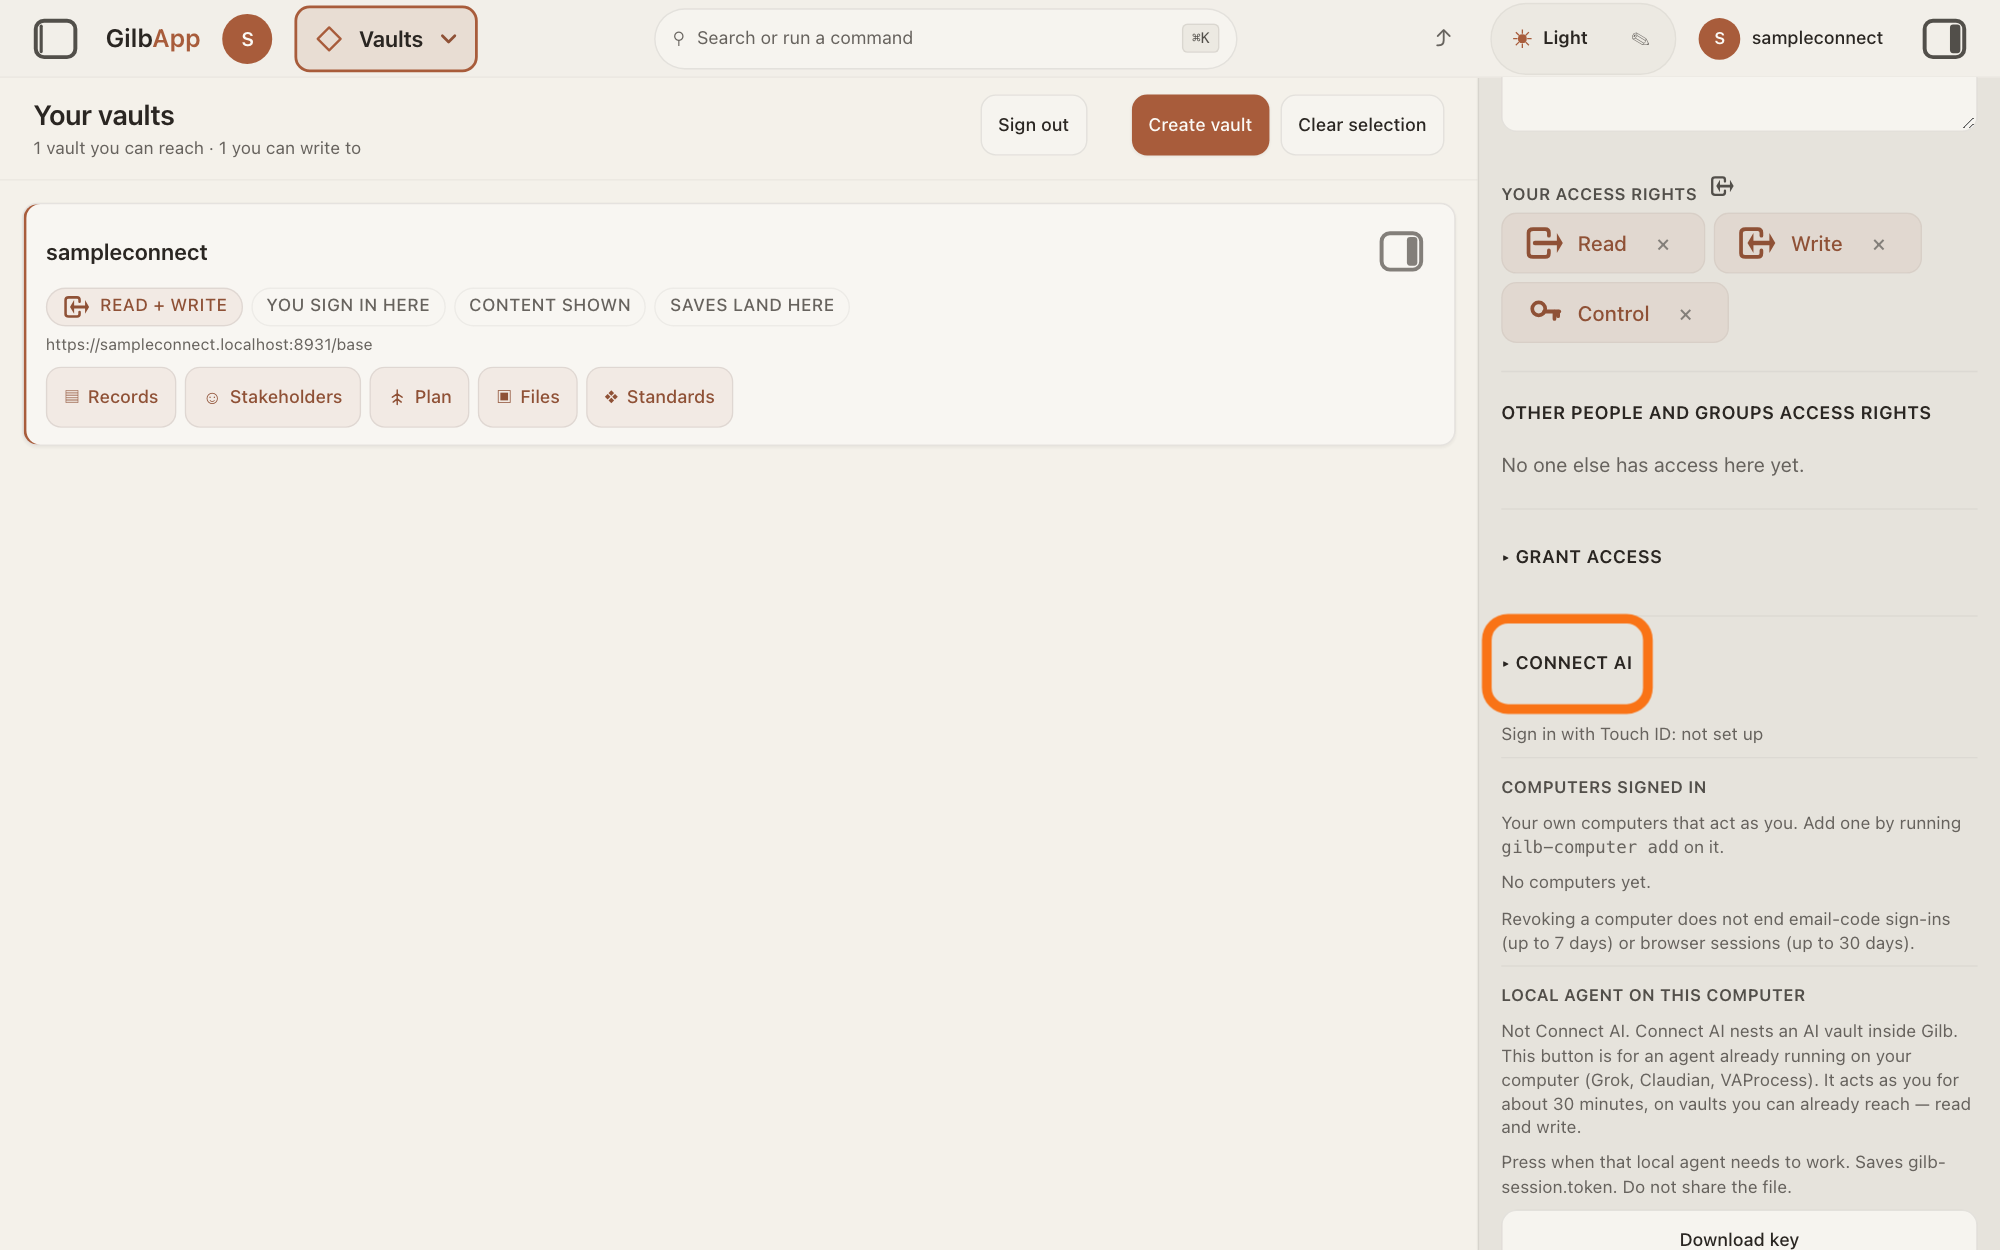
Open ▸ CONNECT AI.
In the pane, scroll down past OTHER PEOPLE AND GROUPS ACCESS RIGHTS and ▸ GRANT ACCESS, and press ▸ CONNECT AI. On a Mac it opens with macOS and Claude Code chosen and says "Use GilbPlatform from Claude Code or Claudian on your Mac. Do these steps in order."
Show as text
The grey pane on the right now shows your vault's details. Scroll it down past "YOUR ACCESS RIGHTS", "OTHER PEOPLE AND GROUPS ACCESS RIGHTS" and the closed fold "▸ GRANT ACCESS". Just below is the closed fold "▸ CONNECT AI", outlined in orange: click it to open it. Further down are "COMPUTERS SIGNED IN" and "LOCAL AGENT ON THIS COMPUTER", which this answer does not use.
More about this
This answer is for Claude Code; for Codex, the other button under the tabs, see the answer on making an AI vault and connecting Codex to it. Claudian is a community plug-in that runs Claude Code inside Obsidian, a note-taking app. Until you type a short name, the places for the lines say Type the short name at the top first. This answer uses steps 1 to 3 of ▸ CONNECT AI; its steps 4 to 8 (the AI vault, Bind AI, giving access, the test) are the next answers.
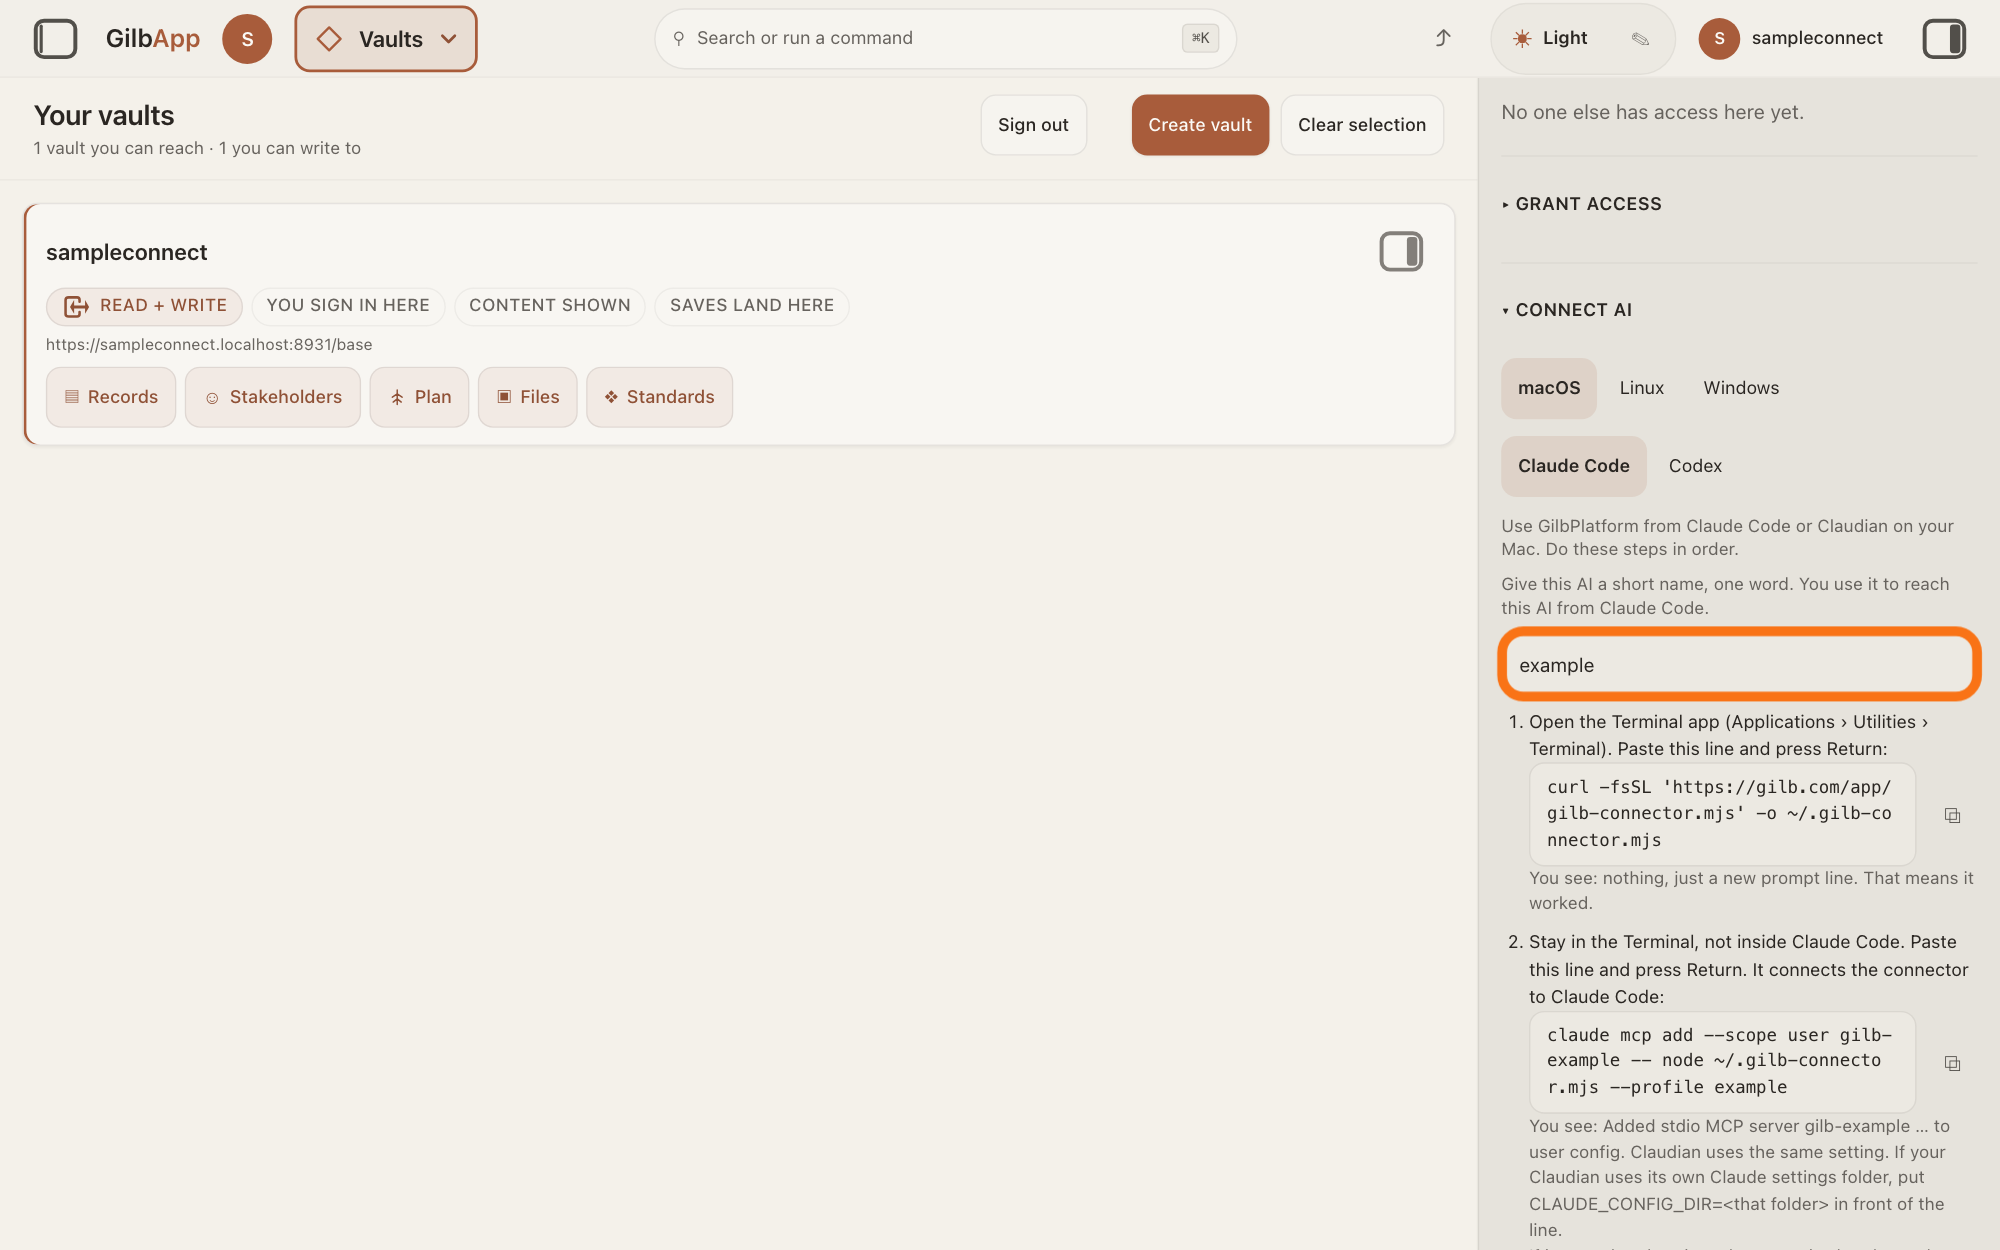
Type a short name in the box Short name, for example example.
Click the box that shows Short name, for example example and type one word for this AI, such as example. GilbApp puts it into the lines below.
Show as text
In the right pane, "▾ CONNECT AI" is open. Under it are three tabs, "macOS", "Linux" and "Windows", with "macOS" chosen, and a second row with "Claude Code", chosen, and "Codex". Then comes "Give this AI a short name, one word." The box under that is outlined in orange: click it and type your short name; here the one word example is typed. The numbered steps below then show your Terminal lines with that name in them.
More about this
Use small letters, digits and dashes, at most 20, starting with a letter or digit, and not default; otherwise the screen asks for lower-case letters, numbers and dashes only. Claude Code will call this AI gilb- and the short name, for example gilb-example. Note the short name: the check that your AI can reach your vault uses it.
Paste the first line in Terminal and press Return.
Press ⧉ at the end of the line under step 1 to copy it, paste it in Terminal and press Return. The line reads:
curl -fsSL 'https://gilb.com/app/gilb-connector.mjs' -o ~/.gilb-connector.mjs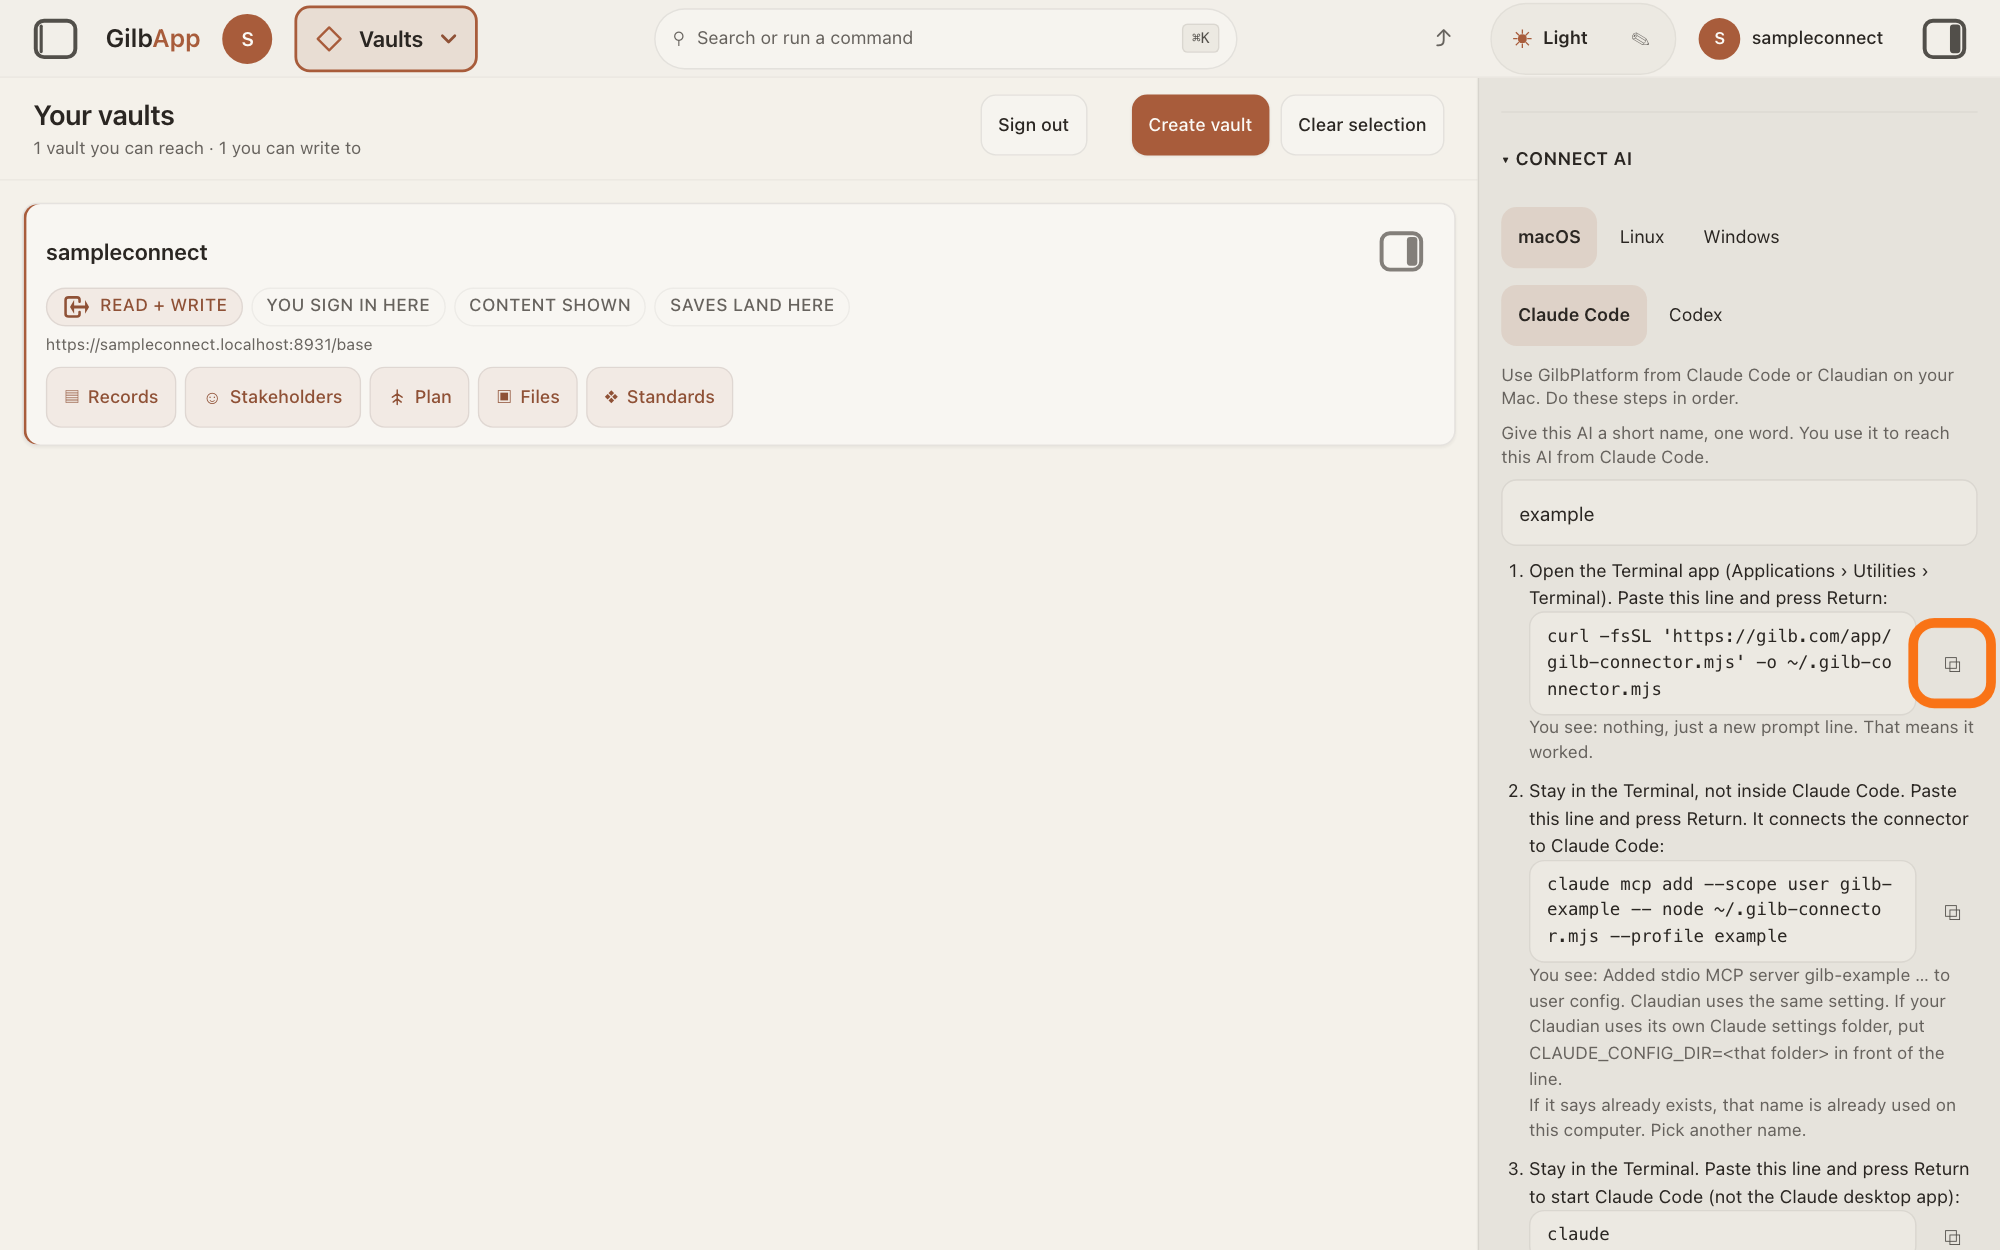
Show as text
In the right pane, under "▾ CONNECT AI", the short name box now holds the name typed (example in the picture). Below it, step 1 says "Open the Terminal app (Applications › Utilities › Terminal). Paste this line and press Return:" and shows the curl line. To the right of that line is a small copy button, outlined in orange: click it, then paste in Terminal. Under the line: "You see: nothing, just a new prompt line. That means it worked."
More about this
It downloads the GilbPlatform connector, the small program that lets Claude Code reach GilbPlatform, into your home folder as .gilb-connector.mjs. When it works, Terminal shows nothing, just a new prompt line.
Paste the second line in Terminal and press Return.
Press ⧉ at the end of the line under step 2, paste it in Terminal (not inside Claude Code) and press Return. With the short name example it reads:
claude mcp add --scope user gilb-example -- node ~/.gilb-connector.mjs --profile example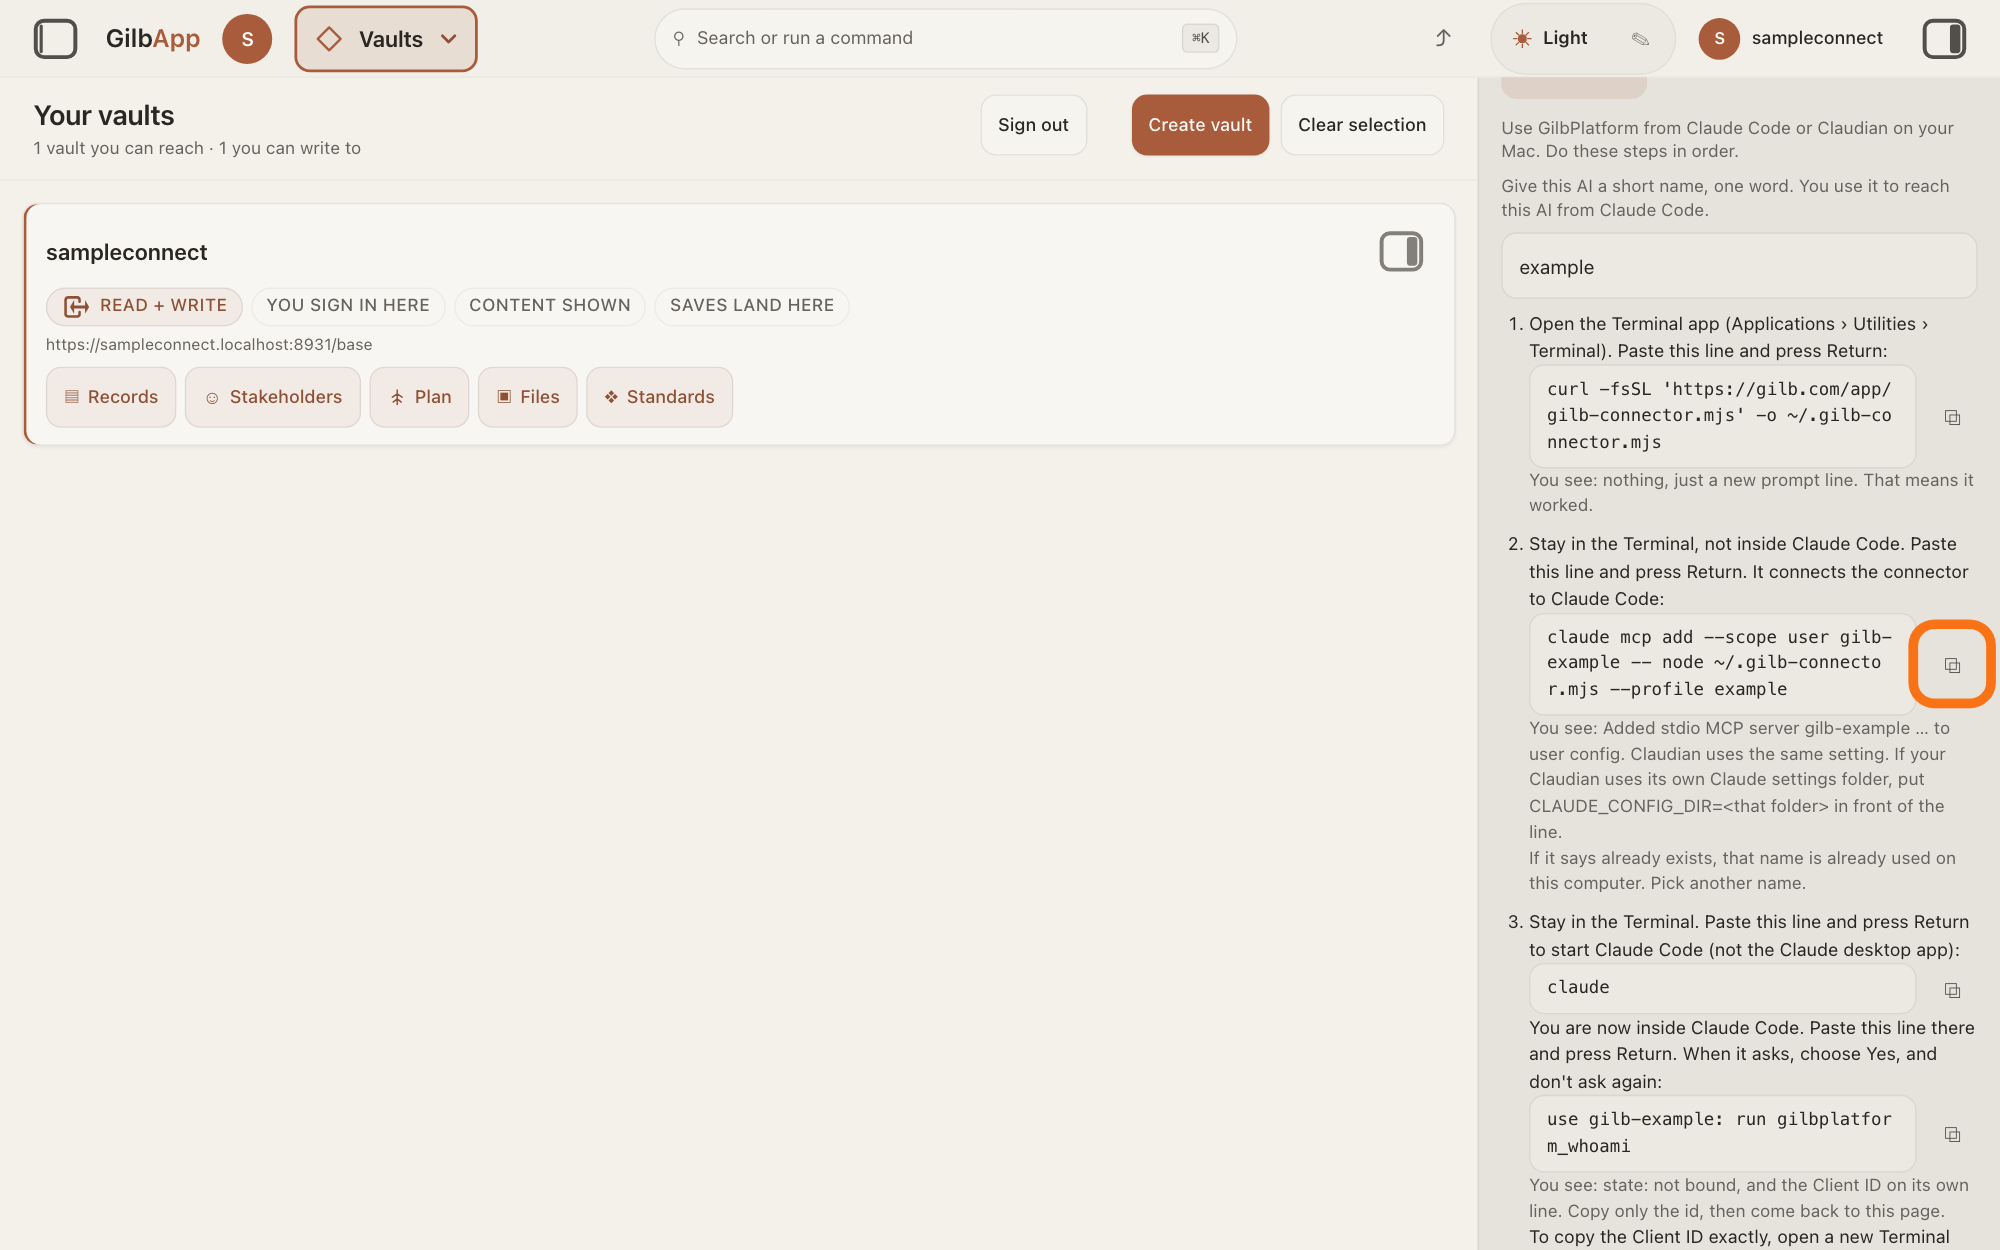
Show as text
In the right pane, read step 2: "Stay in the Terminal, not inside Claude Code." Its line starts "claude mcp add --scope user gilb-" and ends with your short name. The small copy button to the right of that line is outlined in orange: click it, then paste in Terminal and press Return. Under the line the pane says what Terminal shows: "Added stdio MCP server gilb-example ... to user config", and what to do if it says already exists.
More about this
It tells Claude Code to start the connector for this AI. Terminal shows Added stdio MCP server gilb-example … and to user config; --scope user makes it work in every folder. If it says already exists, that short name is already used on this computer: type another one in step 4 and paste the new line. Claudian uses the same setting; if your Claudian uses its own Claude settings folder, put CLAUDE_CONFIG_DIR=<that folder> in front of the line.
Paste the start line in Terminal and press Return.
Press ⧉ next to the first line under step 3, paste it in Terminal and press Return. The line reads:
claude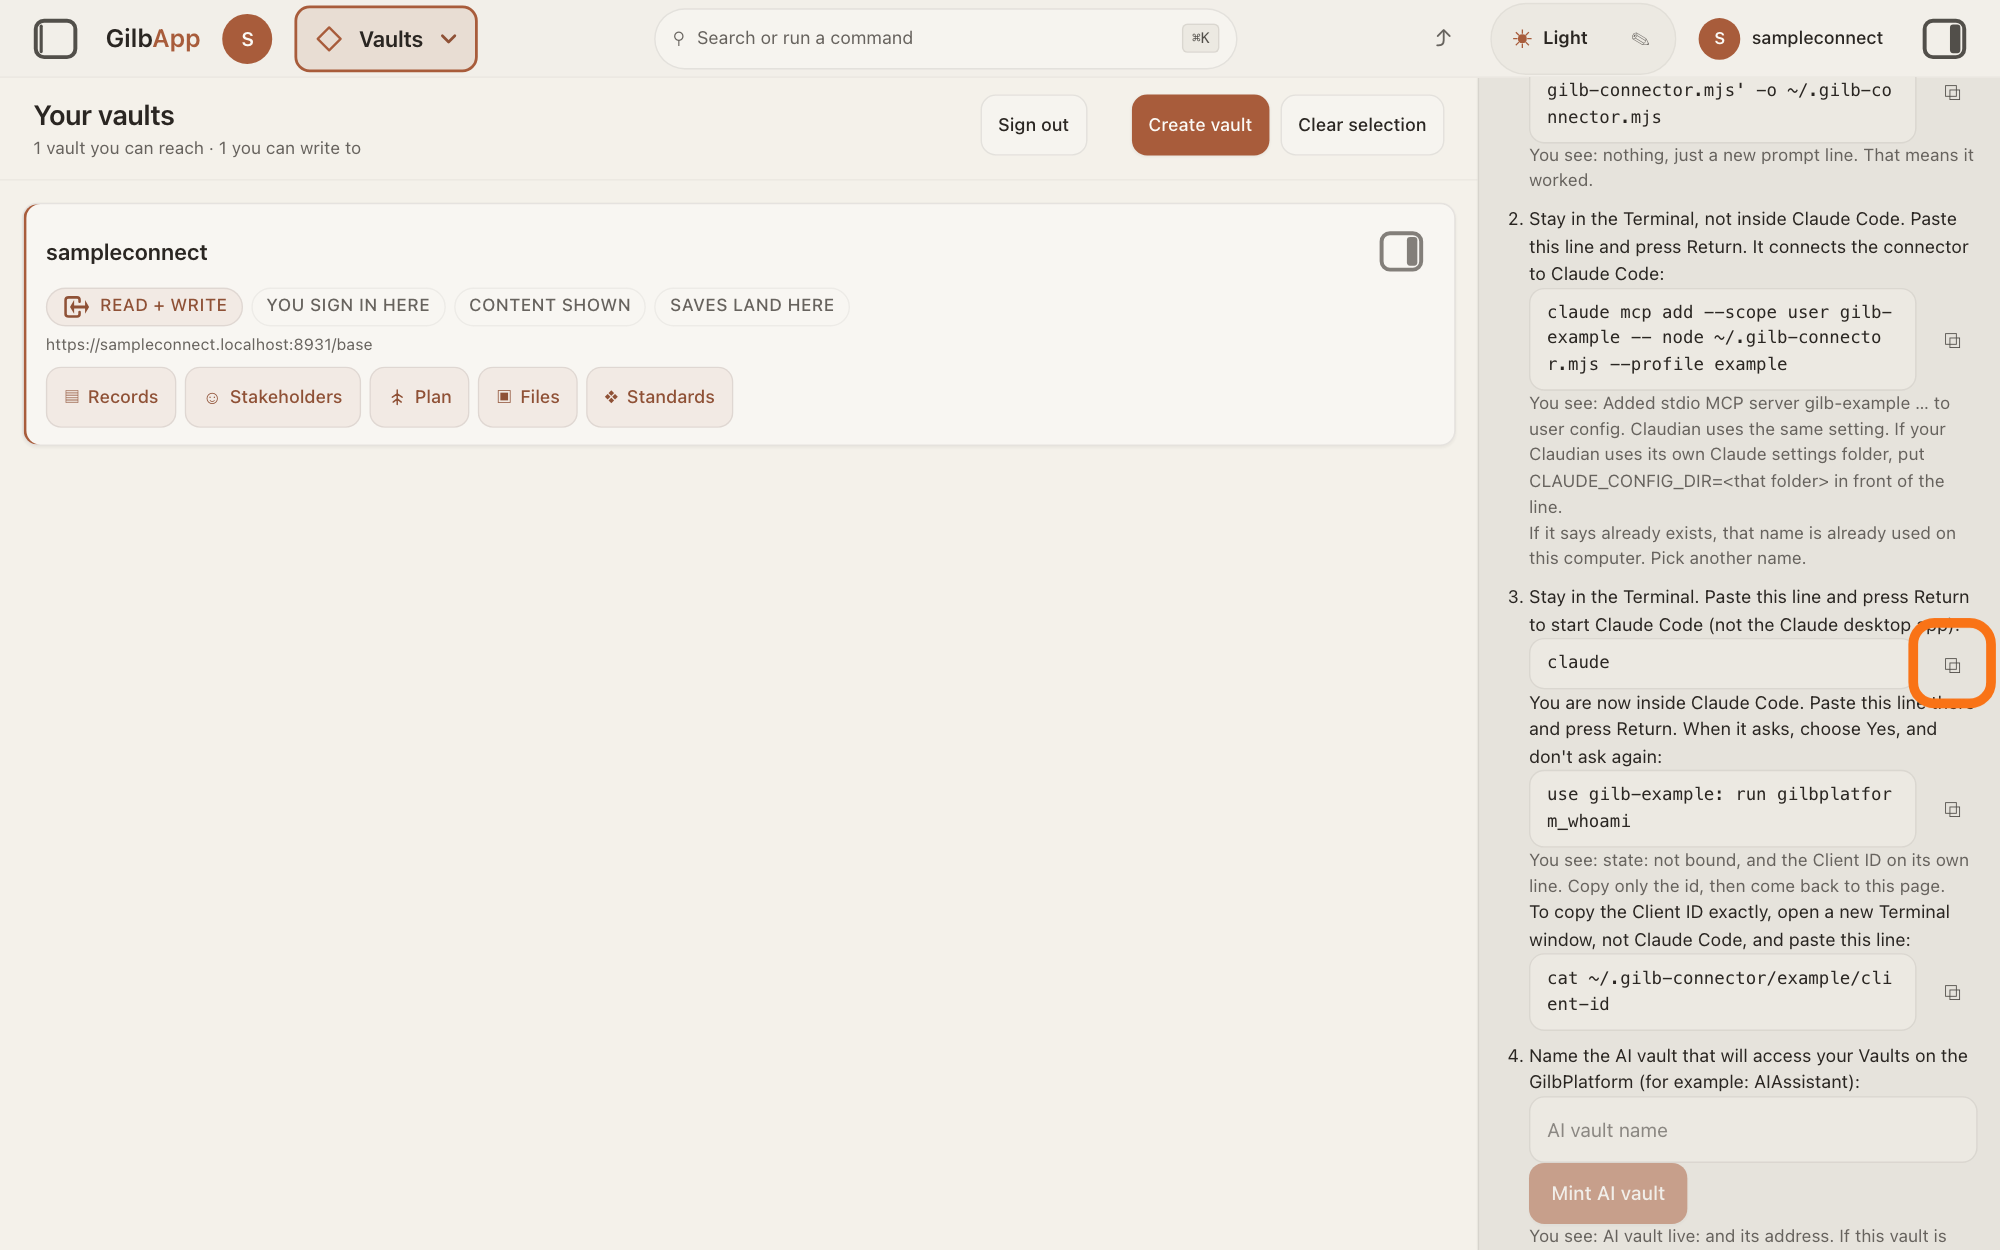
Show as text
In the right pane, step 3 says "Stay in the Terminal. Paste this line and press Return to start Claude Code (not the Claude desktop app):" and shows the one word claude. The small copy button to the right of that line is outlined in orange: click it, then paste in Terminal. Under it the pane goes on: "You are now inside Claude Code."
More about this
Claude Code starts in the Terminal window: this is Claude Code in the Terminal, not the Claude desktop app. What Claude Code shows the first time is in the answer on installing Claude Code.
Paste the who-am-I line in Claude Code and press Return.
Press ⧉ next to the who-am-I line, paste it in Claude Code and press Return. With the short name example it reads:
use gilb-example: run gilbplatform_whoami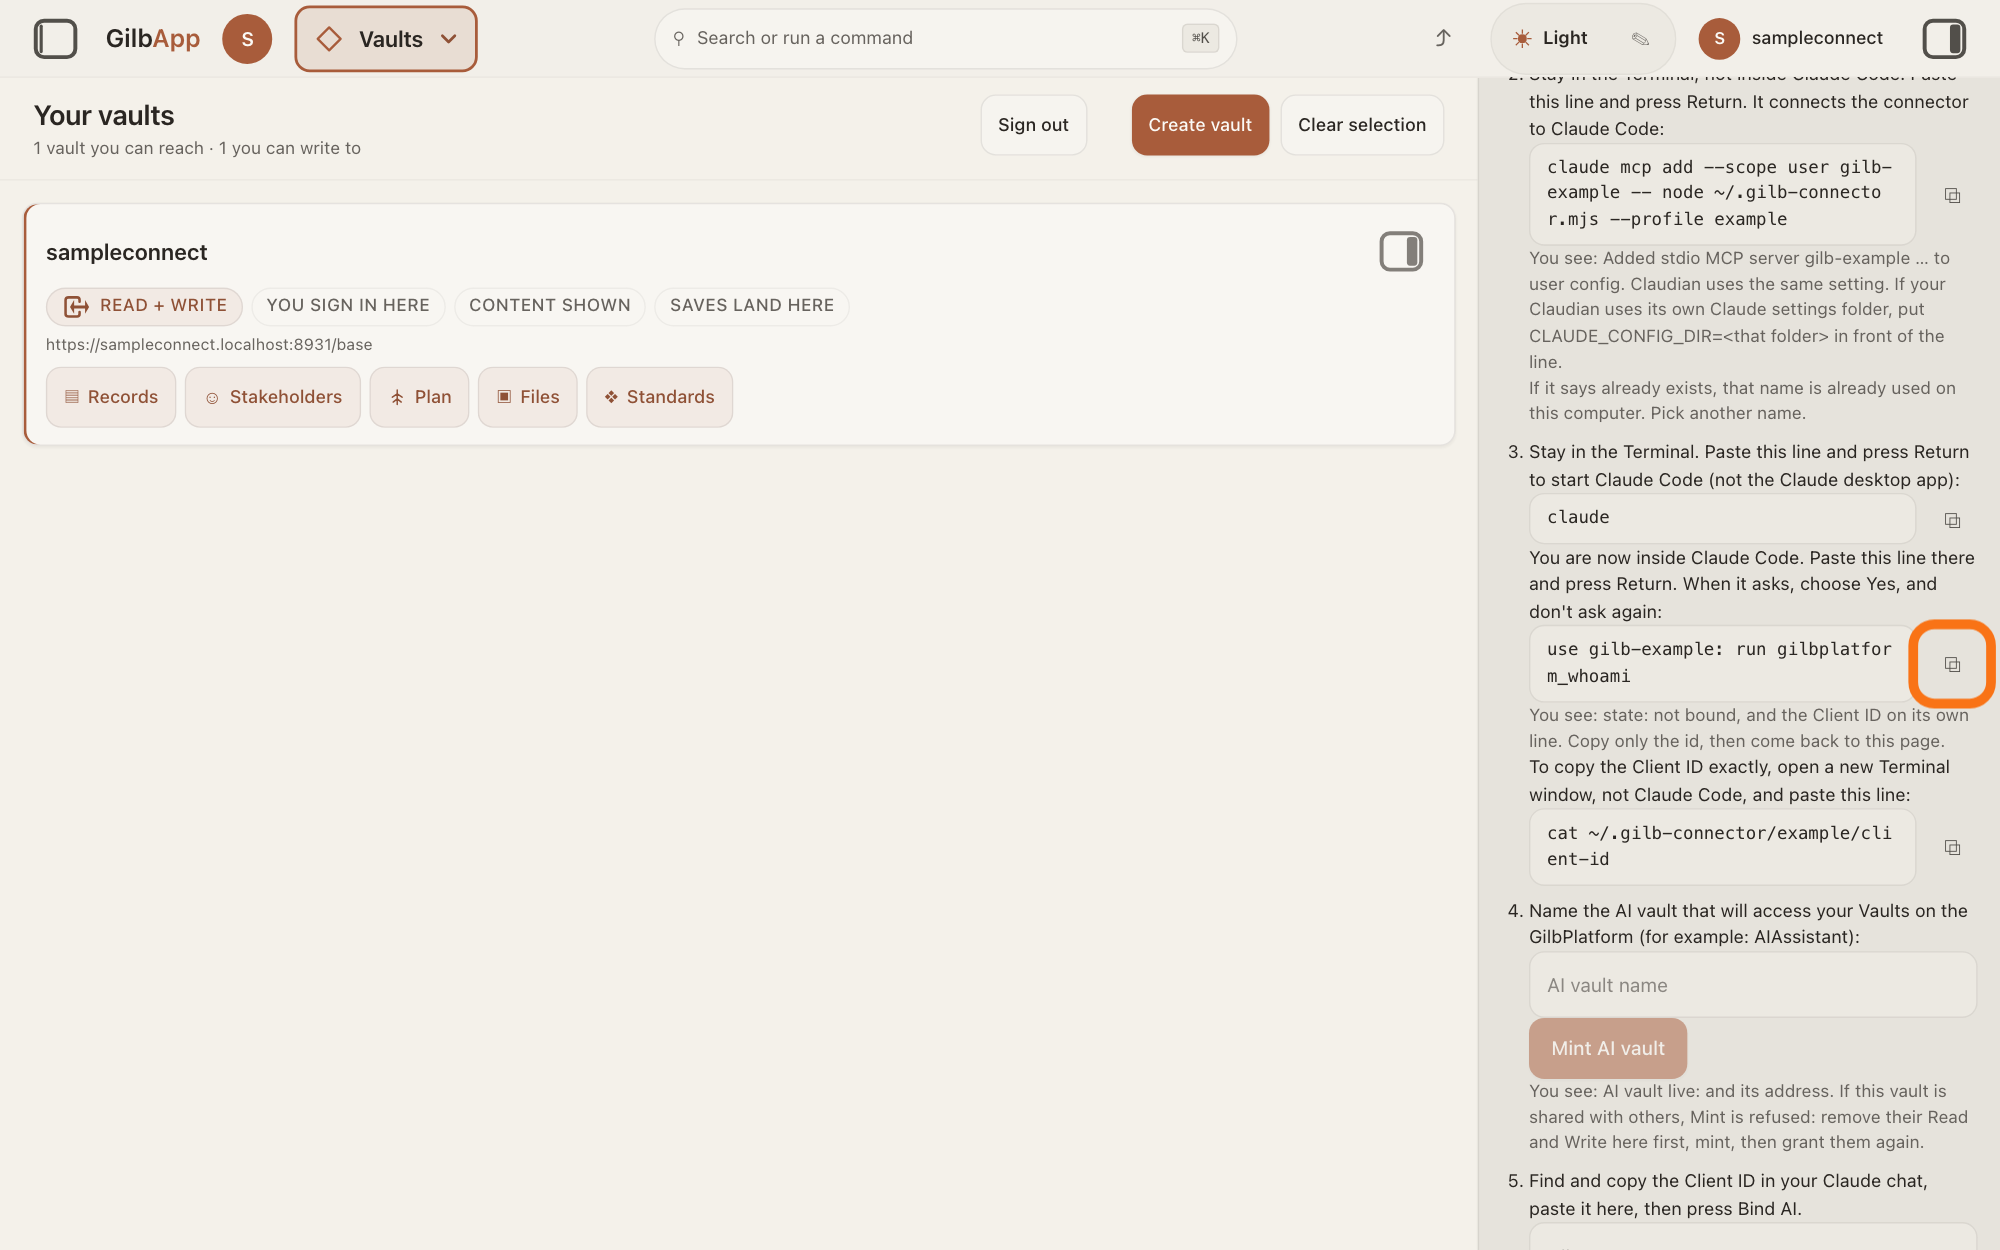
Show as text
In the right pane, under "You are now inside Claude Code. Paste this line there and press Return. When it asks, choose Yes, and don't ask again:", is the line starting "use gilb-" and ending "run gilbplatform_whoami". The small copy button to its right is outlined in orange: click it, then paste the line into Claude Code. Under it: "You see: state: not bound, and the Client ID on its own line."
More about this
When Claude Code asks whether it may use gilbplatform_whoami, GilbApp says: choose Yes, and don't ask again. The answer shows state: not bound and the Client ID, the name GilbPlatform gives this AI, on its own line; that is right for now. This first run makes this AI's own key on your Mac and signs the AI in to GilbPlatform once. Do not skip it: the bind is refused for an AI that has never signed in. Signing in gives the AI no access to your vaults.
Paste the Client ID line in a new Terminal window and press Return.
Press Command-N while Terminal is in front to open a new Terminal window, not Claude Code. Press ⧉ next to the last line under step 3, paste it there and press Return; with the short name example it reads:
cat ~/.gilb-connector/example/client-id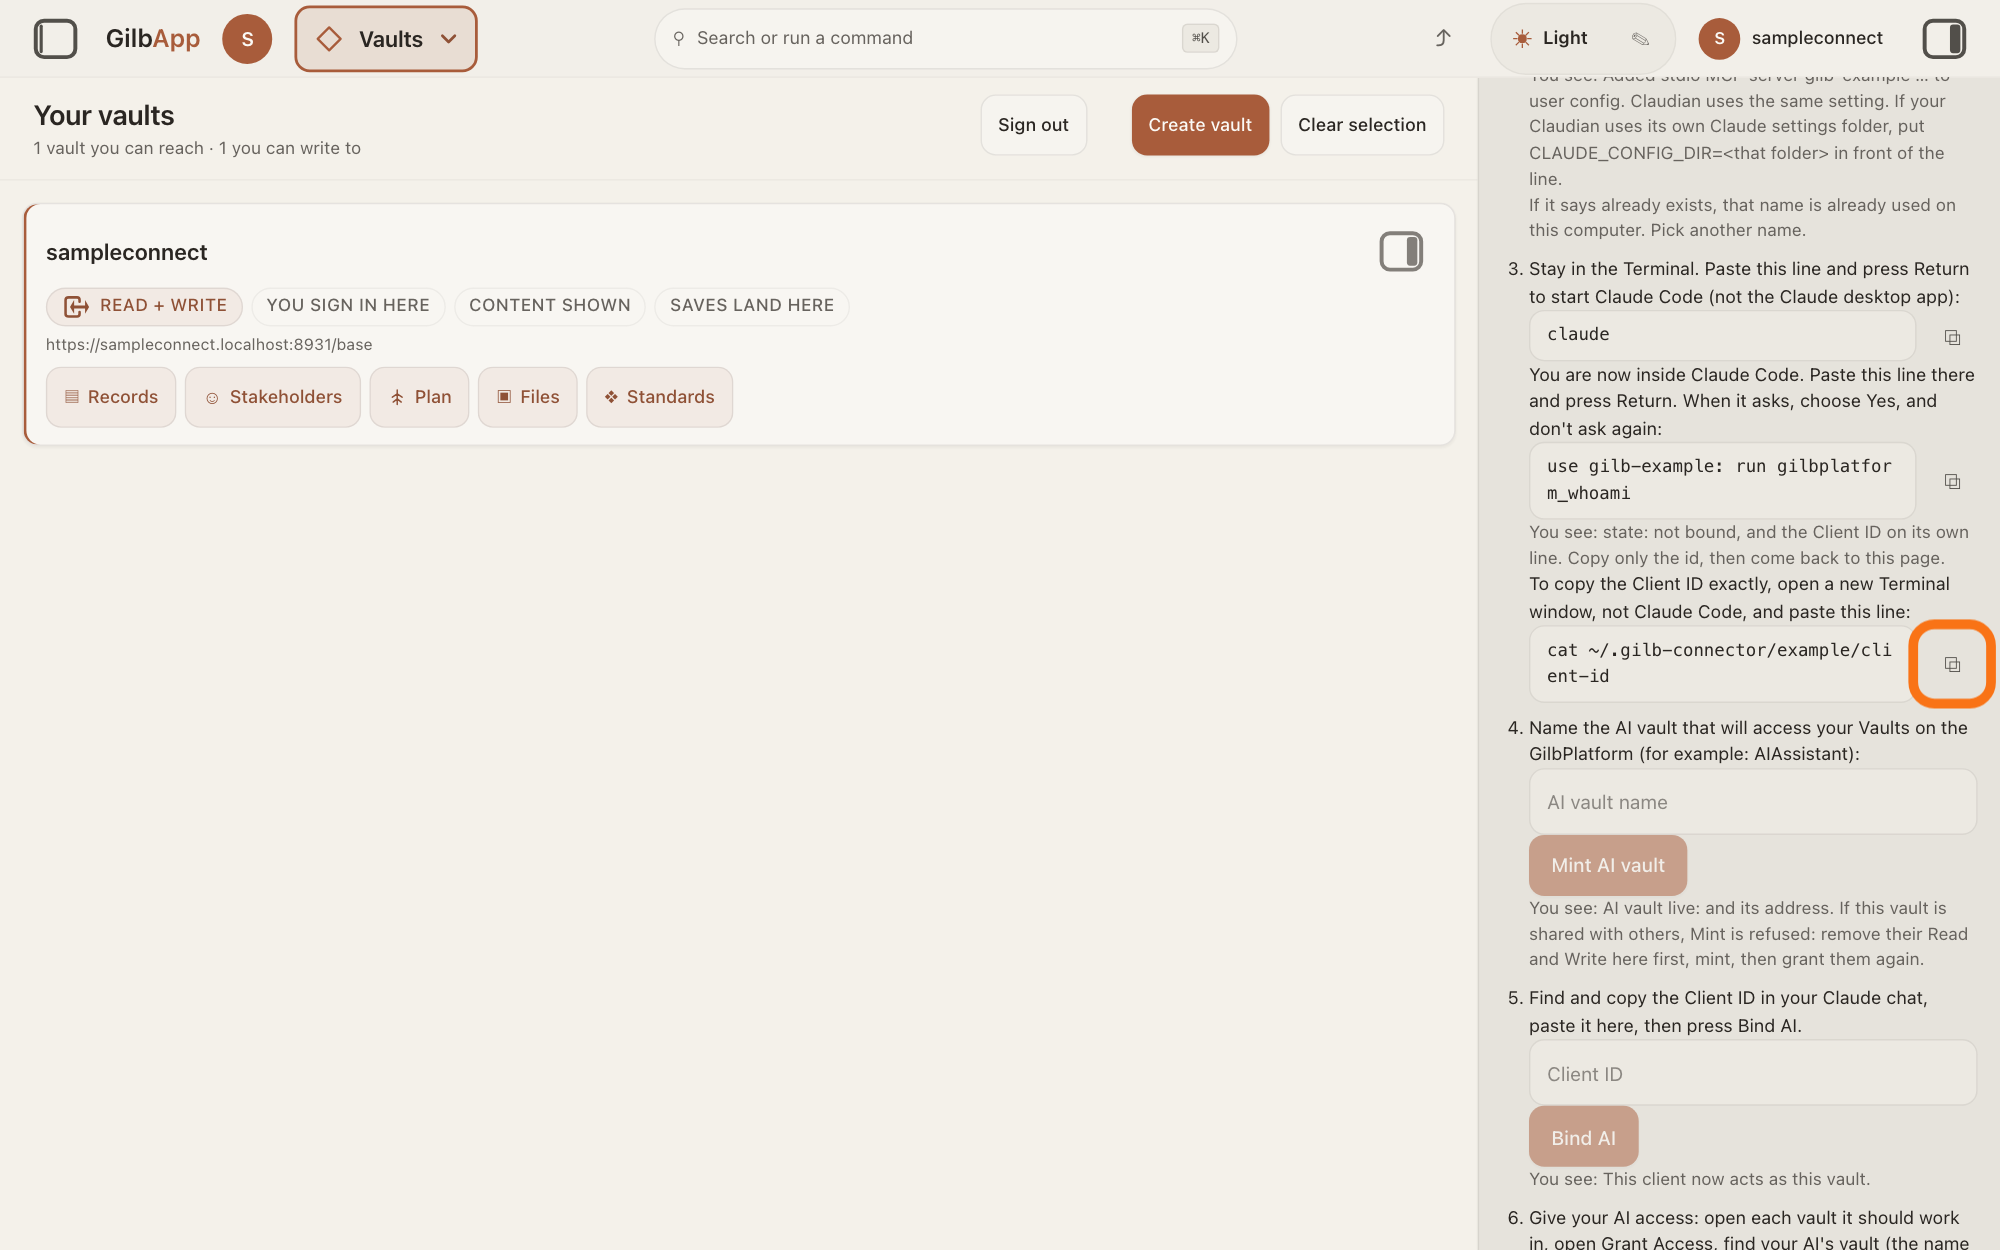
Show as text
In the right pane, under "To copy the Client ID exactly, open a new Terminal window, not Claude Code, and paste this line:", is the line starting "cat ~/.gilb-connector/" and ending "/client-id". The small copy button to its right is outlined in orange: click it, then paste the line into a new Terminal window. Below are steps 4 and 5 of "CONNECT AI", the boxes "AI vault name" and "Client ID", used in the next answers.
More about this
Terminal shows one line: the Client ID. Select it and copy it for the next answer, on making an AI vault. Taken from this file, the Client ID is exact; copied out of Claude Code's answer it can pick up marks at its ends. The Client ID names this AI but gives no access by itself. The same folder holds this AI's private key, readable only by you: do not open it or send it to anyone.
Deeper
Also asked:
What is a Client ID, and must I keep it secret? It is the name GilbPlatform gives your AI. It is not a password and gives no access by itself. What must stay private is the AI's key, kept in the same folder on your Mac: do not open it or send it to anyone.
When you are done, your Mac holds this AI's own key, and GilbPlatform knows the AI by its Client ID. The AI can reach nothing yet. Next, make its AI vault and bind it, then give it access to a vault; each has its own answer.
Your AI is not you. It reaches only the vaults you grant to its AI vault, and it acts as that AI vault. A second AI on the same Mac gets its own short name and its own Client ID.
GilbApp also shows two other ways at the bottom of the vault's pane. COMPUTERS SIGNED IN lists computers that act as you, added by running a command, gilb-computer add, on them. No GilbApp screen or help says yet where to get that command, so this answer uses ▸ CONNECT AI. LOCAL AGENT ON THIS COMPUTER has Download key: it saves a file, gilb-session.token, that lets an agent already running on your computer act as you for about 30 minutes, on vaults you can already reach. It is Not Connect AI: it makes no AI vault, and it ends after about 30 minutes. Do not share that file.
Grok, which GilbApp also offers, is connected in GilbApp's chat with Connect, not on your computer. In the same chat, Connect also offers Claude Code, which pairs the chat with Claude Code through a small bridge. Both are in the answer on connecting your AI to GilbApp chat.
This answer is for a Mac. Under Linux GilbApp says These Linux steps need further testing. Under Windows, Codex is chosen for you, and with Claude Code chosen it says Claude Code on Windows is not available yet. Choose Codex.
Checked against GilbApp d529620.