
← Back to How do I work with Jackfruit?
How do I give my AI access to a vault?
Short answer
Open ▸ GRANT ACCESS on the vault, choose Vault, paste the AI vault's address, choose read, press Grant, then do the same with write.
Before you start
You need to be signed in to GilbApp on a computer, with your AI vault made and bound, each by its own answer, and its address, shown after AI vault live: when you made it.
Control on the vault your AI should work in. The pictures show a made-up person on a test site; your screen shows your own name and address.
Words used here (3)
- AI vault
- An AI vault is a small vault that stands for your AI; your AI reaches only the vaults you grant it.
- GilbApp
- GilbApp is the app, opened in a web browser at https://gilb.com/app, where you open, fill and share your vaults.
- onward reach
- ONWARD REACH says whether a vault you give access to reaches only your vault, or also the vaults your vault has been given access to.
Steps
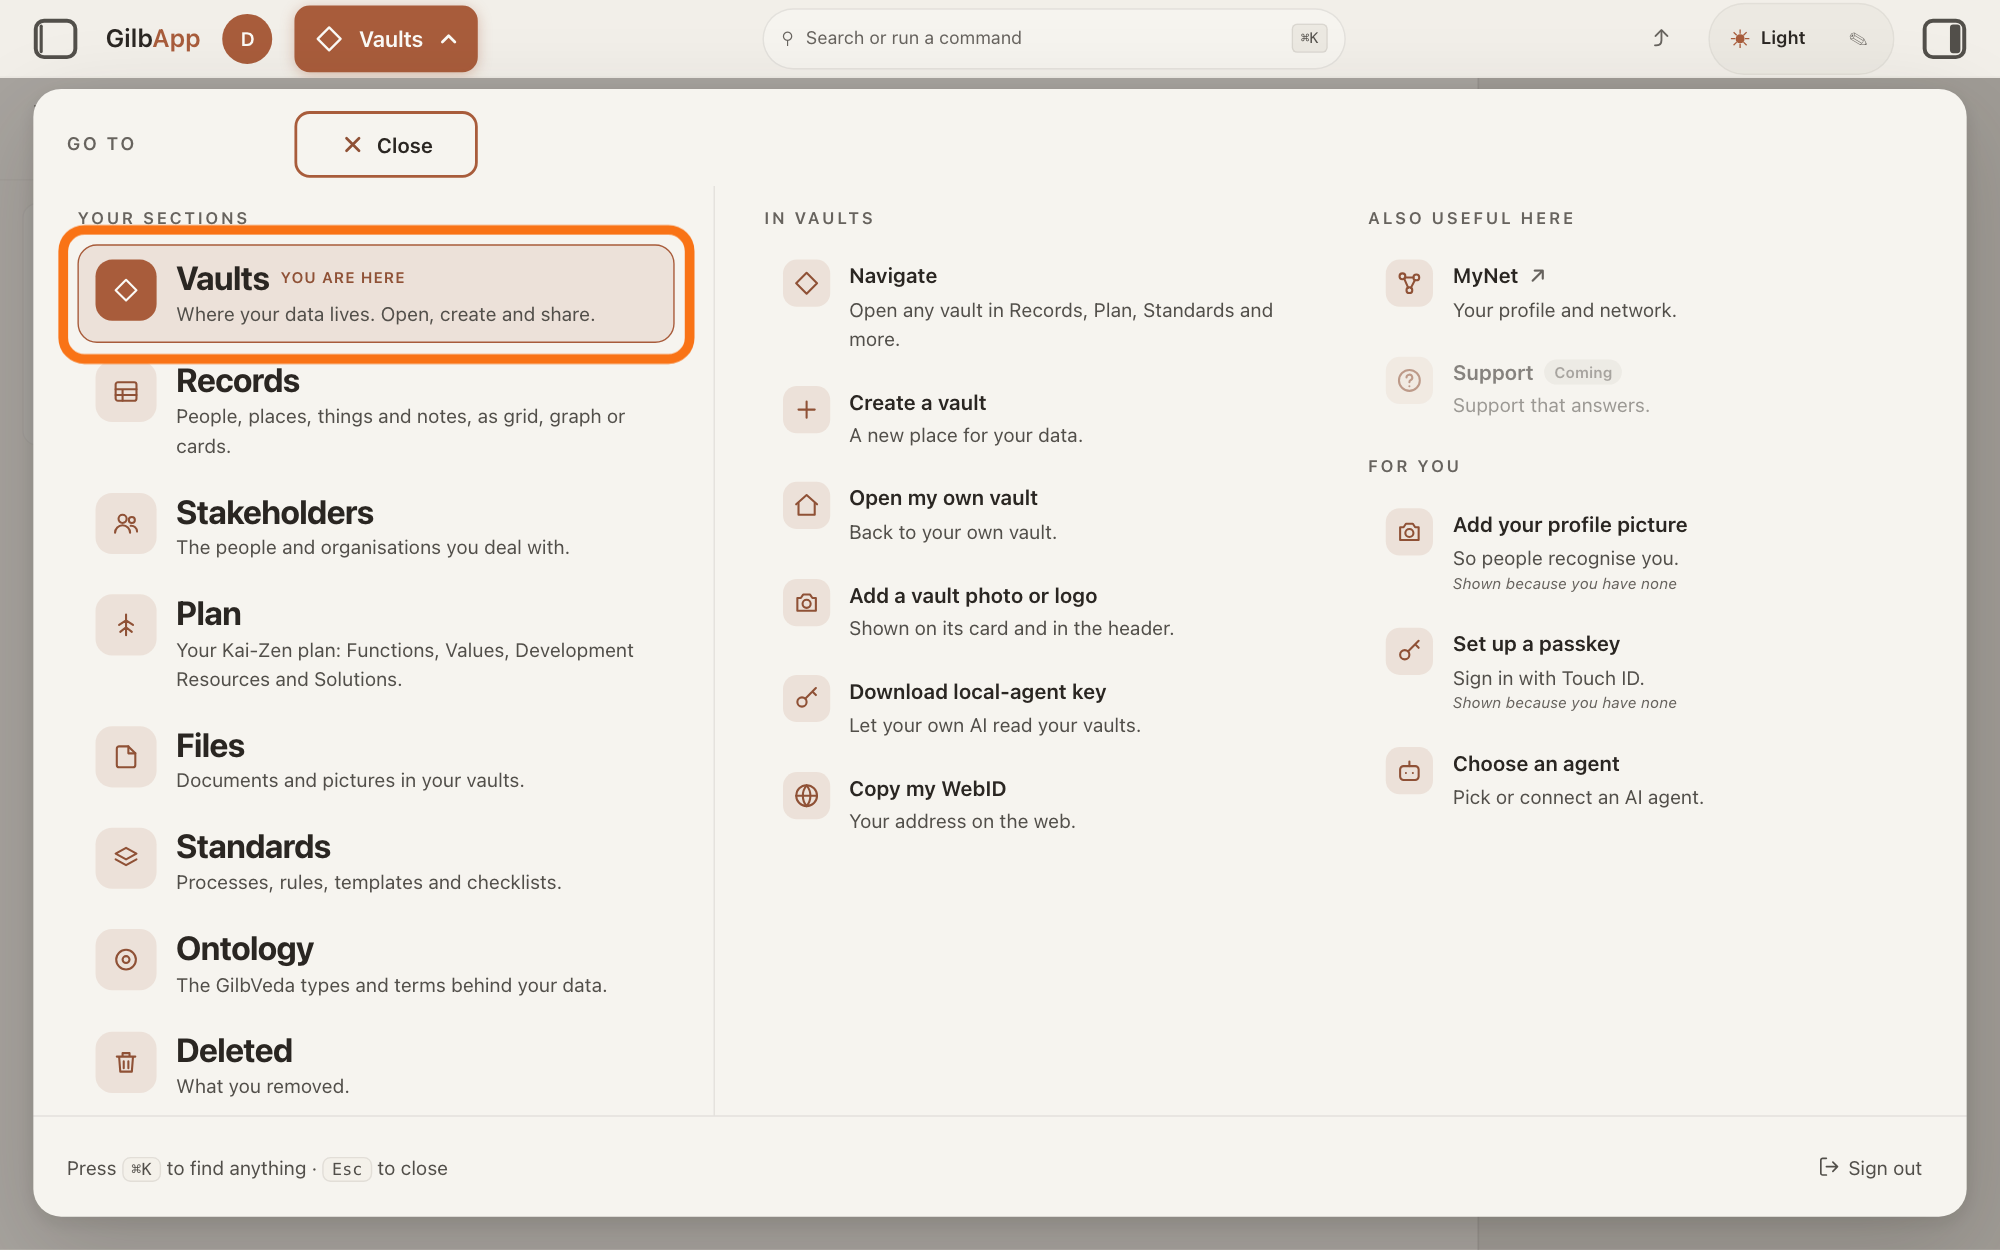
Press Main menu at the top left and choose Vaults.
Press Main menu, next to your profile picture at the top left, and under YOUR SECTIONS choose Vaults. The button shows the name of the section you are in, such as Vaults.
Show as text
At the top left, next to your profile picture, is the "Main menu" button; here it reads "Vaults" with a small arrow. Pressing it opens a large panel headed "GO TO". In its left column, under "YOUR SECTIONS", the first row is "Vaults", "Where your data lives. Open, create and share." That row has the orange outline: click it. "Close" at the panel's top, or the Esc key, closes the panel.
More about this
The Vaults screen lists your vaults as cards. Your AI vault is listed under the vault you made it in. If you no longer have its address, press its card's panel button: the pane shows the address under VAULT ID, with ⧉ to copy it.
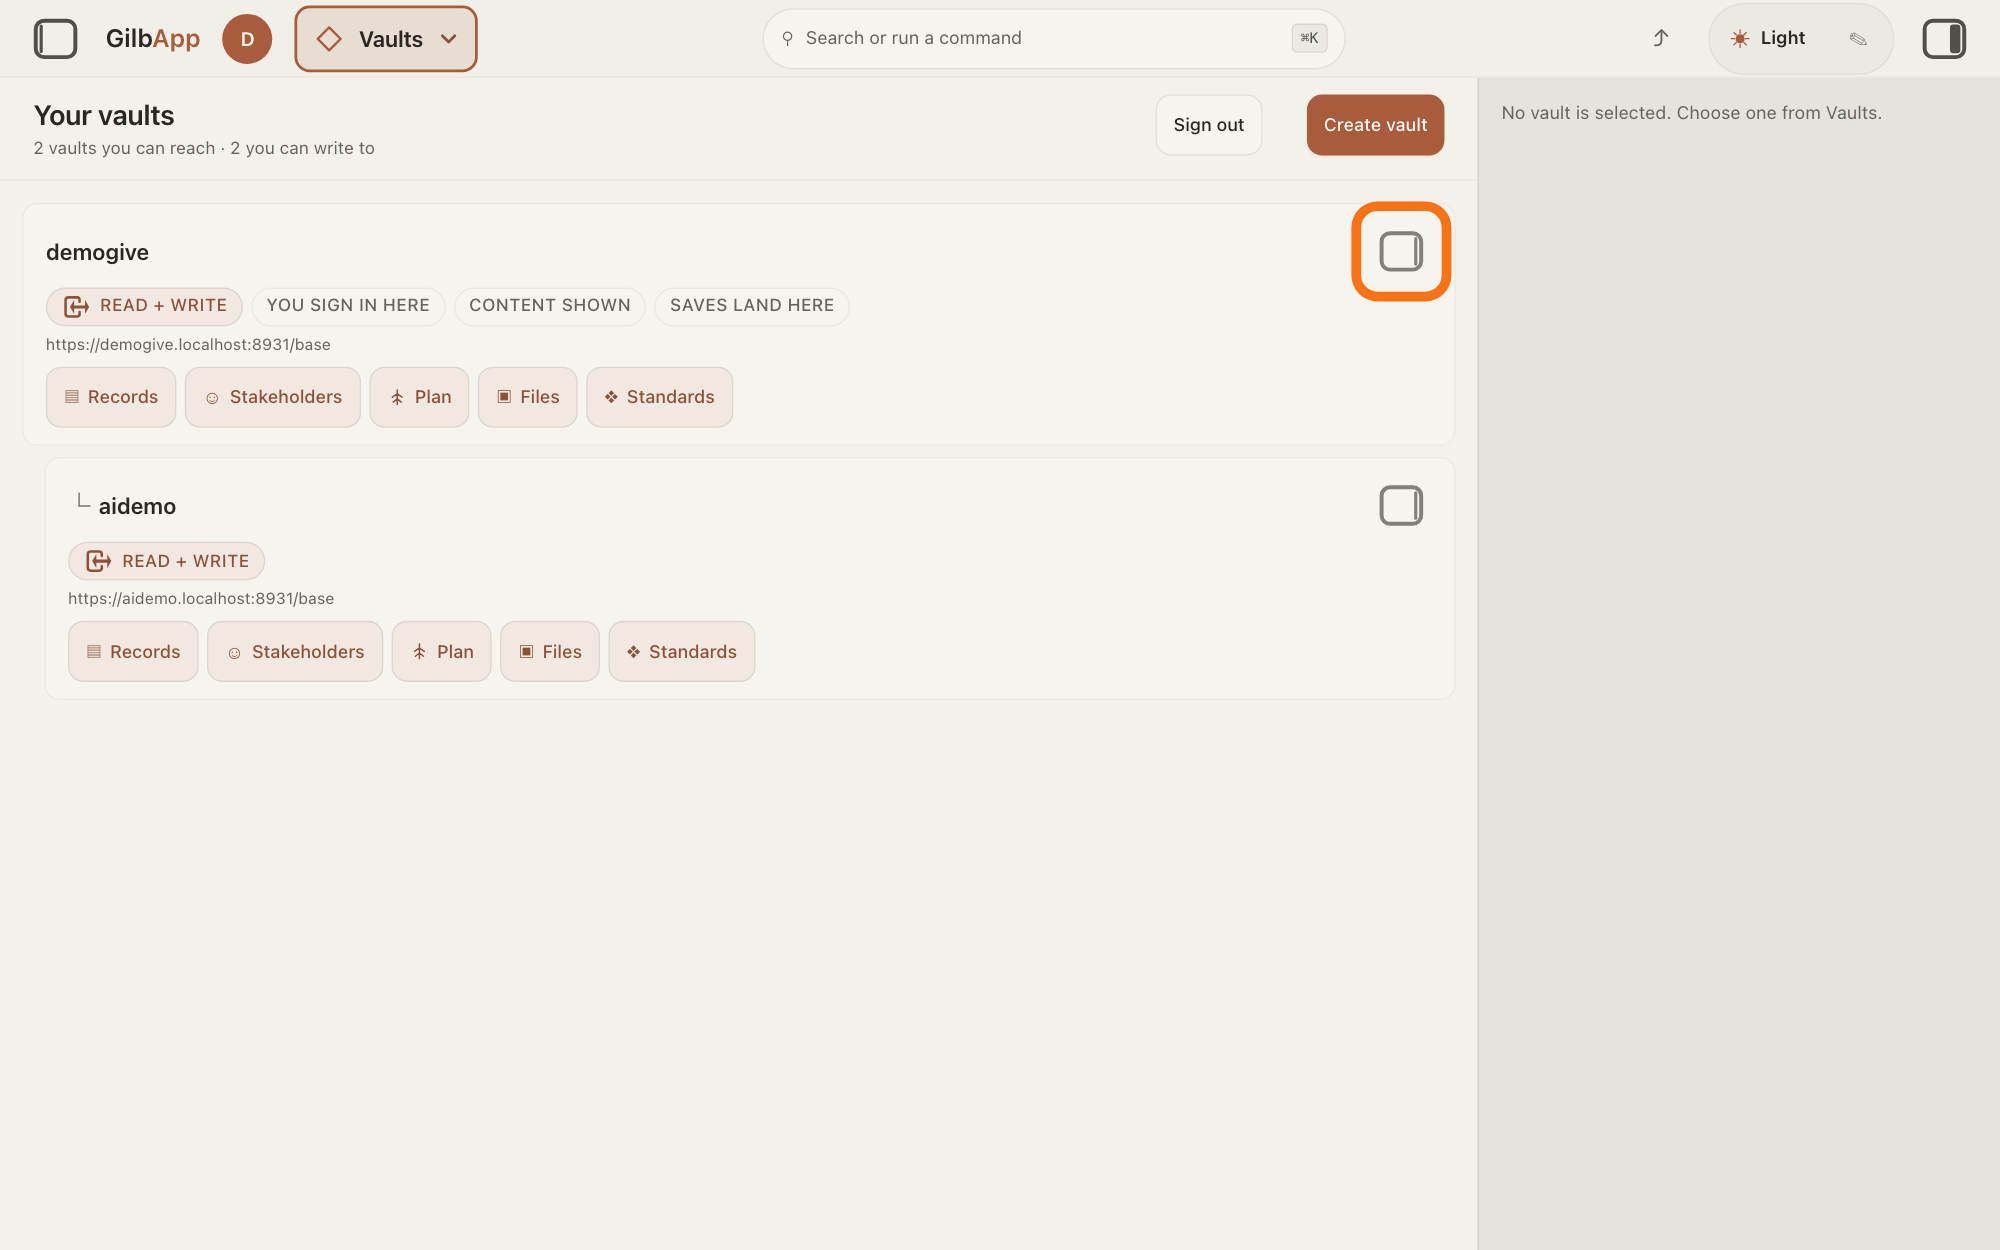
Press the panel button at the top right of the vault's card.
Press the small square button at the top right of the card of the vault your AI should work in; its hover text is Show vault info. The pane on the right shows that vault's details.
Show as text
The middle of the screen is headed "Your vaults" and lists your vaults as cards. Your AI vault's card sits just under the vault you made it in, set in a little with a small corner mark before its name. Find the card of the vault your AI should work in and click the small square button at that card's top right; in the picture it is the top card's button, outlined in orange.
More about this
Clicking the card itself only selects it; on a computer it does not open the pane.
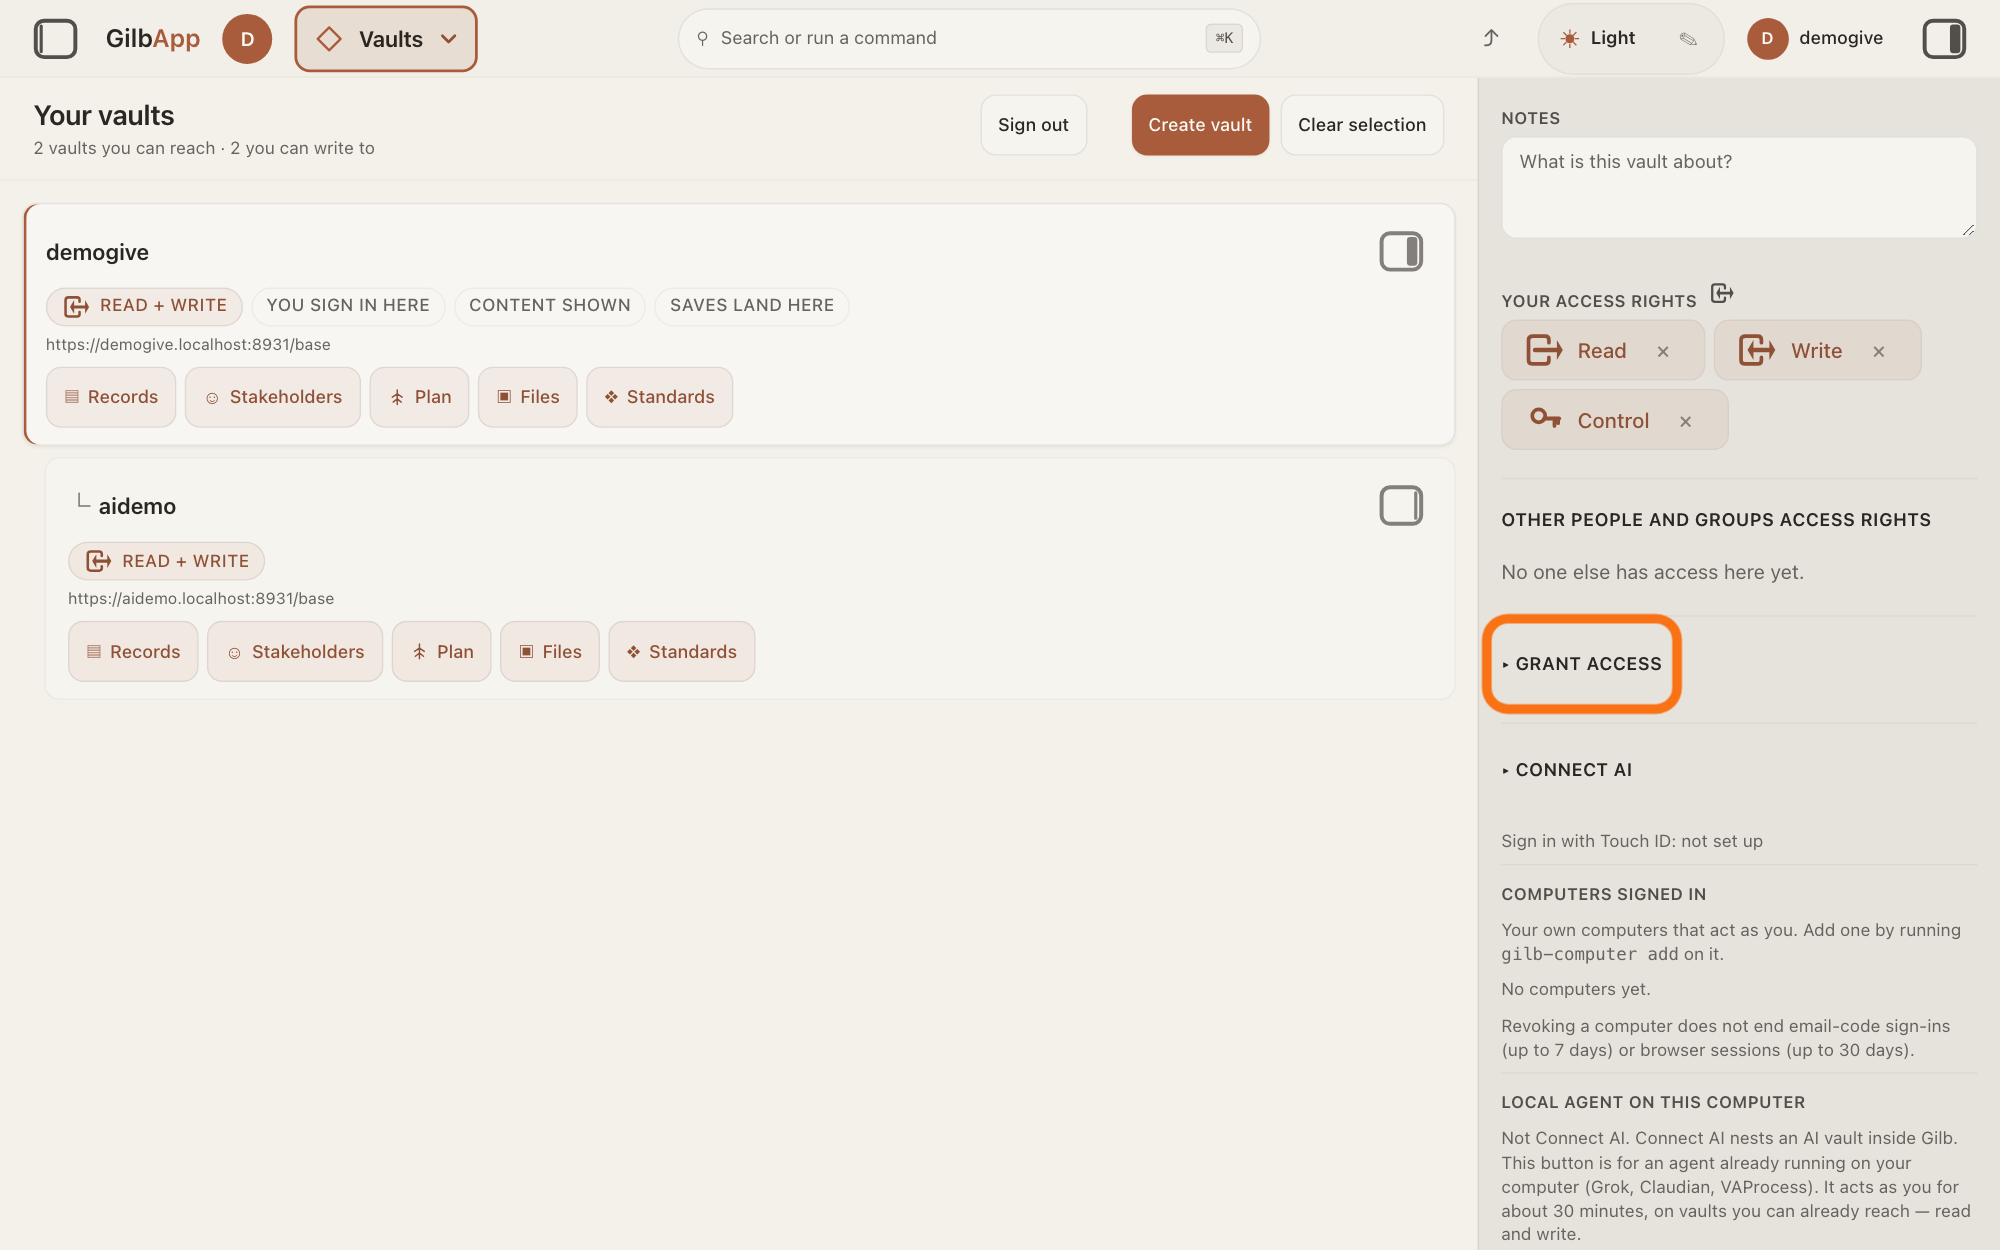
In that panel, scroll down and open ▸ GRANT ACCESS.
Below the vault's details find OTHER PEOPLE AND GROUPS ACCESS RIGHTS and open ▸ GRANT ACCESS.
Show as text
The grey pane on the right now shows the chosen vault: "NOTES", then "YOUR ACCESS RIGHTS" with "Read", "Write" and "Control", then "OTHER PEOPLE AND GROUPS ACCESS RIGHTS" with "No one else has access here yet." Just below that, the closed fold "▸ GRANT ACCESS" is outlined in orange: click it. "▸ CONNECT AI" below it is not needed here.
More about this
Only someone who holds Control on the vault sees this part. Its first part, PUBLIC with Make public, makes the vault readable by anyone; you do not need it. ▸ CONNECT AI below is where you made the AI vault; you do not need it here.
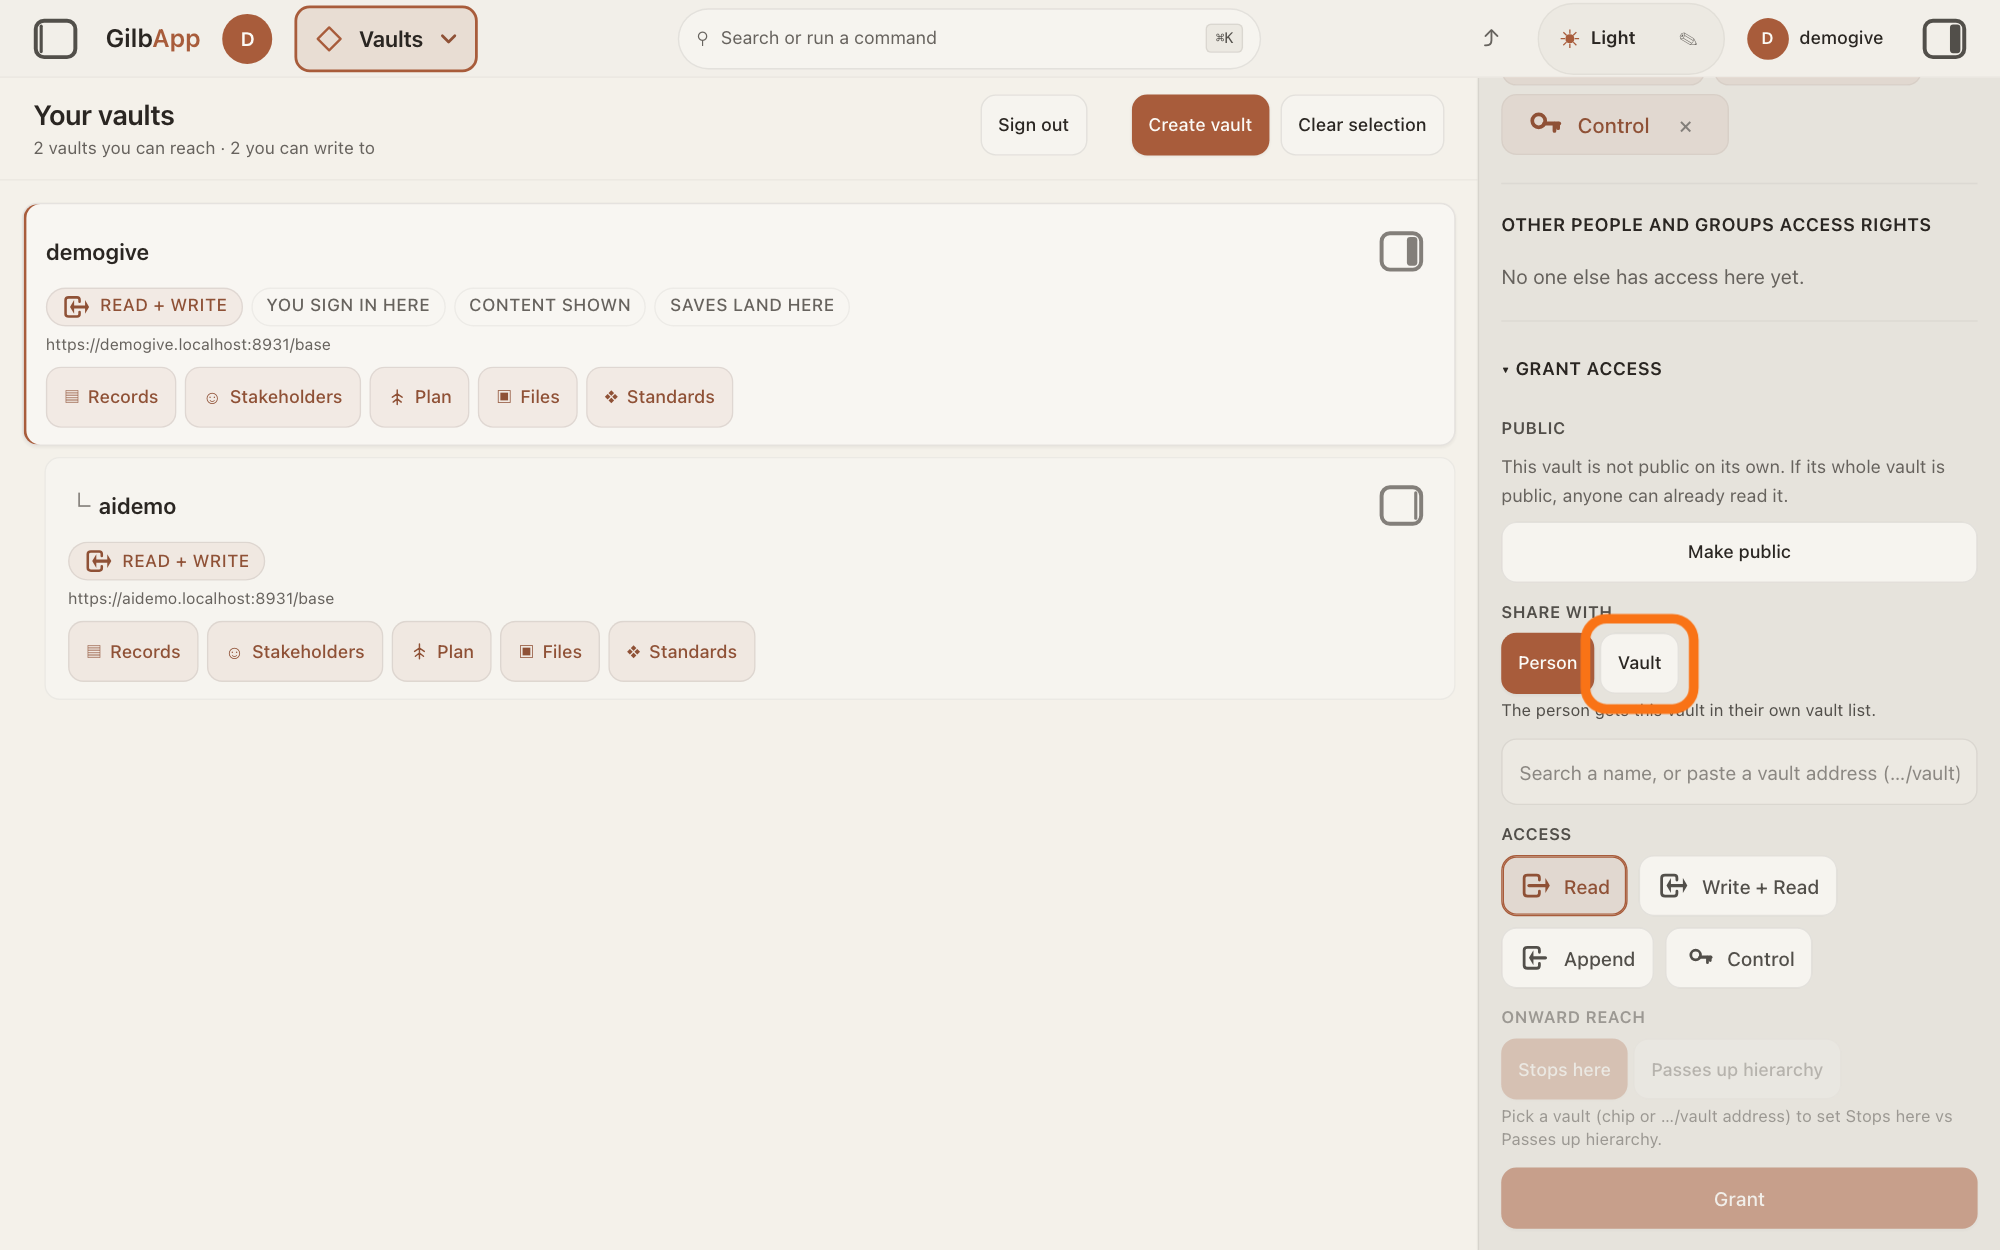
Under SHARE WITH, choose Vault.
Person is chosen when the section opens; press Vault. The line under it then says "Vault-to-vault reach. ⛔ Not a person grant — a person will get no access from this."
Show as text
In the right pane, "▾ GRANT ACCESS" is open. It starts with "PUBLIC" and "Make public", which you skip. Under "SHARE WITH" are two buttons: "Person", chosen, and "Vault". "Vault" is outlined in orange: click it. Below, with "Person" chosen, "ACCESS" offers "Read", "Write + Read", "Append" and "Control", and "Grant" is still pale.
More about this
Your AI acts as its AI vault, not as a person, so it gets access only through Vault.
Paste the AI vault's address in the search box.
Click the box that shows Search a name, or paste a vault address (…/vault) and paste the AI vault's address, ending in /vault.
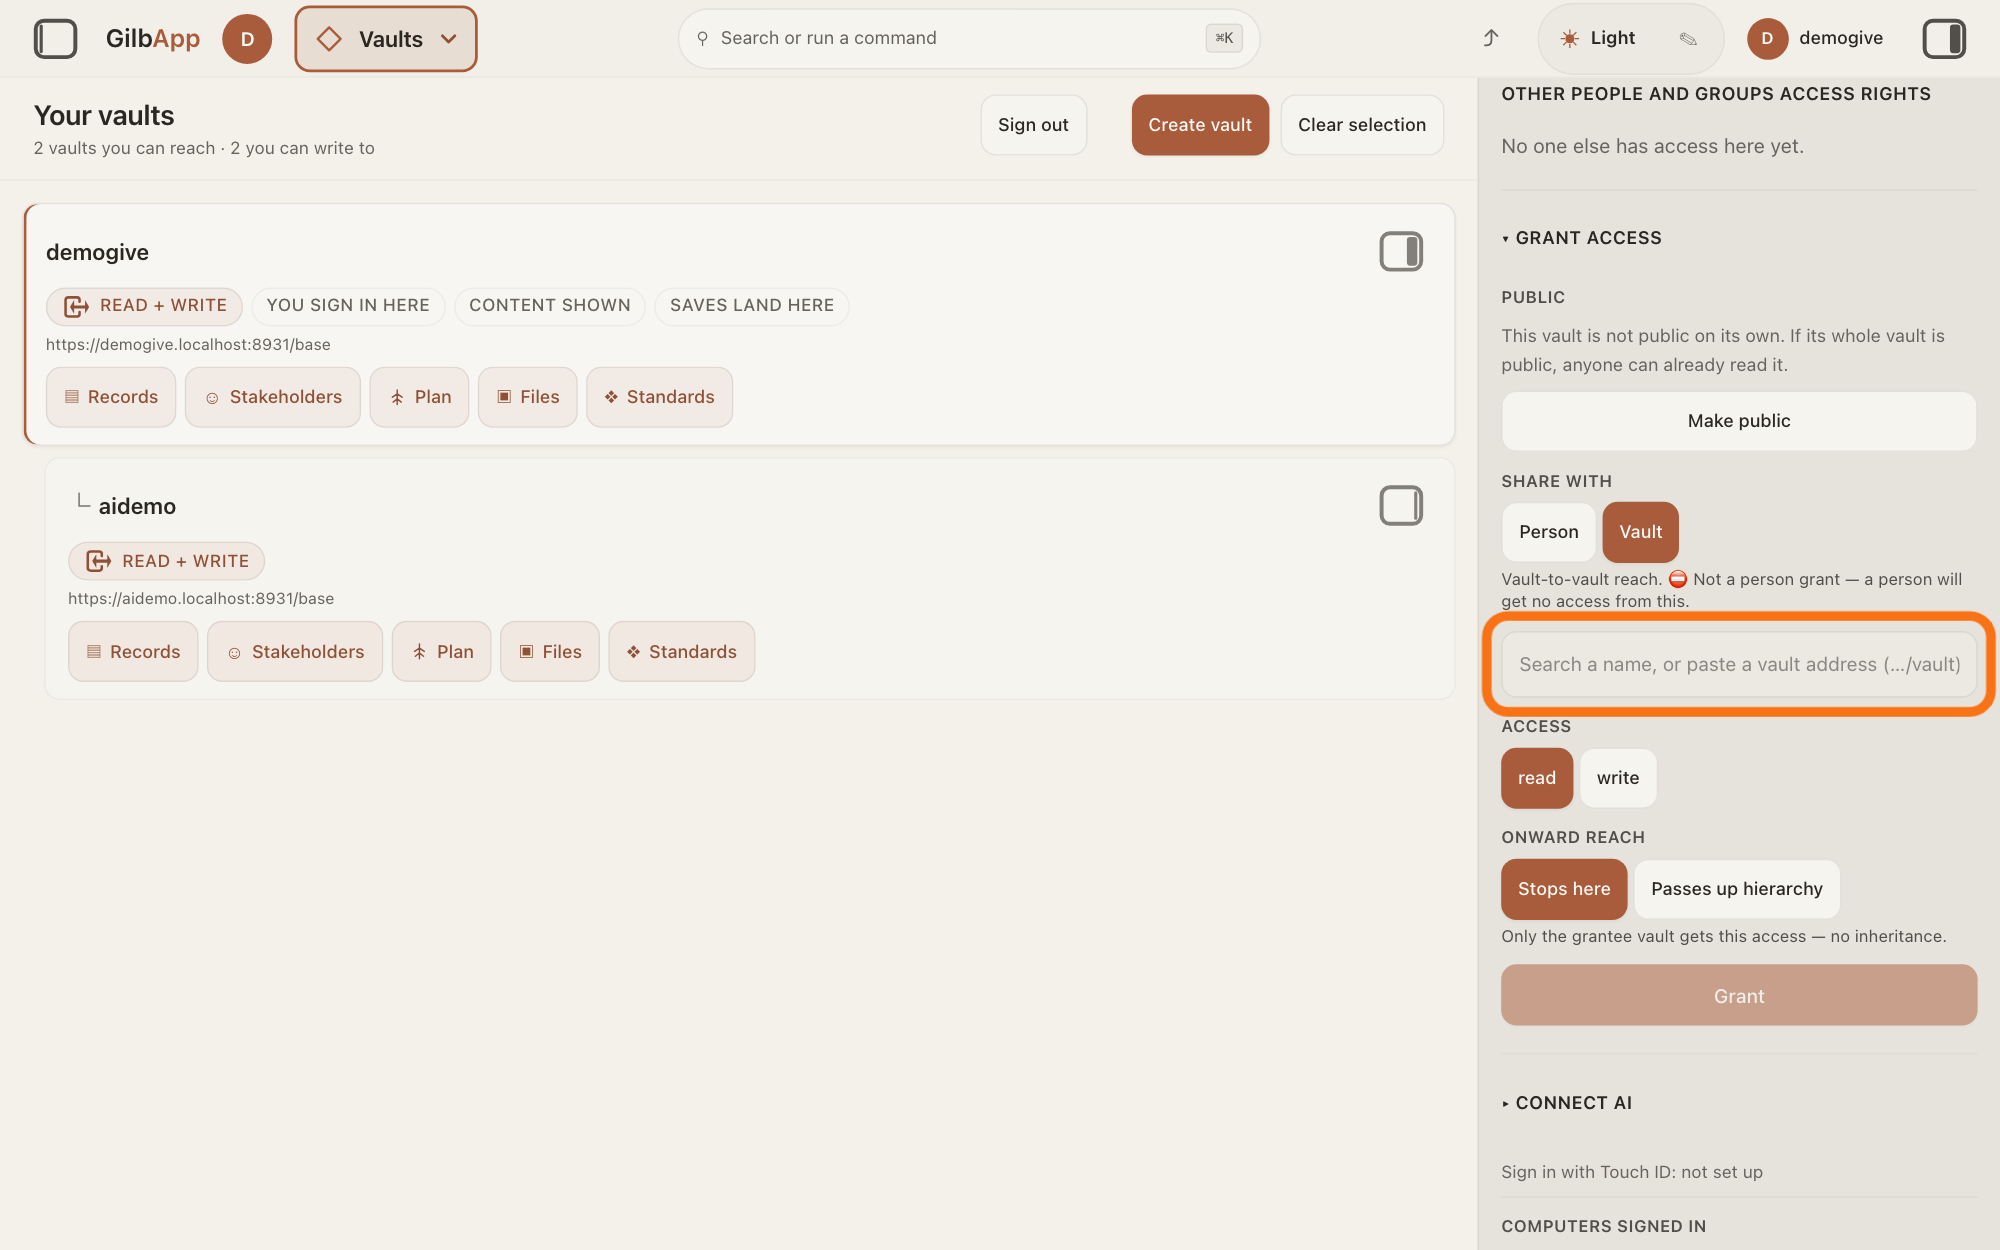
Show as text
In the right pane, "Vault" is now chosen under "SHARE WITH", with the line "Vault-to-vault reach. ⛔ Not a person grant — a person will get no access from this." Under it, the empty box "Search a name, or paste a vault address (…/vault)" is outlined in orange: click it and paste your AI vault's address. Below are "ACCESS" ("read", "write"), "ONWARD REACH" and a pale "Grant".
More about this
Typing the AI vault's name does not find it: the name search offers only people's own vaults. If the box holds something that is not a vault address, Grant answers "Vault-to-vault reach needs a vault address — a person’s vault ends in /vault, a platform vault in /base. To share with a person, switch to Person." The address of the vault you are on is refused with A vault cannot grant access to itself.
Under ACCESS, choose read.
Press read under ACCESS; it is chosen when the section opens. read lets your AI read what is in the vault.
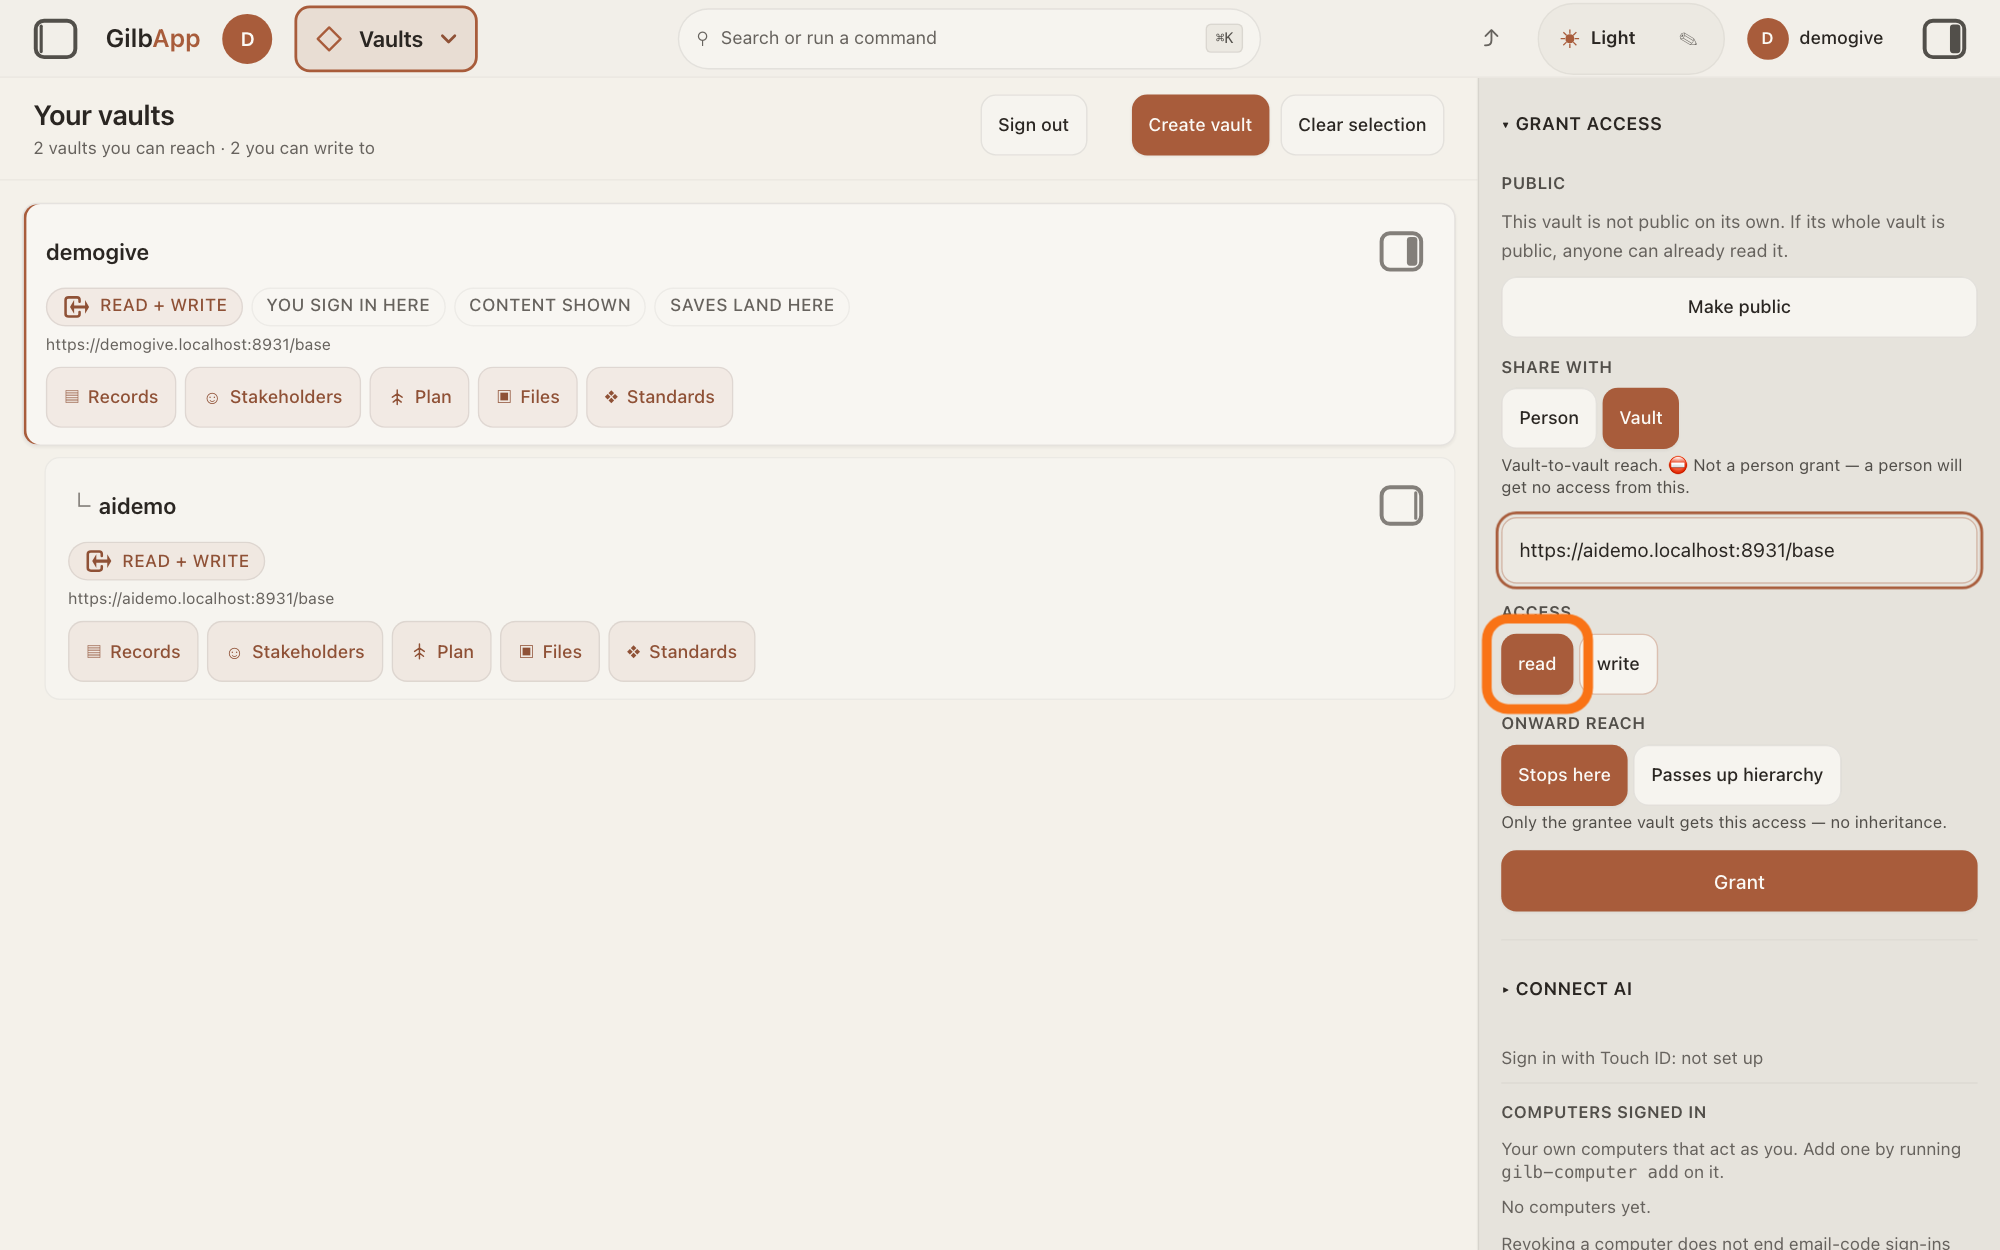
Show as text
In the right pane, the box under "SHARE WITH" now holds the pasted AI vault address. Under "ACCESS" are two buttons, "read" and "write"; "read" is dark, which means chosen, and is outlined in orange: leave it chosen or click it. "ONWARD REACH" and the "Grant" button, now dark, are below.
More about this
For a vault there are only read and write, given one at a time; Append and Control are offered only for a person. read gives no writing, so you give write too, in steps 9 and 10.
Under ONWARD REACH, choose Stops here or Passes up hierarchy.
Choose Stops here or Passes up hierarchy; Stops here is chosen when the section opens.
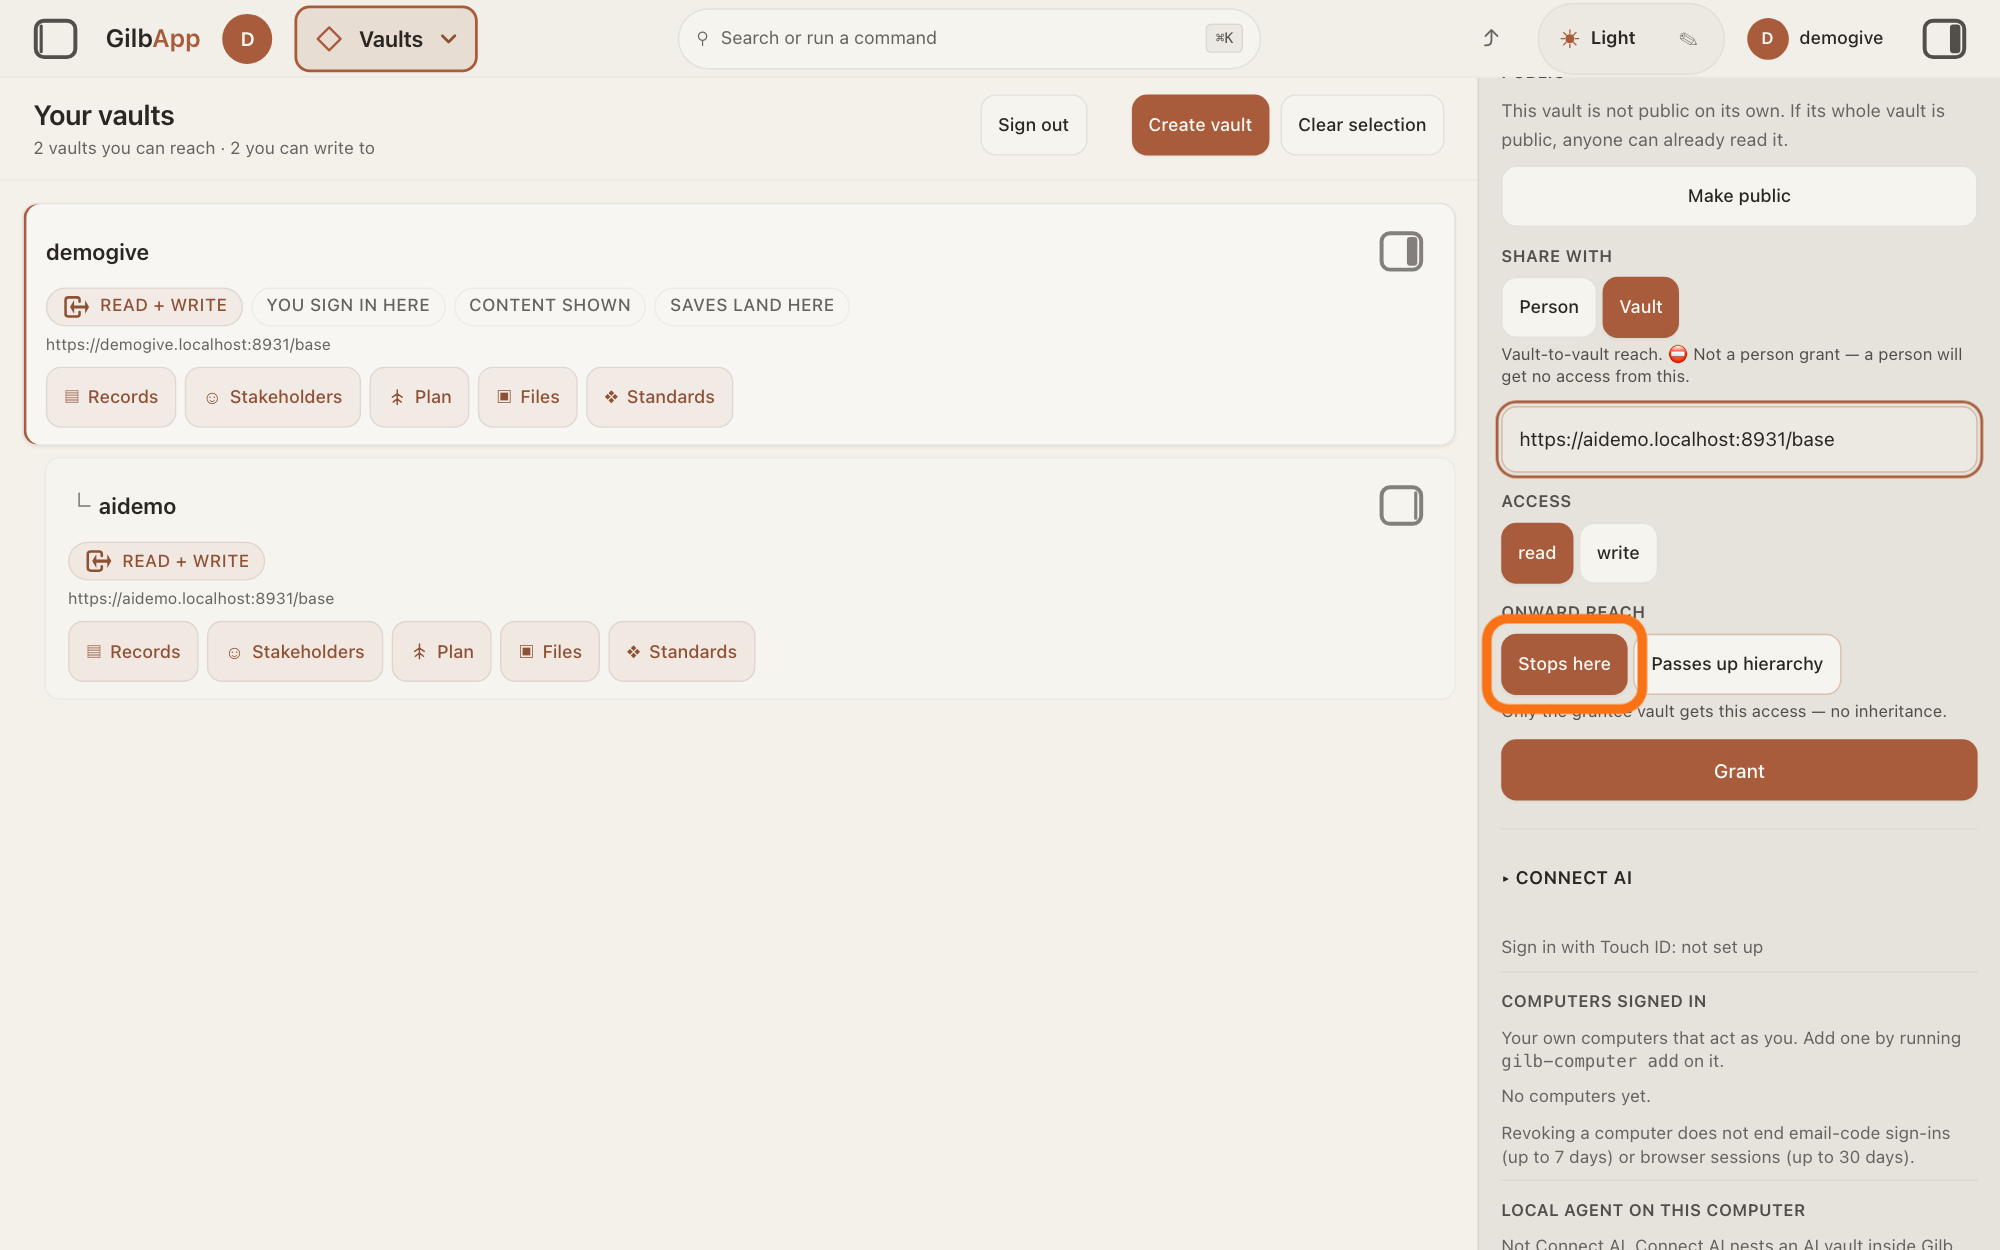
Show as text
In the right pane, below "ACCESS" ("read" chosen), "ONWARD REACH" offers "Stops here" and "Passes up hierarchy". "Stops here" is chosen and outlined in orange; the line under it reads "Only the grantee vault gets this access — no inheritance." Keep "Stops here", or click "Passes up hierarchy" if you want that. "Grant" is just below.
More about this
With Stops here, your AI reaches this vault and no further. With Passes up hierarchy, it also reaches the vaults this vault has itself been given access to, with either choice, and goes on from those only where they were given access with Passes up hierarchy. Neither choice lets anyone into your AI vault: no one can be given reading or writing in it.
Press Grant.
Press Grant. The screen says Vault granted · read · stops here, or passes onward at the end, and the list above the form shows the AI vault's address with vault · read · stops here or vault · read · passes onward.
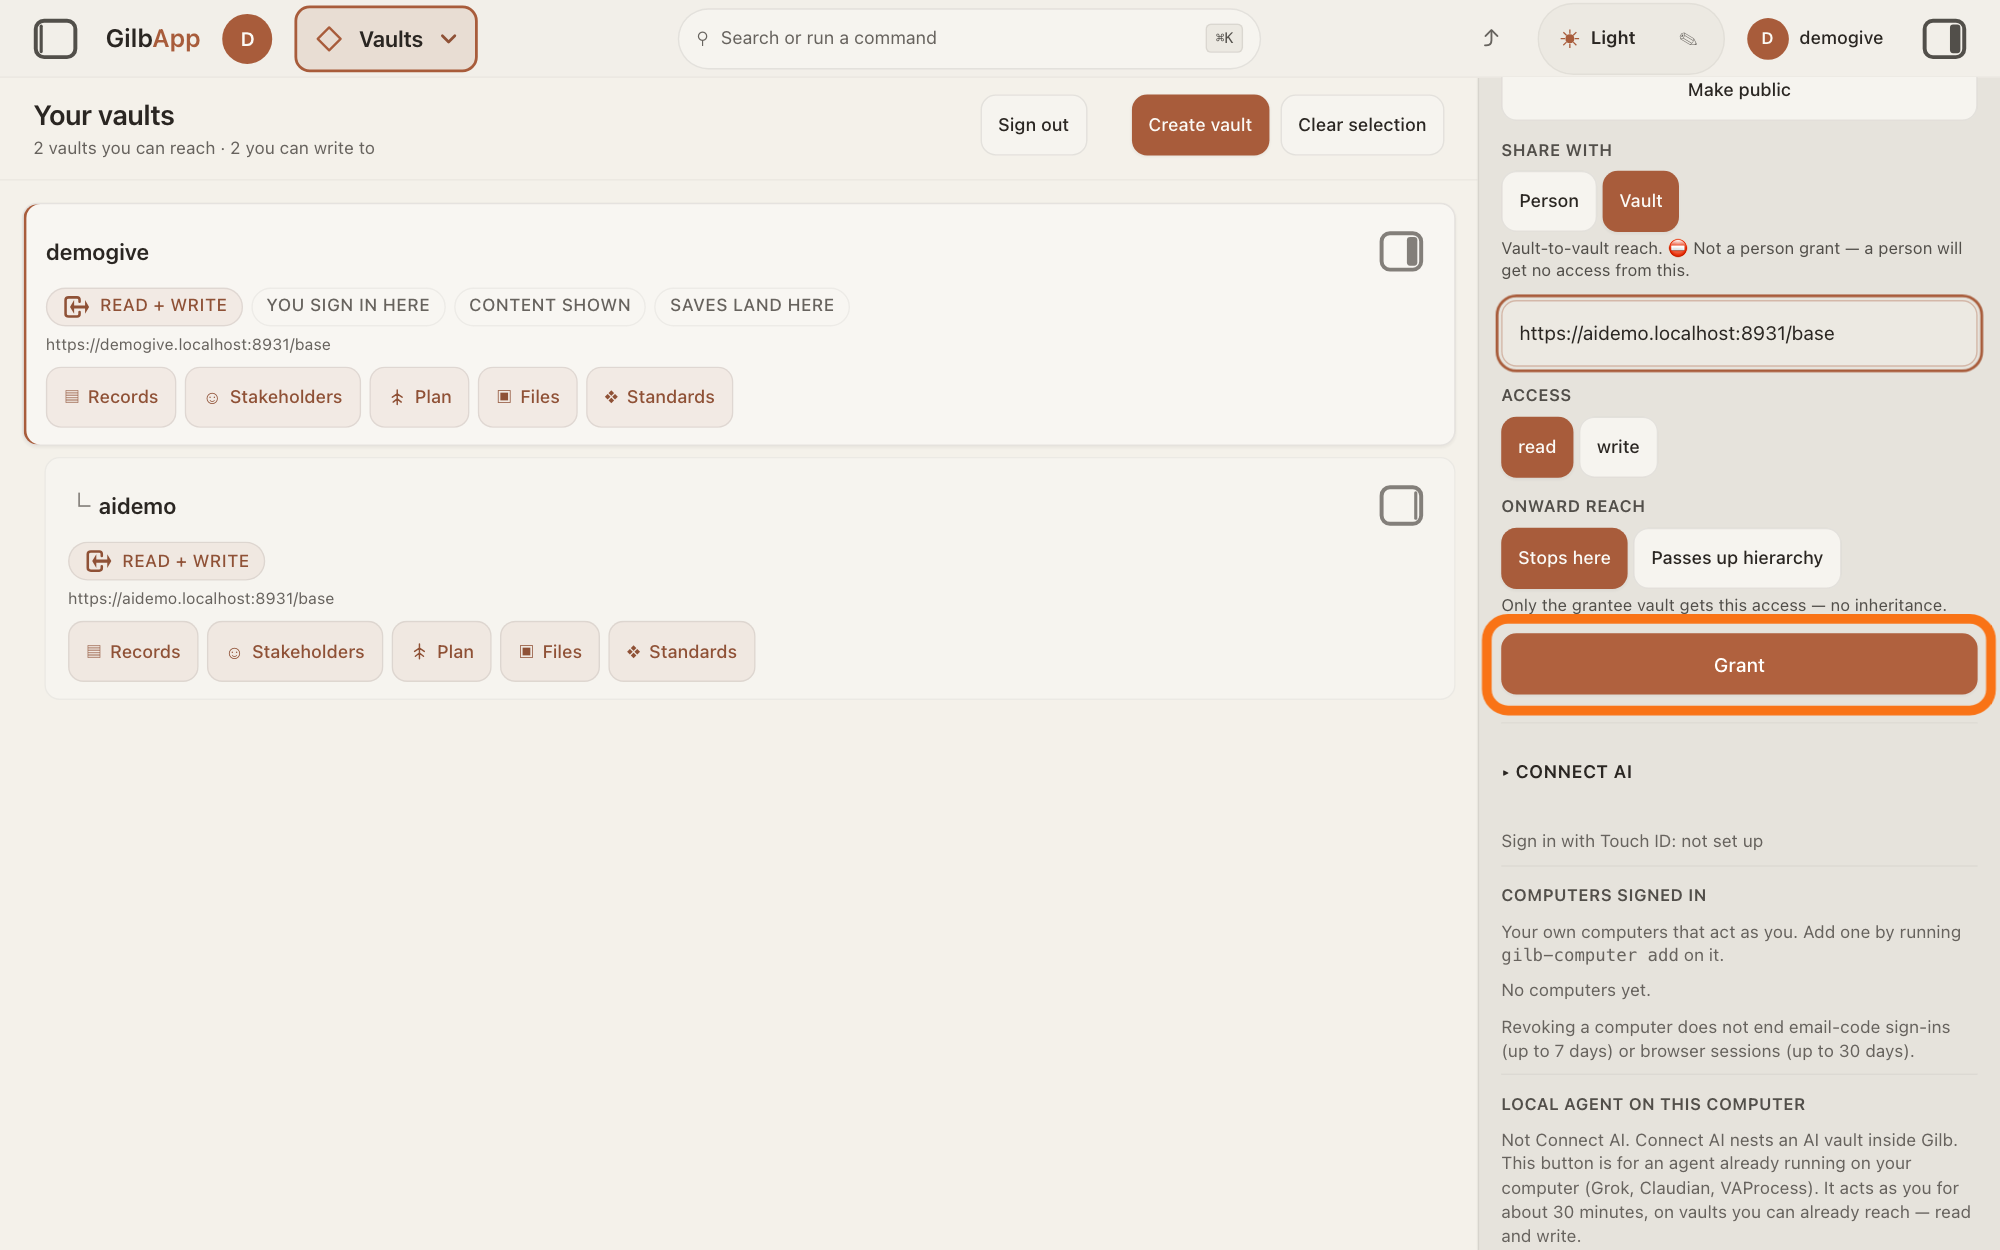
Show as text
In the right pane, the AI vault address is in the box, "Vault", "read" and "Stops here" are chosen (dark), and the line "Only the grantee vault gets this access — no inheritance." sits above the wide button "Grant". "Grant" is outlined in orange: click it. "▸ CONNECT AI" below is not needed.
More about this
The button stays grey while the box is empty and reads Granting… while it works. The box is empty again afterwards.
Paste the AI vault's address in the search box again.
Paste the AI vault's address in the box that shows Search a name, or paste a vault address (…/vault) again.
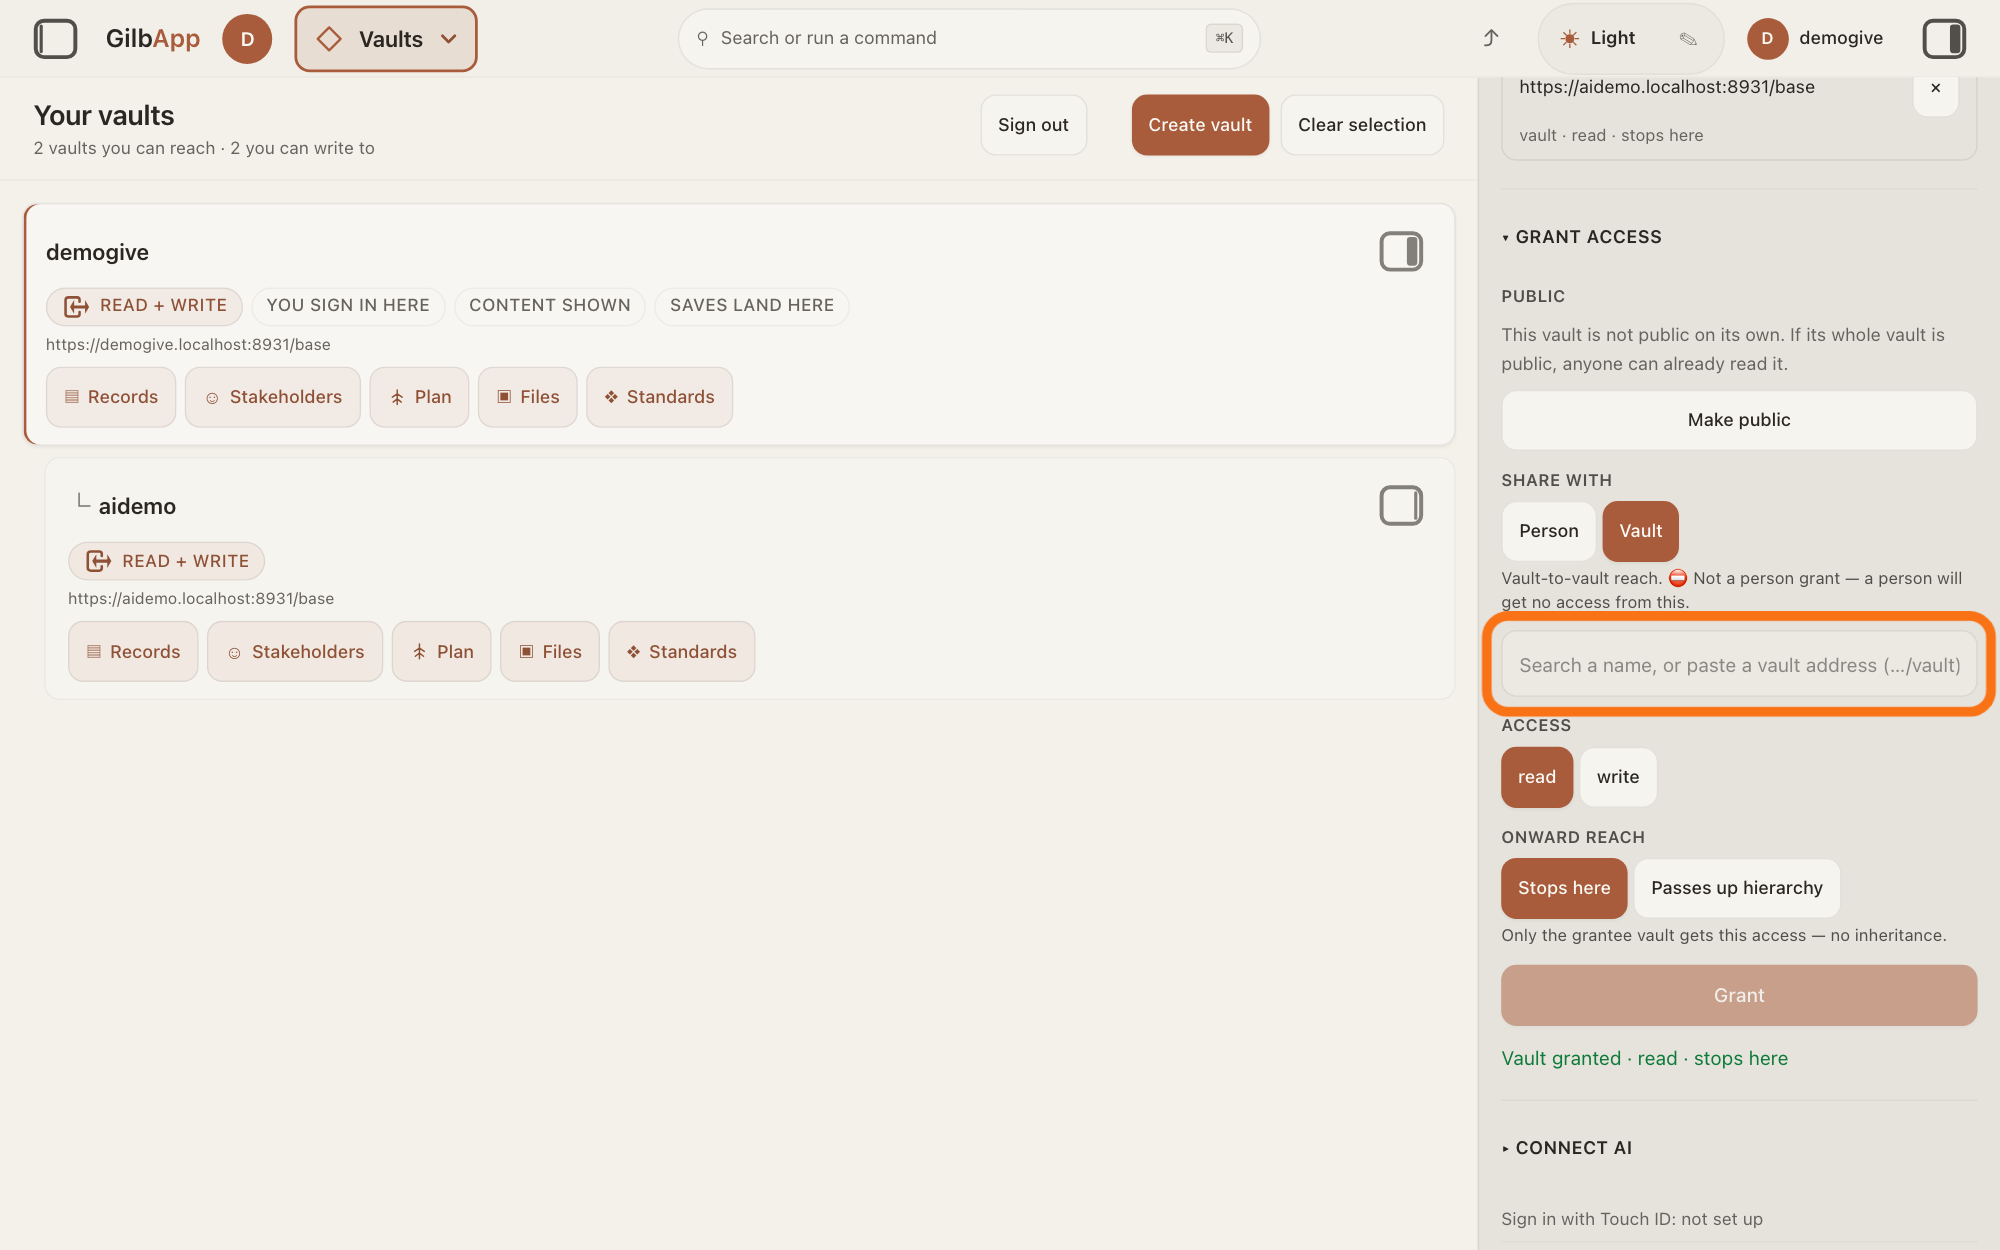
Show as text
In the right pane, the access list at the top now shows a line for your AI vault's address with "vault · read · stops here" and a small "×" at its right. Below the button "Grant" the green line reads "Vault granted · read · stops here". The address box under "SHARE WITH" is empty again: the box "Search a name, or paste a vault address (…/vault)" is outlined in orange. Click it and paste the AI vault's address again.
More about this
Vault and your ONWARD REACH choice stay as they were.
Under ACCESS, choose write and press Grant.
Press write under ACCESS, then press Grant. The screen says Vault granted · write and the onward reach, and the list shows a second line for the AI vault with write.
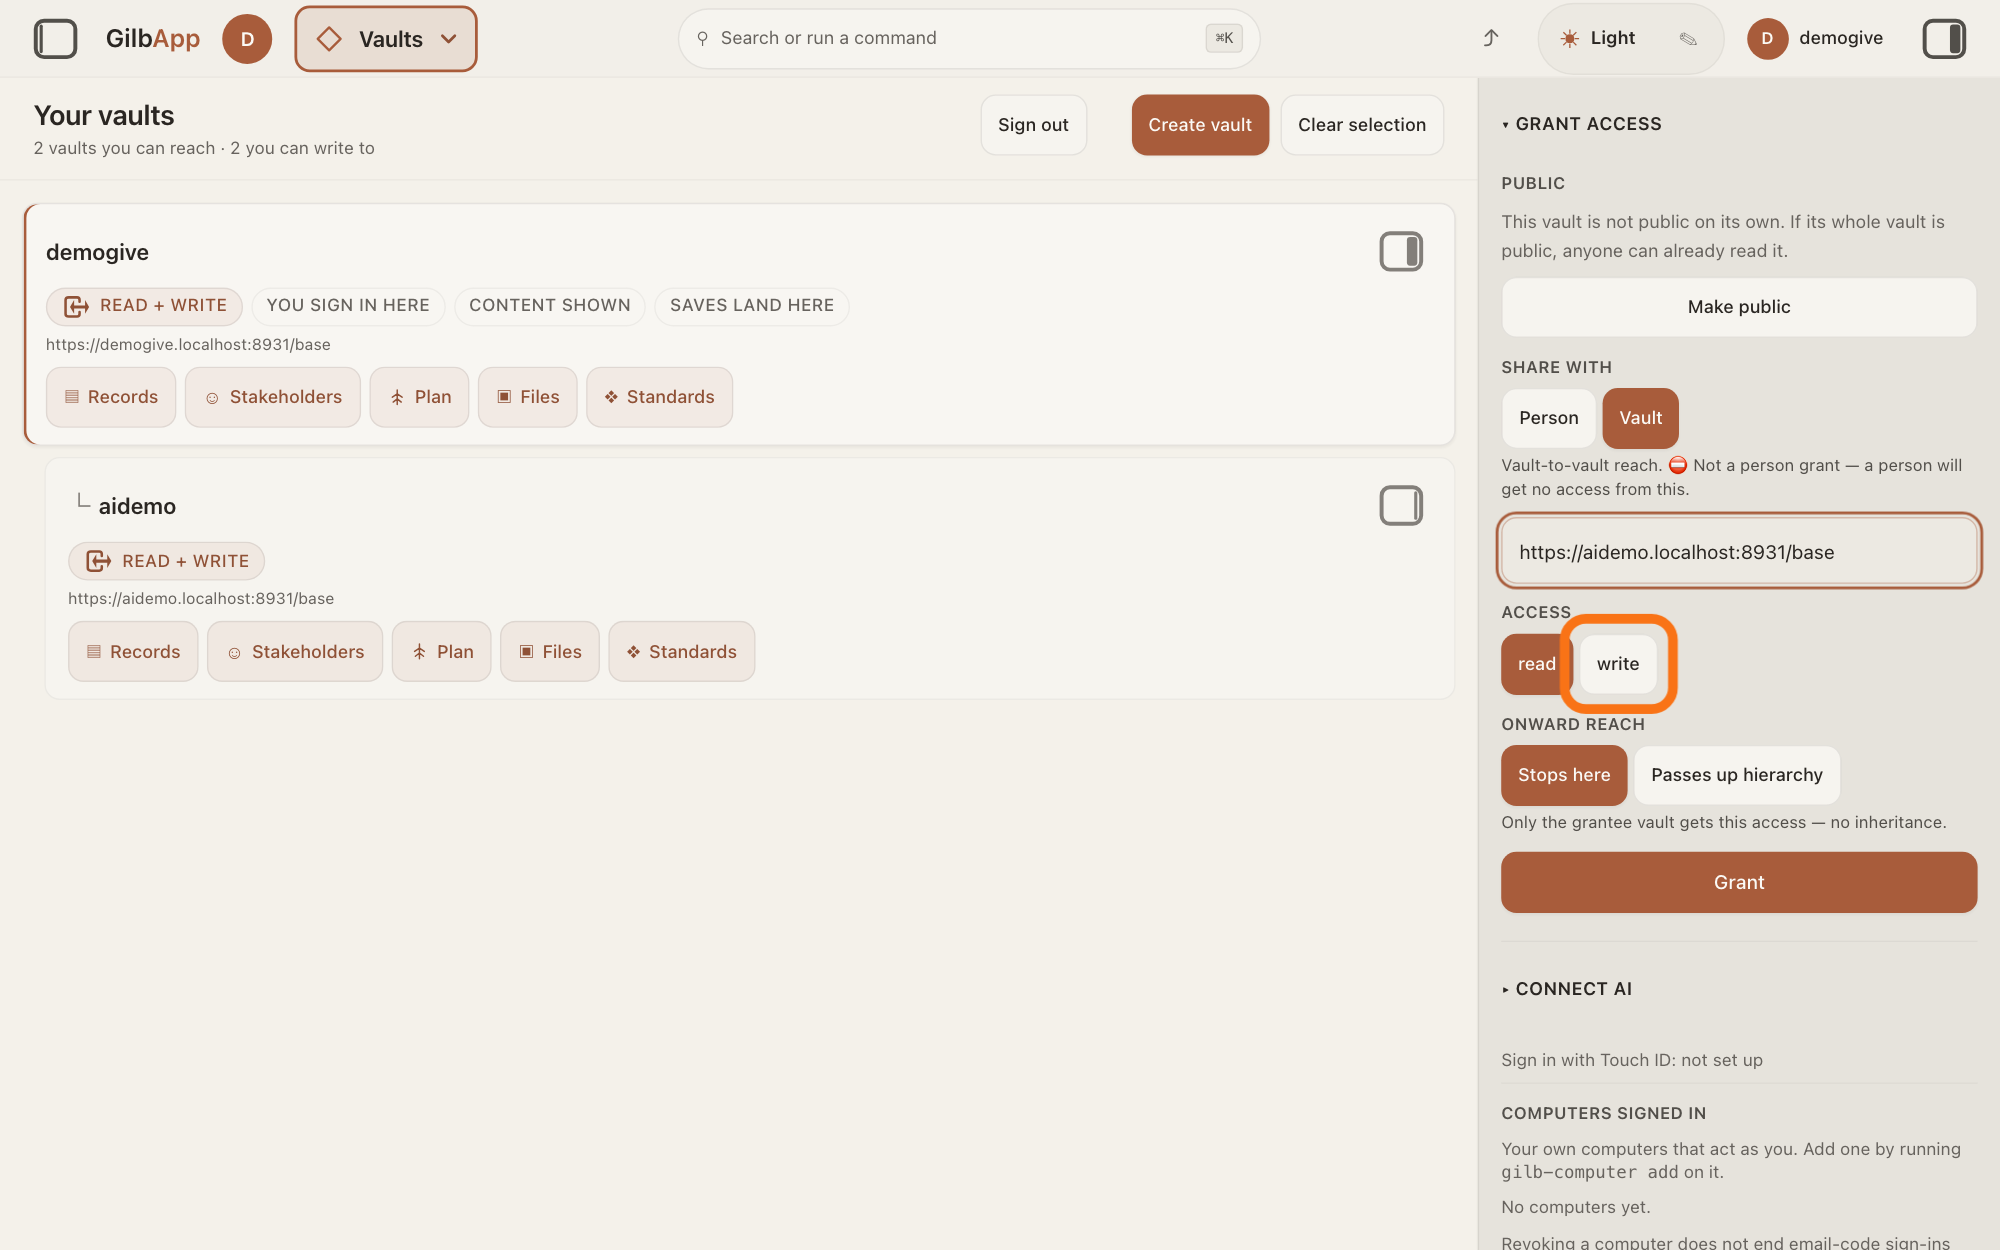
Show as text
In the right pane, the box under "SHARE WITH" holds the AI vault address again. Under "ACCESS", "read" is still dark, chosen, and "write" beside it is outlined in orange: click "write". Then press the wide button "Grant" further down, under "ONWARD REACH", where "Stops here" is still chosen.
More about this
Your AI can now read and write in this vault. It sees the access on its next call; you do not need to restart Claude Code. The answer on checking that your AI can reach your vault tells you how to test it.
Deeper
Also asked:
Should my AI get read or write access? read alone where it should only look; read and write where it should also make or change records. write alone does not let it read what is there.
Can I let an agent only read, never write? In Claude Code or Codex, yes: an agent there acts as your AI vault, so give that AI vault only read on the vault. In GilbApp's chat an agent works as you, with your own access, so a grant here cannot limit it.
What does Onward reach mean? Whether the vault you give access to reaches only your vault (Stops here), or also the vaults your vault was given access to (Passes up hierarchy).
Your AI reaches its own AI vault, any vault it makes there, and the vaults you give its AI vault access to; with no grant it reaches none of your vaults. Give access on each vault it should work in, the same way.
Which to give: read alone where your AI should only look, such as a vault it reads to answer your questions; read gives no writing, so it cannot add, change or end anything there. read and write where it should also make or change records, such as the vault of a project it plans or builds with you; the steps above give both. write does not include read: with write alone your AI could write in the vault but not read what is there. Give your AI vault access only on the vaults it should work in.
The agent you chat with in GilbApp is not your AI vault: it works as you, with your own access, so it needs no grant here.
To take the access away, press × at the right of the AI vault's line in the list; that has its own answer. Your AI loses the vault from its next request.
Step 6 in ▸ CONNECT AI says to find your AI's vault by the name you gave it. The name search does not find it: paste its address, as above.
This answer is written for a computer screen.
Checked against GilbApp d529620.