
← Back to How do I connect my computer to my vault?
How do I make an AI vault and connect Claude Code to it?
Short answer
In ▸ CONNECT AI, type a name in AI vault name, press Mint AI vault, paste the Client ID, and press Bind AI.
Before you start
The Client ID from the answer on connecting your computer, and a vault of your own that no one else can read or write, and no vault above it either, such as the one you made at sign-up. The pictures show a made-up person on a test site; your screen shows your own name and address.
Words used here (4)
- AI vault
- An AI vault is a small vault that stands for your AI; your AI reaches only the vaults you grant it.
- Client ID
- A Client ID is your AI's fixed name on GilbPlatform; find it by pasting GilbApp's line in a new Terminal window, then bind the AI.
- short name
- A short name is the one word you give one AI on one computer, such as gilb-example; it keeps that AI's key and tools apart.
- GilbPlatform
- GilbPlatform is the service that keeps people's and organisations' data in vaults, each at its own web address.
Steps
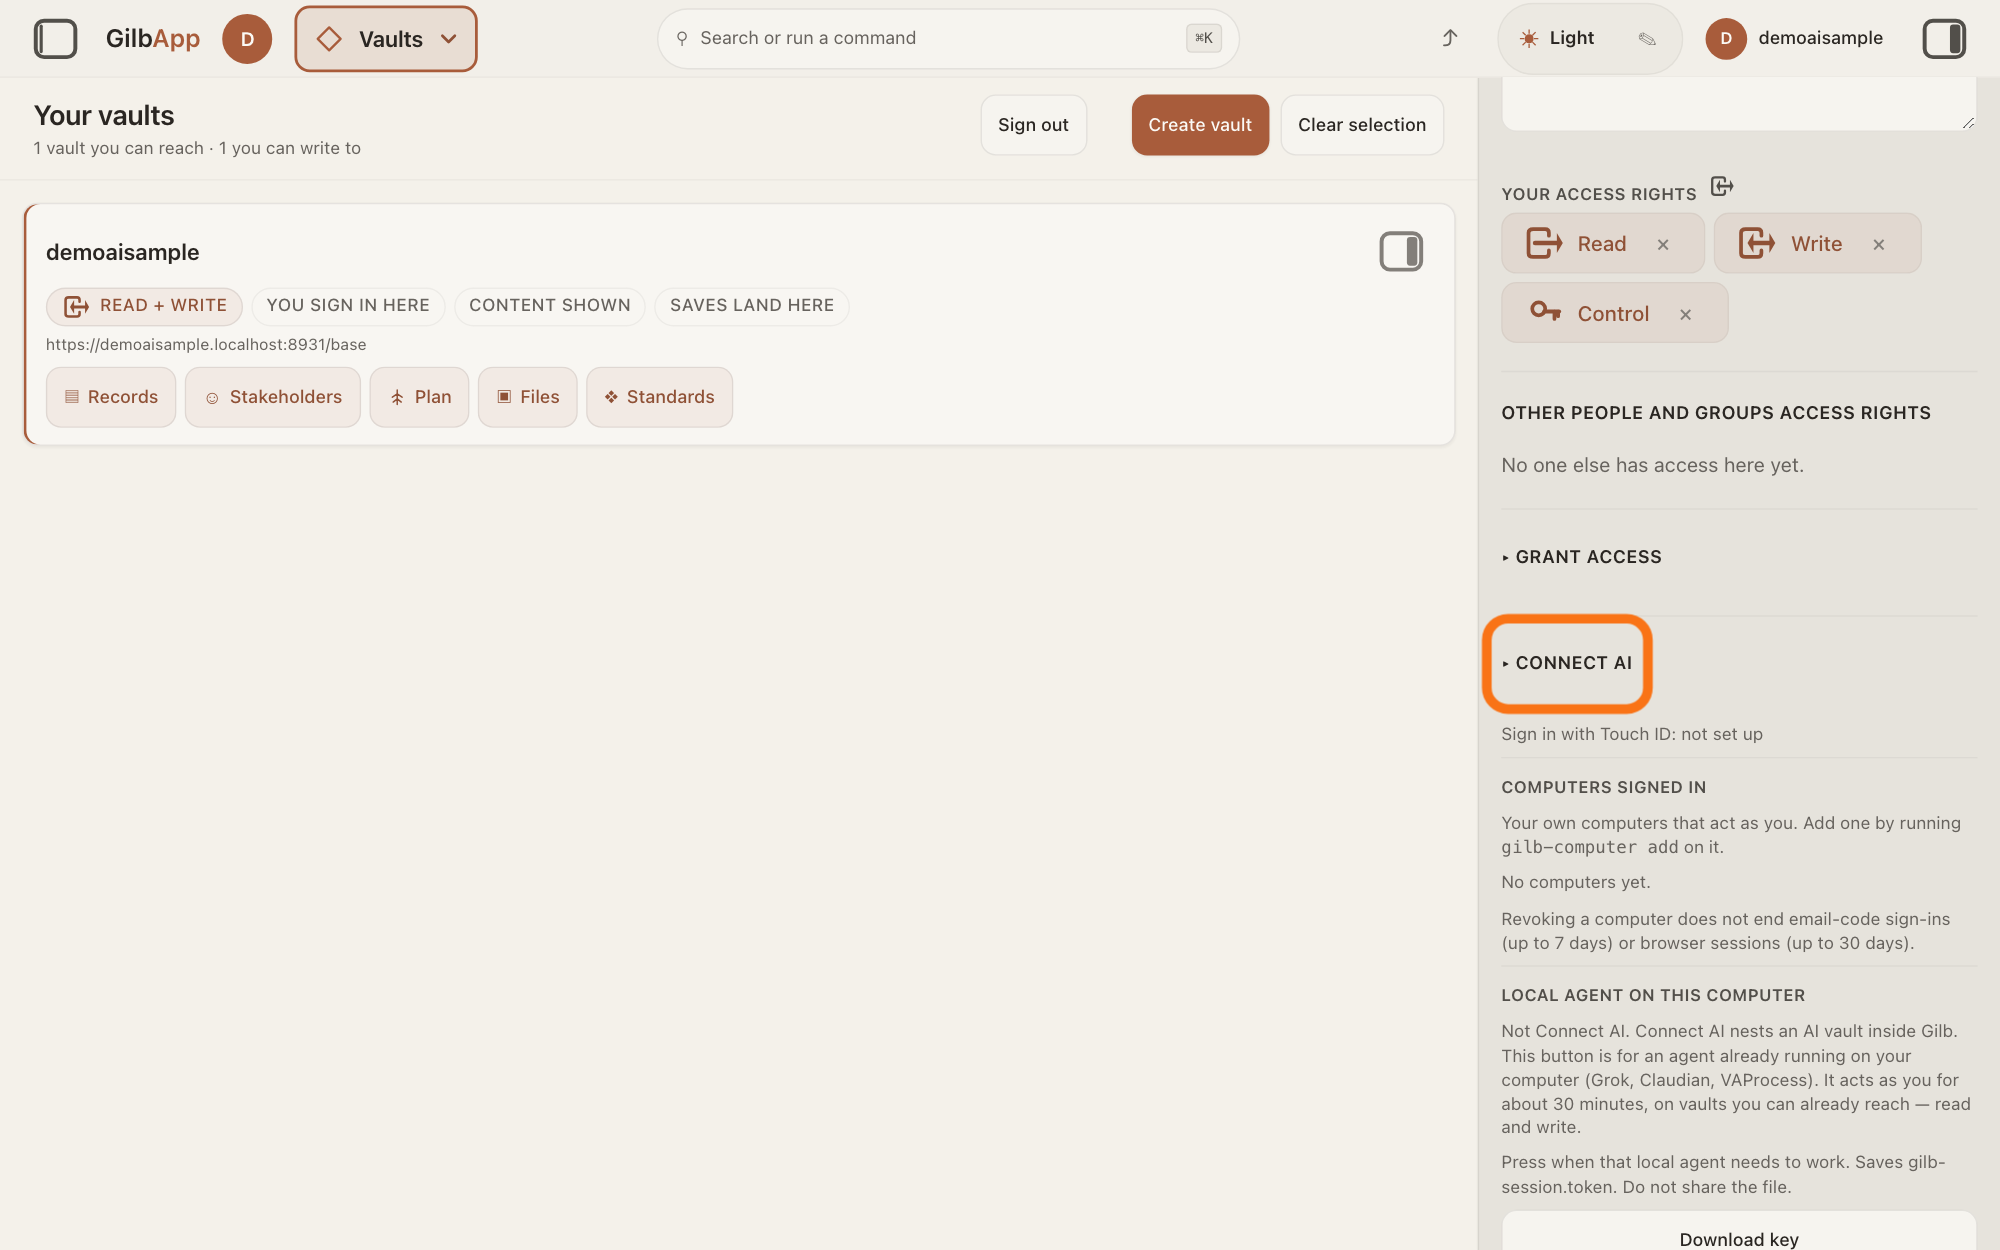
Open ▸ CONNECT AI on your vault.
If it is still open from connecting your computer, go on. Otherwise do steps 1 to 3 of the answer on connecting your computer.
Show as text
The grey pane on the right shows your vault's details, scrolled down past "YOUR ACCESS RIGHTS", "OTHER PEOPLE AND GROUPS ACCESS RIGHTS" ("No one else has access here yet.") and the closed fold "▸ GRANT ACCESS". The closed fold "▸ CONNECT AI" just below is outlined in orange: click it to open it. If it is already open from connecting your computer, skip this.
More about this
The AI vault is made inside this vault, so use a vault that no one else can read or write, and no vault above it. Under the tabs macOS, Linux and Windows, Claude Code must be chosen; on a Mac it is chosen for you. For Codex, see the answer on making an AI vault and connecting Codex to it. Steps 1 to 3 at the top of ▸ CONNECT AI are the computer part, done already; you do not need the short name here. Steps 6 to 8 come after this answer.
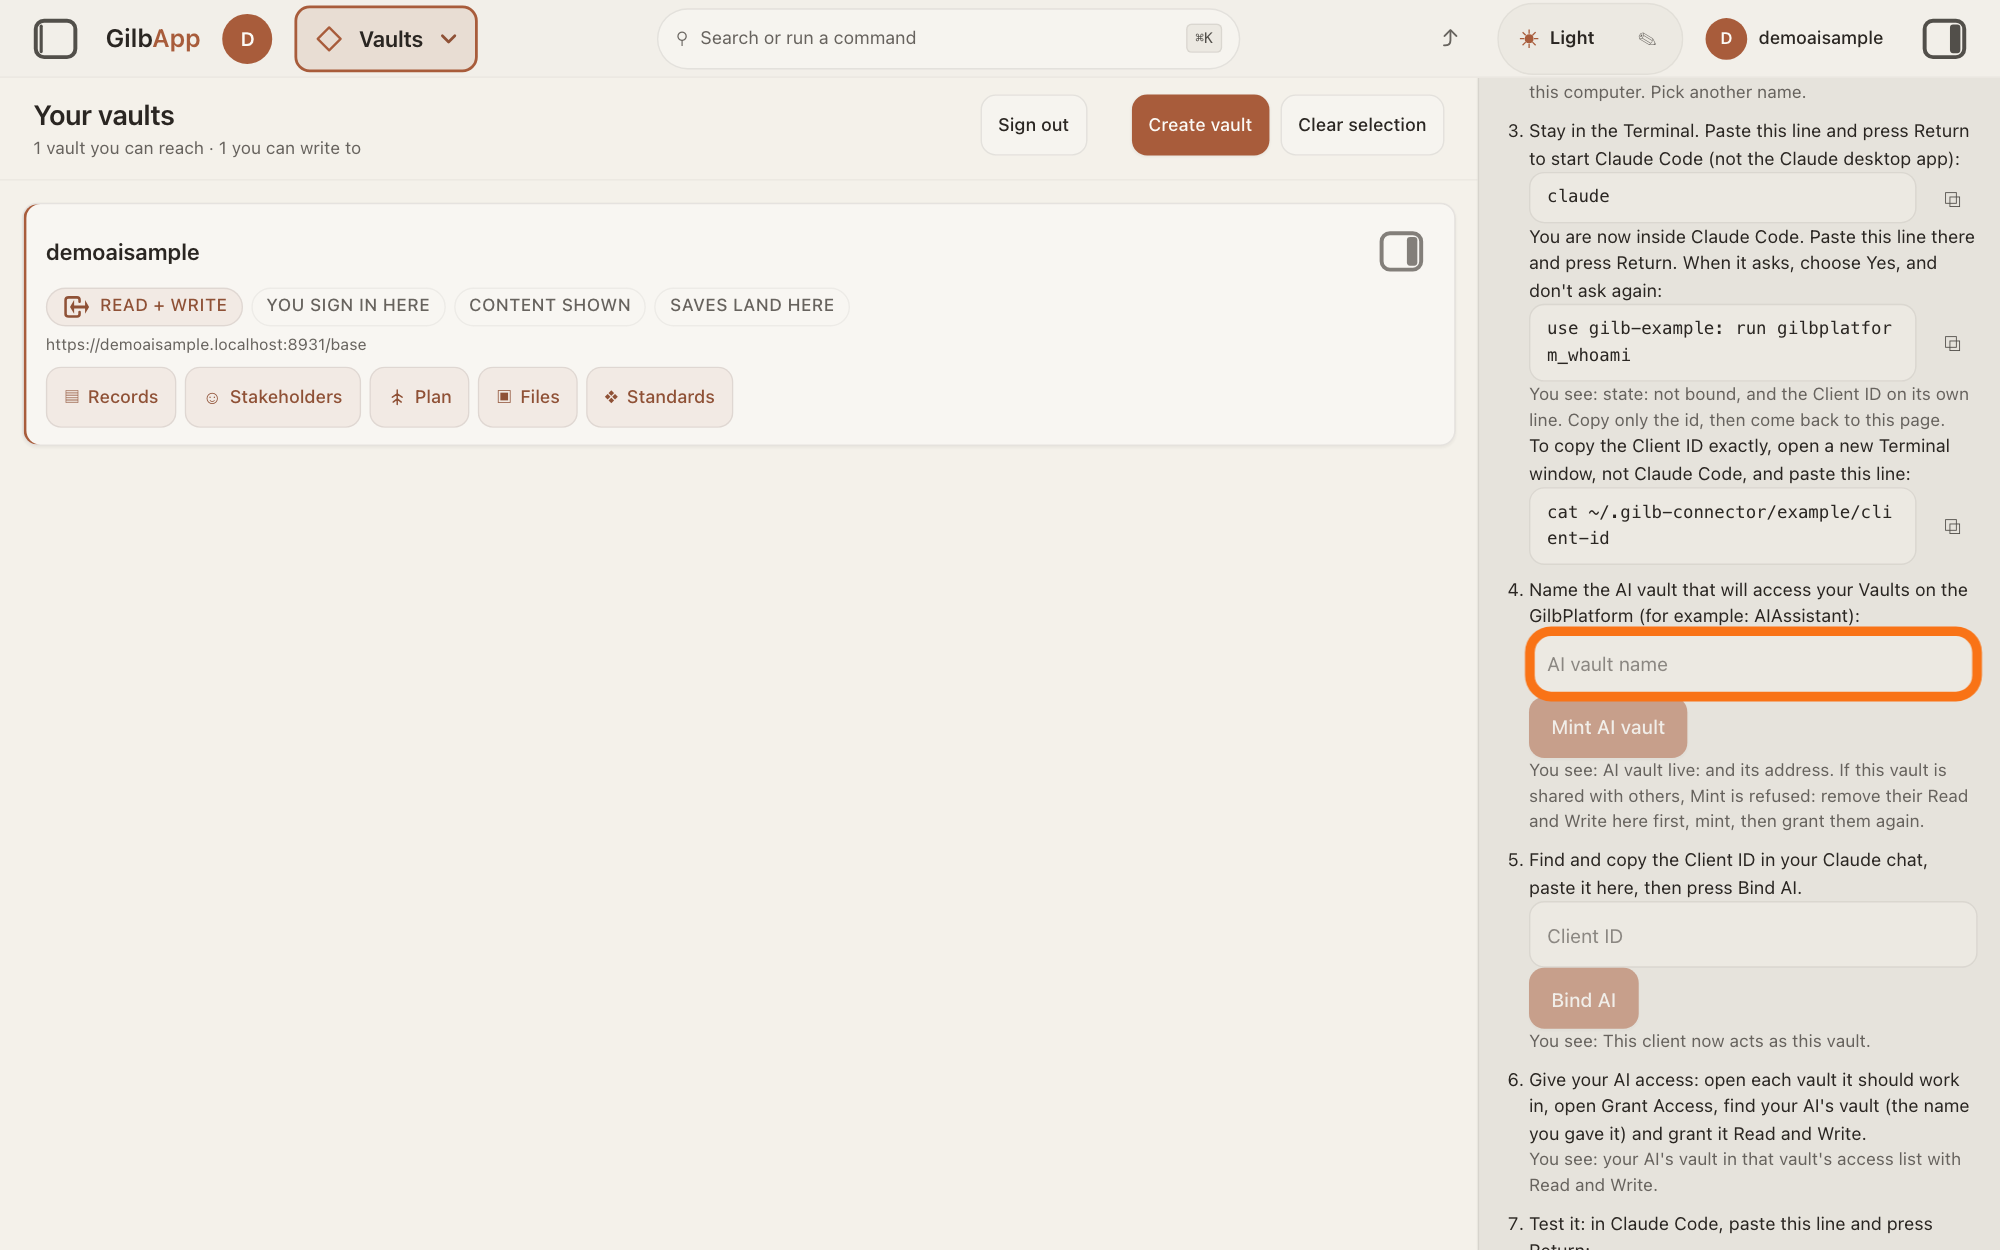
Type a name in the box AI vault name.
Under step 4, "Name the AI vault that will access your Vaults on the GilbPlatform (for example: AIAssistant):", click the box that shows AI vault name and type a name for your AI's vault.
Show as text
In the right pane, scroll down inside "CONNECT AI" past steps 1 to 3 (the Terminal lines) to step 4: "Name the AI vault that will access your Vaults on the GilbPlatform …". Under it, the empty box "AI vault name" is outlined in orange: click it and type a name. The button "Mint AI vault" below it is still pale and cannot be pressed yet.
More about this
The name becomes the AI vault's address, as for any vault you make. Return does not press the button here; use the button.
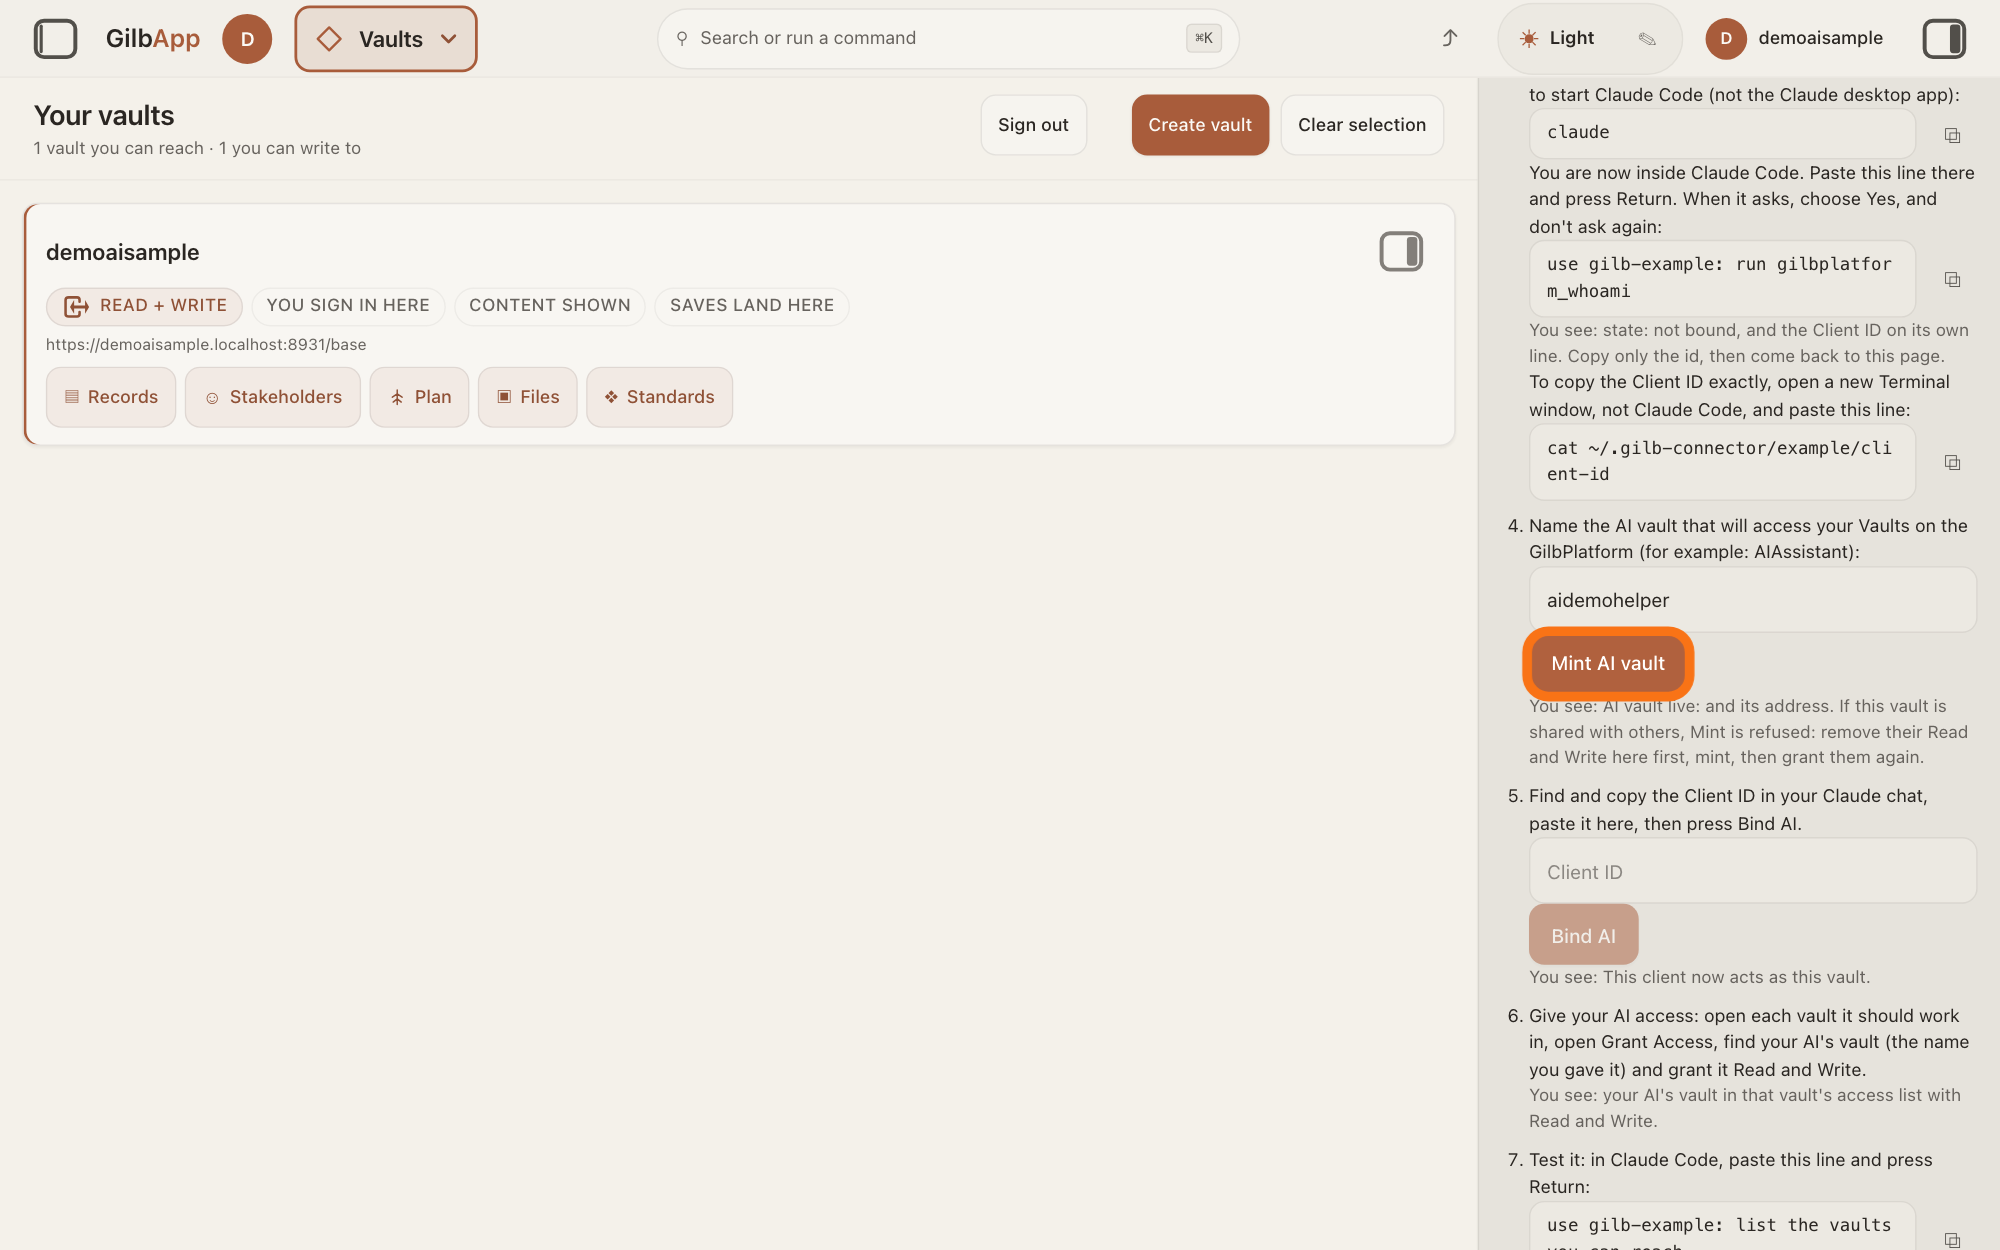
Press Mint AI vault.
Press Mint AI vault. The screen says AI vault live: and the AI vault's address, ending in /vault; keep that address for giving the AI access.
Show as text
In the right pane, under step 4, the box "AI vault name" now holds the name you typed. The button just below it, "Mint AI vault", is now dark and is outlined in orange: click it. The grey text under it says what follows: "You see: AI vault live: and its address." and that Mint is refused if this vault is shared with others.
More about this
The button is dimmed and cannot be pressed while the box is empty, and reads Minting… while it works. If someone else can read or write this vault, or a vault above it, the mint is refused: "This vault is shared, so its readers would also see an AI vault inside it. Remove the others' Read and Write on this vault, mint the AI vault, then grant them again. Access you grant after the mint does not reach the AI vault." Do as it says, taking their access away first.
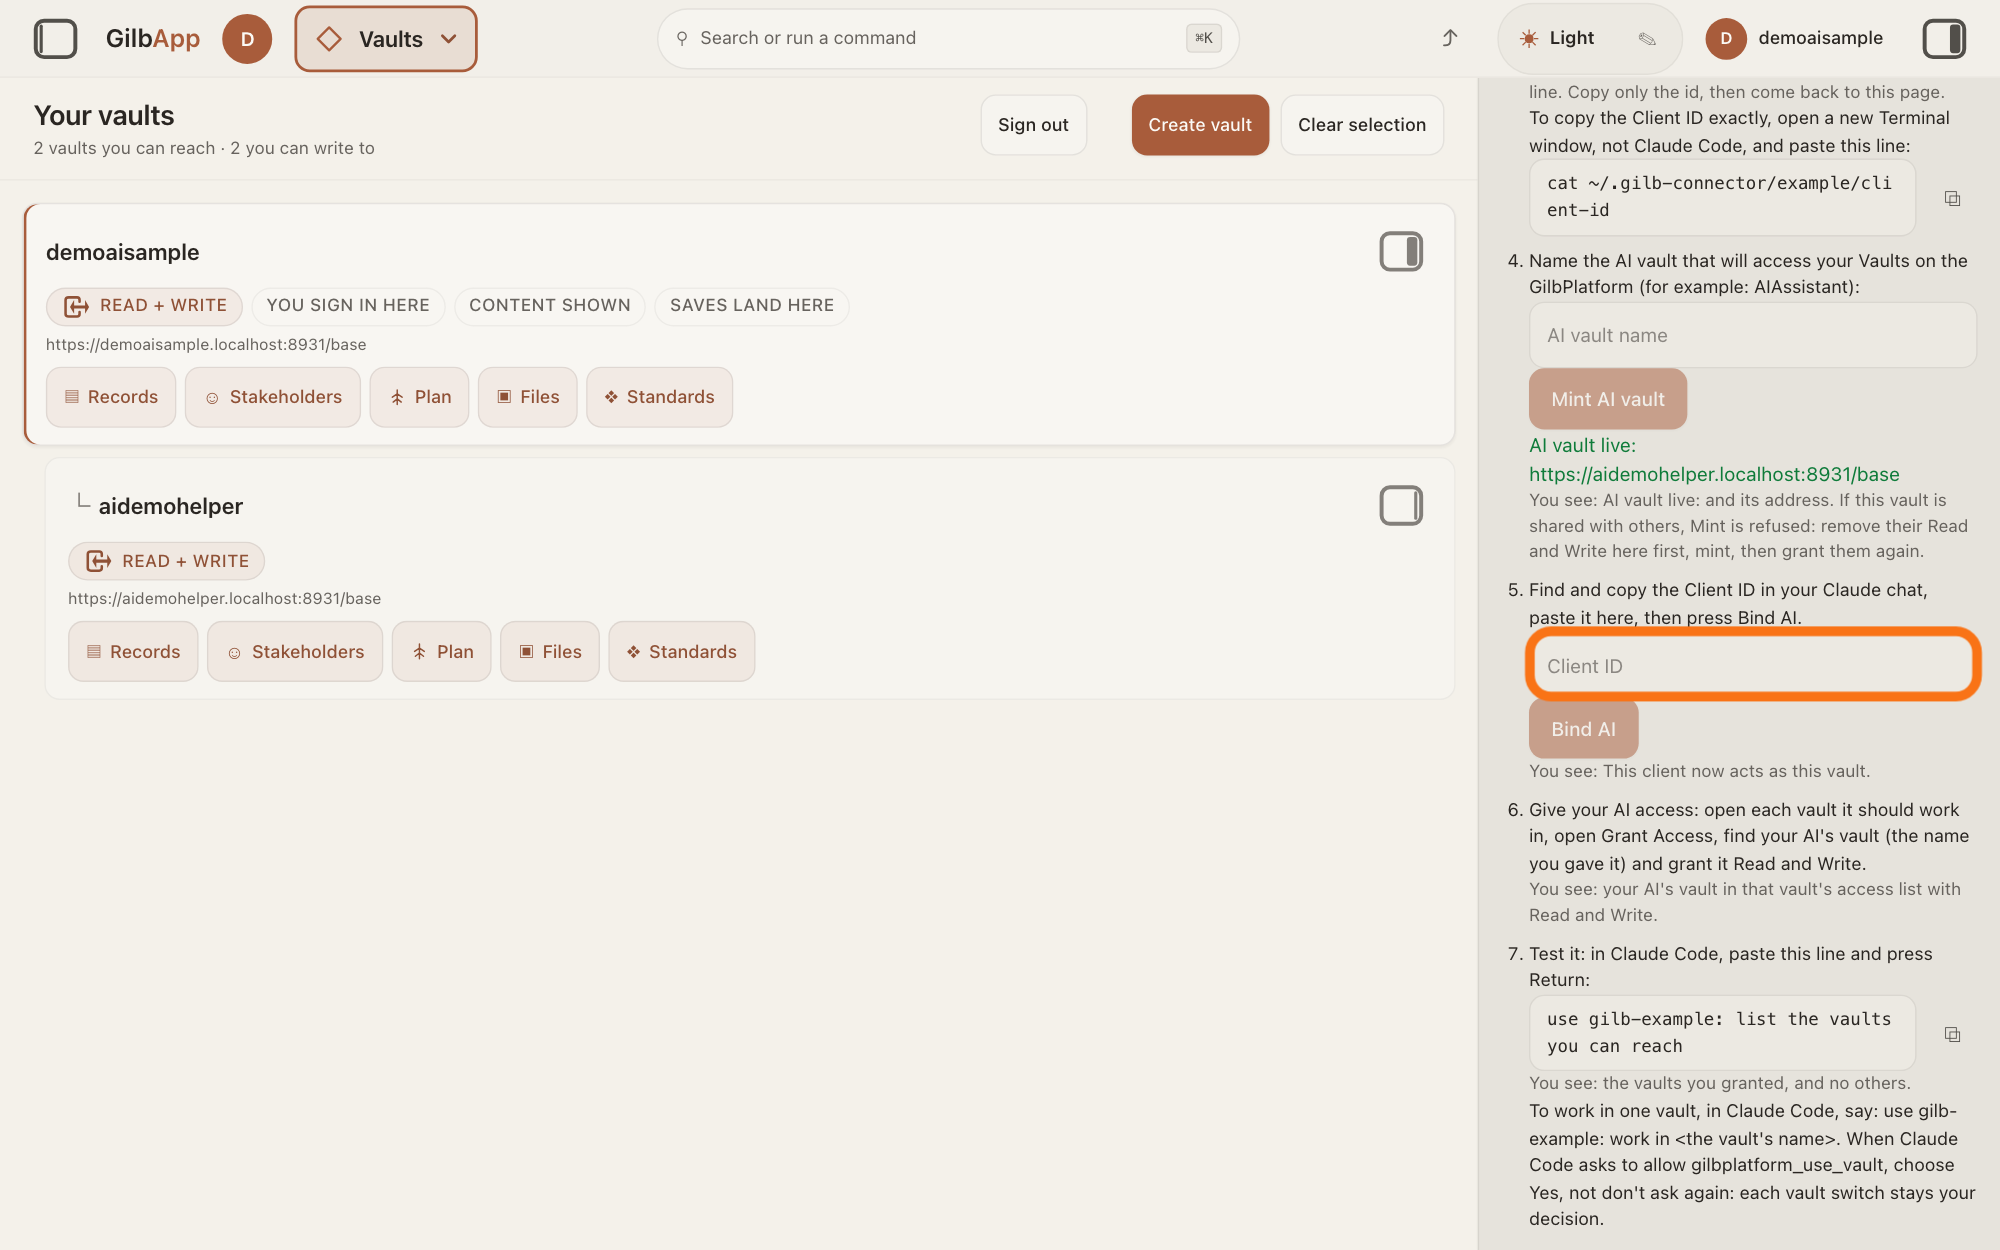
Paste the Client ID in the box Client ID.
Under step 5, "Find and copy the Client ID in your Claude chat, paste it here, then press Bind AI.", click the box that shows Client ID and paste the Client ID you copied.
Show as text
In the right pane, under the "Mint AI vault" button, a green line reads "AI vault live:" followed by the new AI vault's address; keep that address. On the left, the new AI vault shows as a card under your vault. Step 5 says "Find and copy the Client ID in your Claude chat, paste it here, then press Bind AI." The empty box "Client ID" under it is outlined in orange: click it and paste your Client ID.
More about this
Spaces, quotes and brackets at its ends are taken off for you. If you lost it, paste the Client ID line in a new Terminal window again (the last step of the answer on connecting your computer).
Press Bind AI.
Press Bind AI. The screen says This client now acts as this vault.: Claude Code, with this AI's short name, now acts as the AI vault.
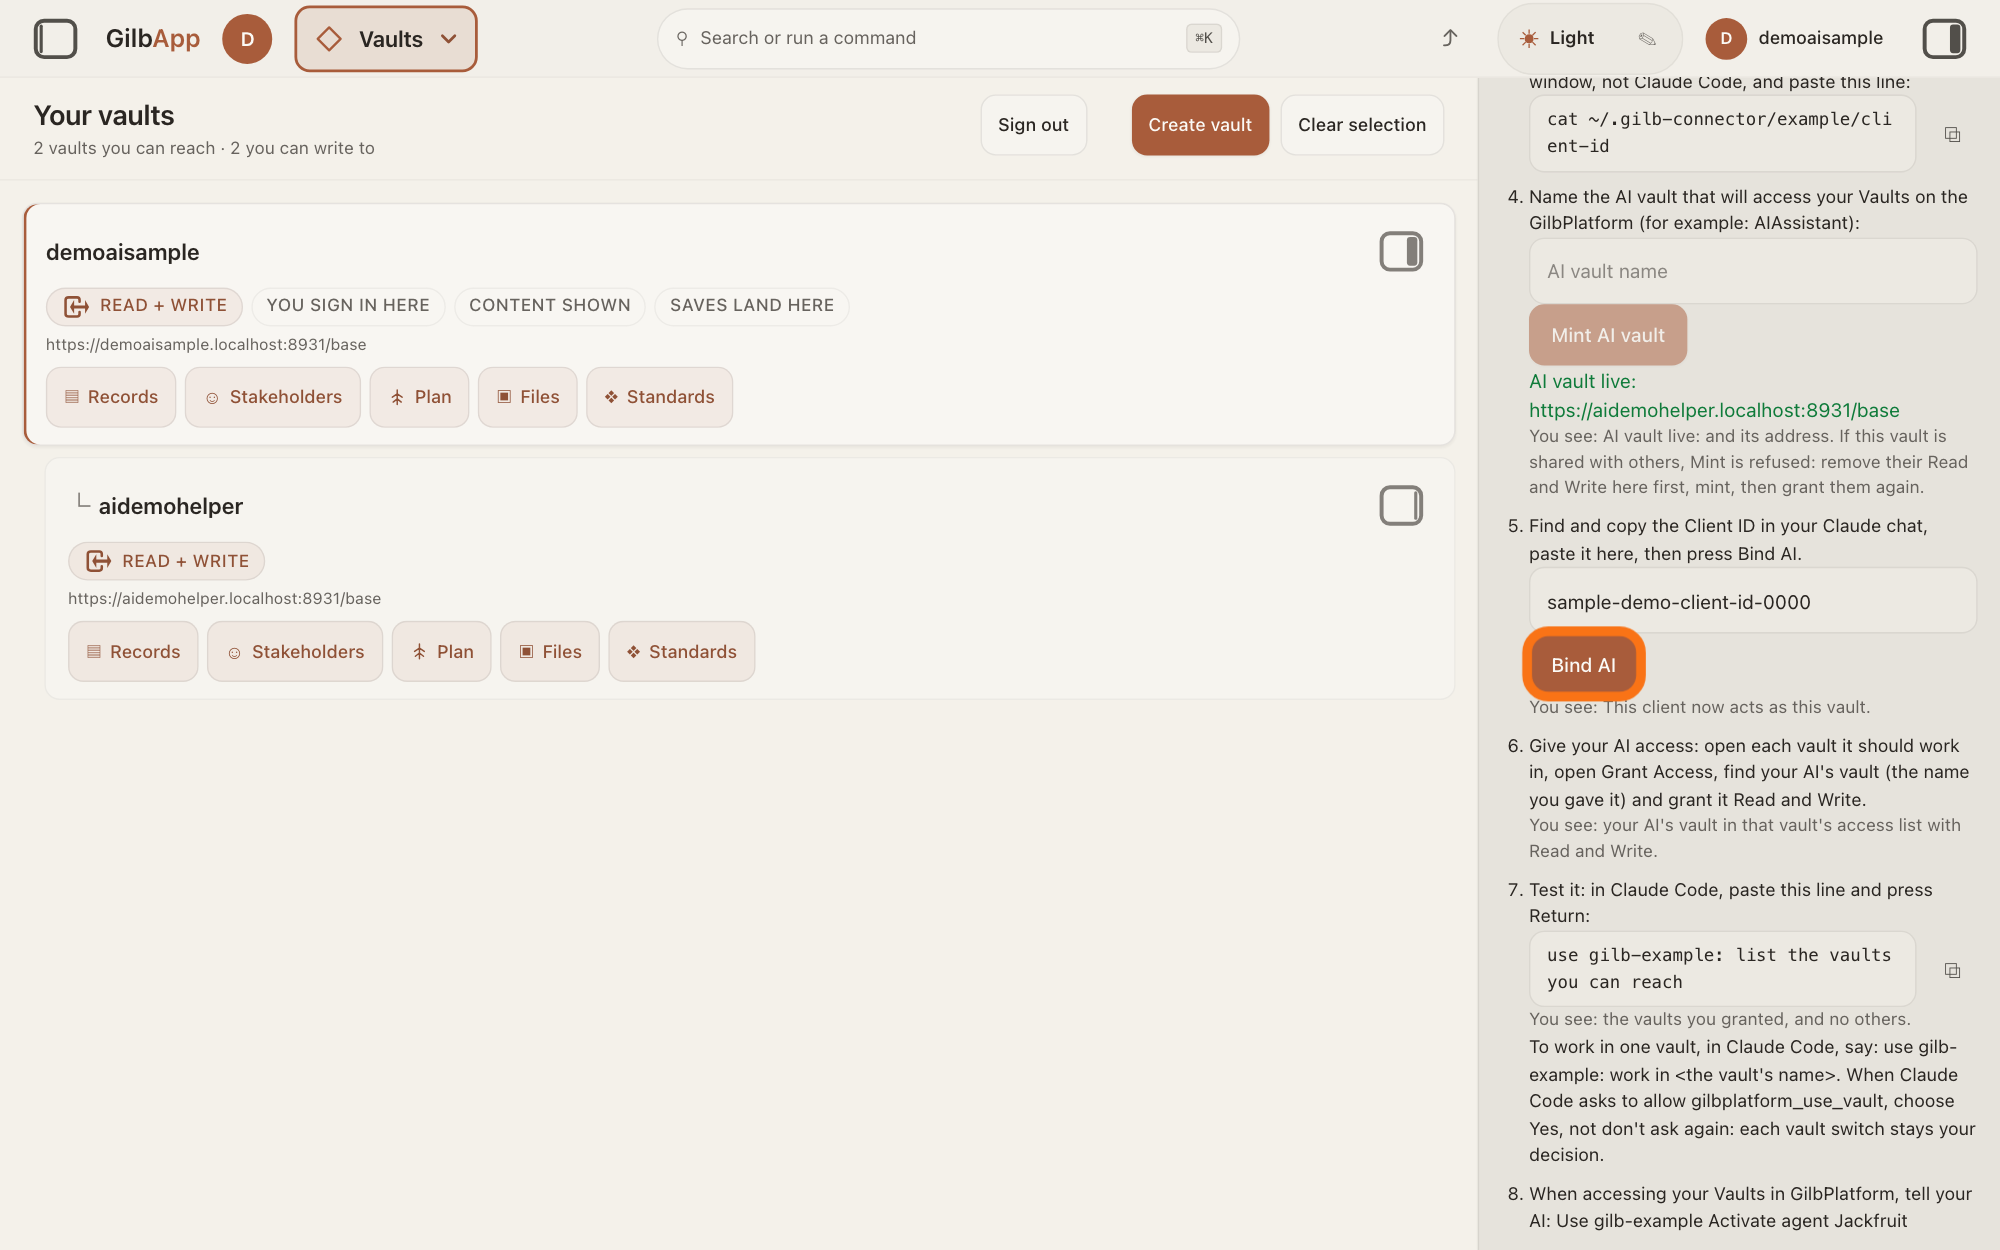
Show as text
In the right pane, under step 5, the box "Client ID" now holds the pasted Client ID, a string of letters and digits. The button "Bind AI" just below it is outlined in orange: click it. The grey text under the button says what follows: "You see: This client now acts as this vault." Steps 6 to 8, on giving your AI access and testing it, follow further down.
More about this
The button reads Binding… while it works. You do not need to restart Claude Code. Below the steps the box This AI may create vaults shows, ticked for you at the first bind: your AI may then make new vaults from Claude Code, each inside the AI vault, with Read, Write and Control for you. Untick it to stop that; vaults it already made stay.
Deeper
Also asked:
How do I connect my AI? For Claude Code, four answers in order: installing Claude Code, connecting your computer to your vault, this answer, then giving your AI access to a vault. Grok is connected in GilbApp's chat with Connect.
What is a Client ID? It is the name GilbPlatform gives your AI. It gives no access by itself: you paste it in Client ID and press Bind AI.
What does Bind AI mean? It ties your AI, known by its Client ID, to the AI vault, so your AI acts as that vault. An AI is bound once, to one AI vault, and only you, who made the AI vault, can bind it.
Your AI can reach none of your vaults yet: only its own AI vault, and any vault it makes there while This AI may create vaults is ticked. Give its AI vault access on each vault it should work in; that has its own answer. In short: on that vault open ▸ GRANT ACCESS, choose Vault under SHARE WITH, not Person, paste the AI vault's address, choose read and press Grant; then do the same with write. ONWARD REACH starts at Stops here; what each choice there does is in the answer on giving your AI access. Typing the AI vault's name does not find it: paste its address.
If you hid and showed the pane again between Mint AI vault and Bind AI, Bind AI works on the vault you opened and says "This is a person's vault. An AI can only bind to an AI vault. Do step 4 first, then bind." Do not mint again: in Vaults, open the AI vault's own pane, open ▸ CONNECT AI there and bind.
Other answers to Bind AI: unknown client means the Client ID is not exact; copy it again from the file. client has no machine principal yet means the AI never signed in (the rest of that sentence is for developers); run the who-am-I line in Claude Code, then bind again. this client already acts as means this AI is bound to another AI vault already: an AI is bound once, to one AI vault.
Only you, who made it, can bind it. No one can be given access to read or write an AI vault. A vault cannot be turned into an AI vault later, or back: make a new one.
On Windows, ▸ CONNECT AI has no Claude Code steps: it says Claude Code on Windows is not available yet. Choose Codex.
This answer is written for a computer screen.
Checked against GilbApp d529620.