
← Back to How do I ask for a one-off spec?
How do I write a Function in my plan?
Short answer
Press Main menu, choose Plan, press + New, choose Function, type a tag (its short name), and press Create.
Before you start
You need to be signed in to GilbApp on a computer, with a vault you can write to, such as your own vault. The pictures show a made-up person on a test site; your screen shows your own name and address.
Words used here (6)
- short name
- A short name is the one word you give one AI on one computer, such as gilb-example; it keeps that AI's key and tools apart.
- GilbApp
- GilbApp is the app, opened in a web browser at https://gilb.com/app, where you open, fill and share your vaults.
- Kai-Zen
- Kai-Zen is the planning agent: it finds out what you want, chooses the way, hands the work to other agents and reports back.
- record
- A record is one piece of data with its own address, such as a person, a place, a thing or a note.
- virtual folder
- A virtual folder is a view that groups records and files without moving them; each may sit in several folders.
- field
- A field is one named fact on a record, such as its title or a due date; its name comes from GilbVeda.
Steps
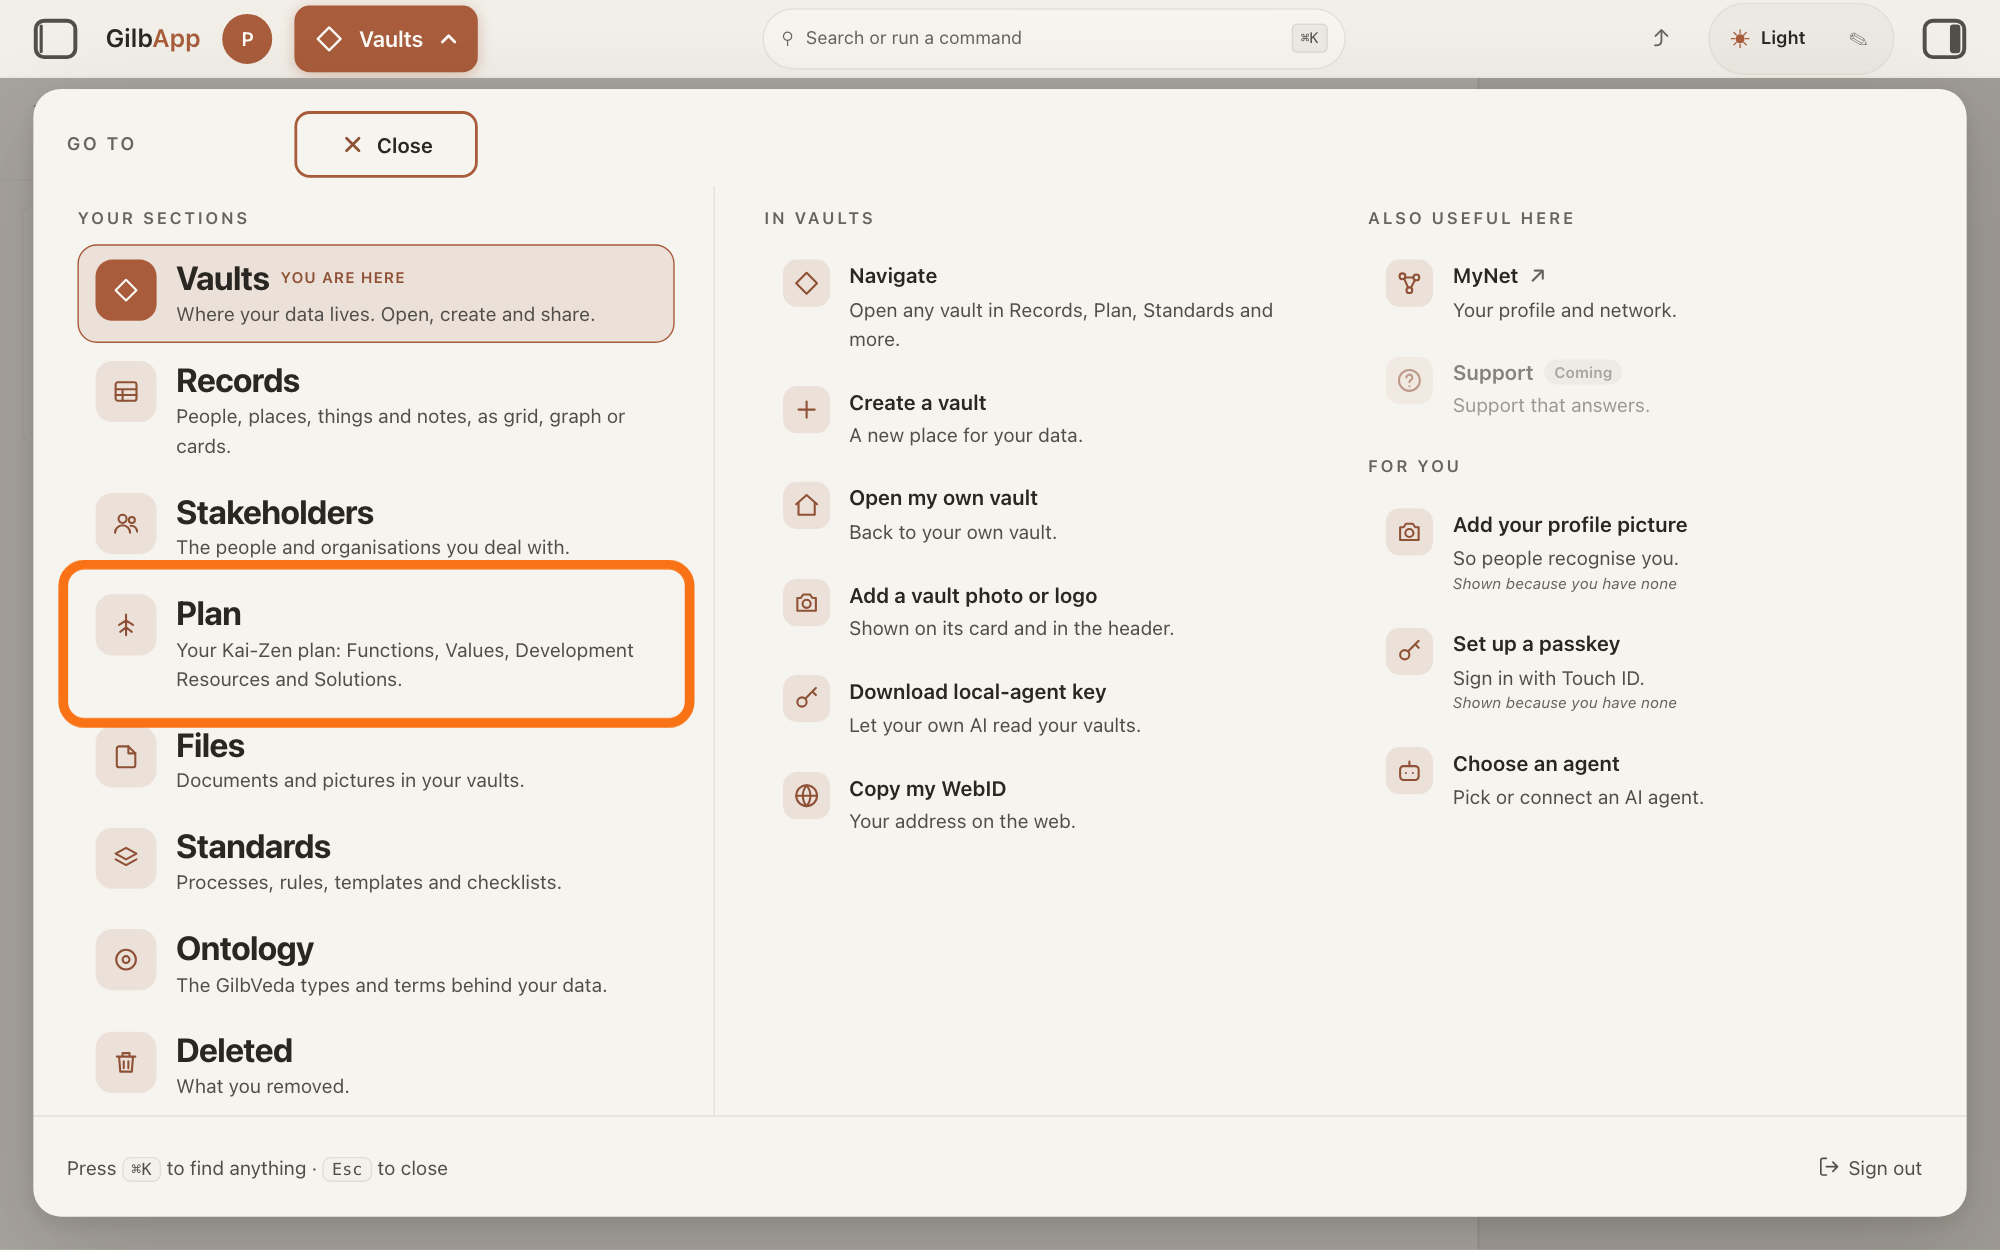
Press Main menu at the top left and choose Plan.
Press Main menu, next to your profile picture at the top left, and under YOUR SECTIONS choose Plan. The button shows the name of the section you are in, such as Vaults.
Show as text
In the GO TO panel that opens from "Main menu" at the top left, look under YOUR SECTIONS on the left. The outlined row is "Plan", with the line "Your Kai-Zen plan: Functions, Values, Development Resources and Solutions." Press it to open the Plan screen.
More about this
A panel headed GO TO opens; Plan reads Your Kai-Zen plan: Functions, Values, Development Resources and Solutions. You can also press the Plan button on the card of a vault (the place where a person or a group keeps their records) in Vaults. The Plan screen lists your plan records and has the views Grid, Graph, Both and Card.
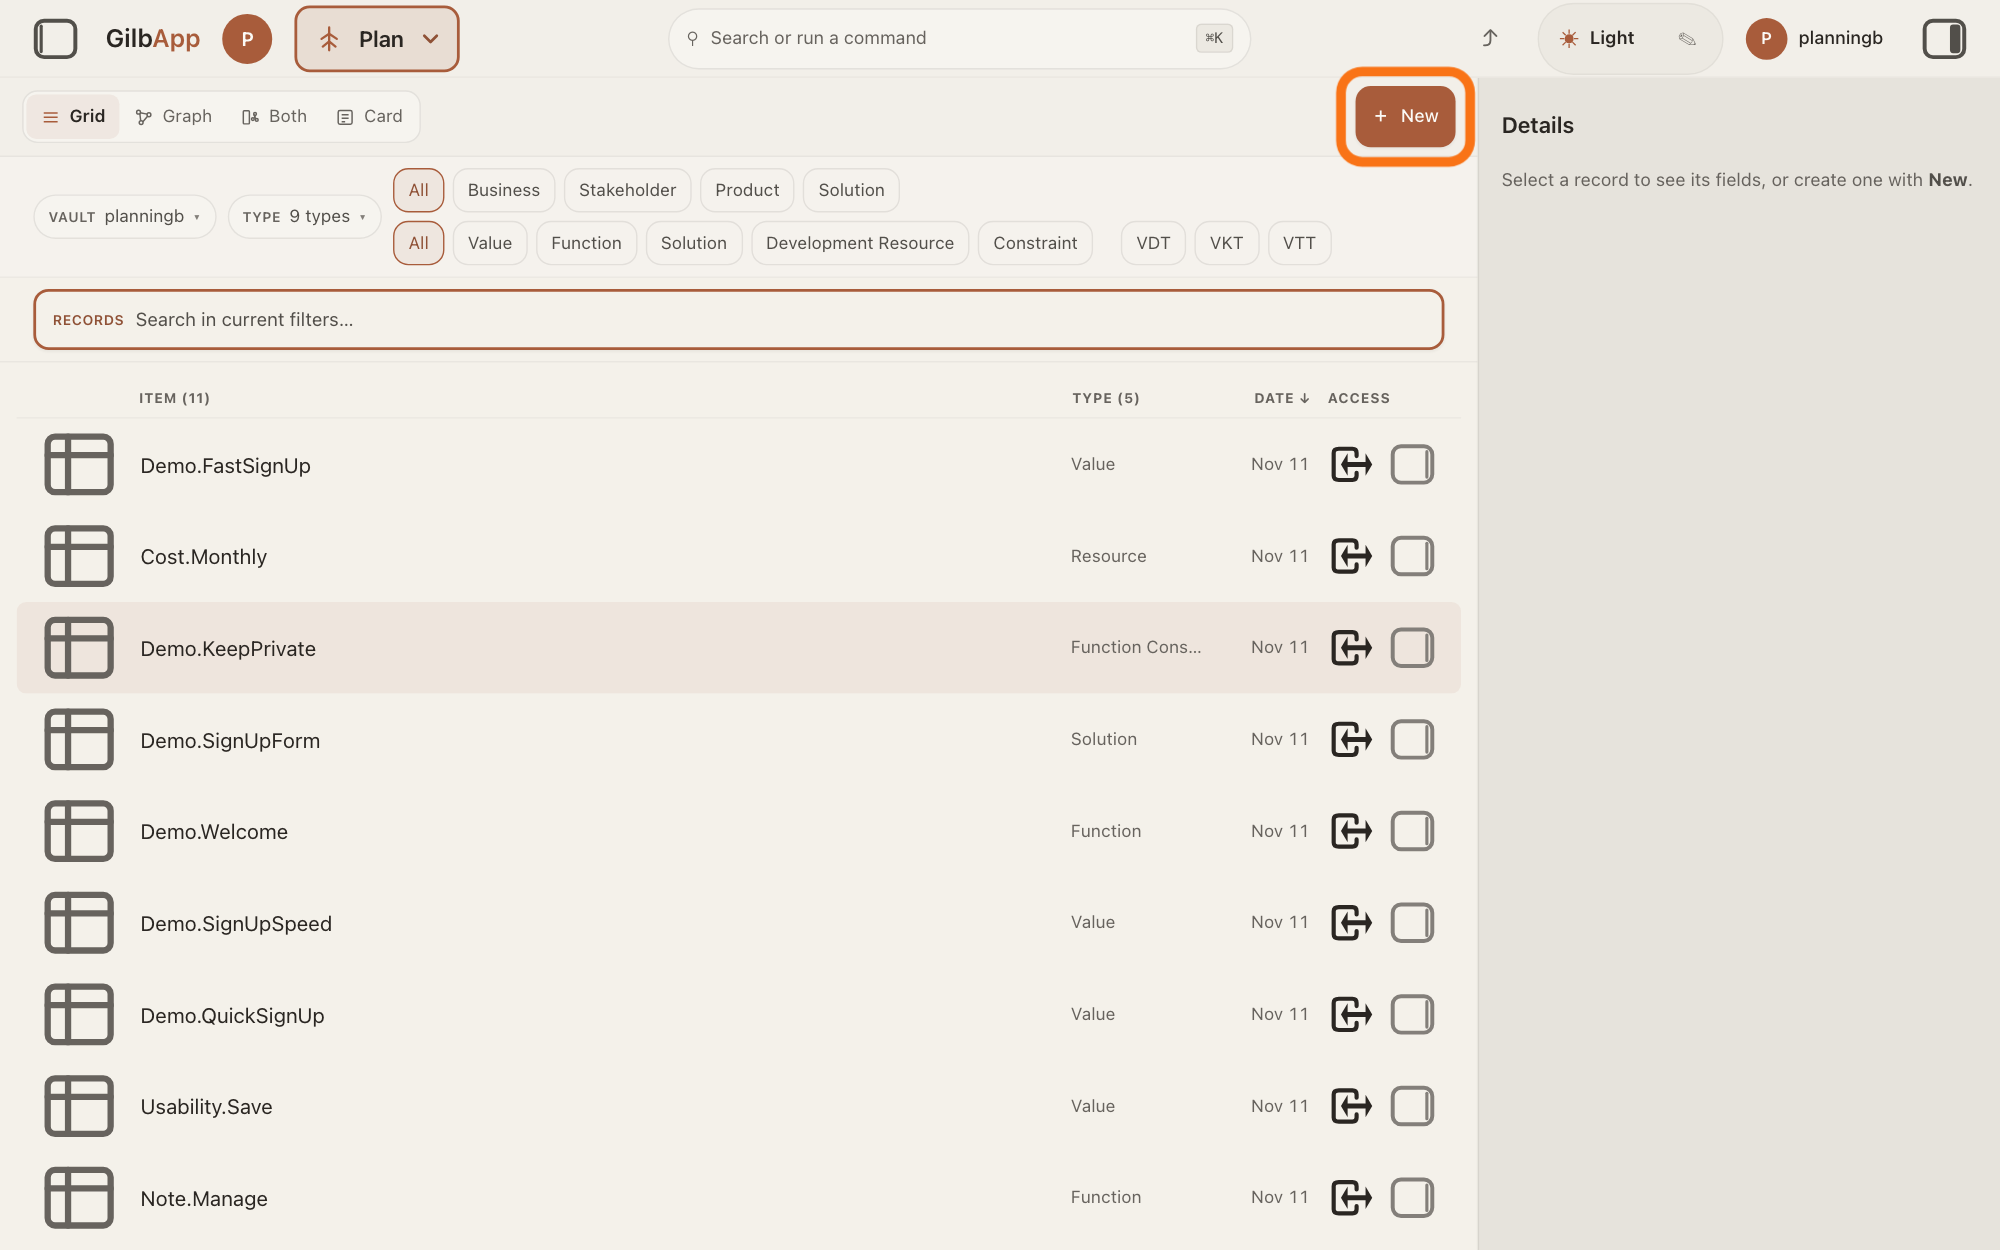
Press + New.
Press + New at the top right of the Plan screen. With no record selected, the type dialog opens at once.
Show as text
Look at the top right of the Plan screen, just left of the Details pane. The outlined button is "+ New". Press it; with no record selected a dialog headed "New function" opens with its "TYPE" list.
More about this
If a record is selected, New first offers five choices: Create a record and link it to the selected record, Link the selected record to a record that already exists, Create a record on its own, Create a virtual folder and Upload a file. Choose Create a record on its own. A new Function needs nothing else; the others make a record joined to the selected one, link two records that already exist, make a virtual folder or upload a file. In Plan, the GO TO panel also has New plan record, which does the same.
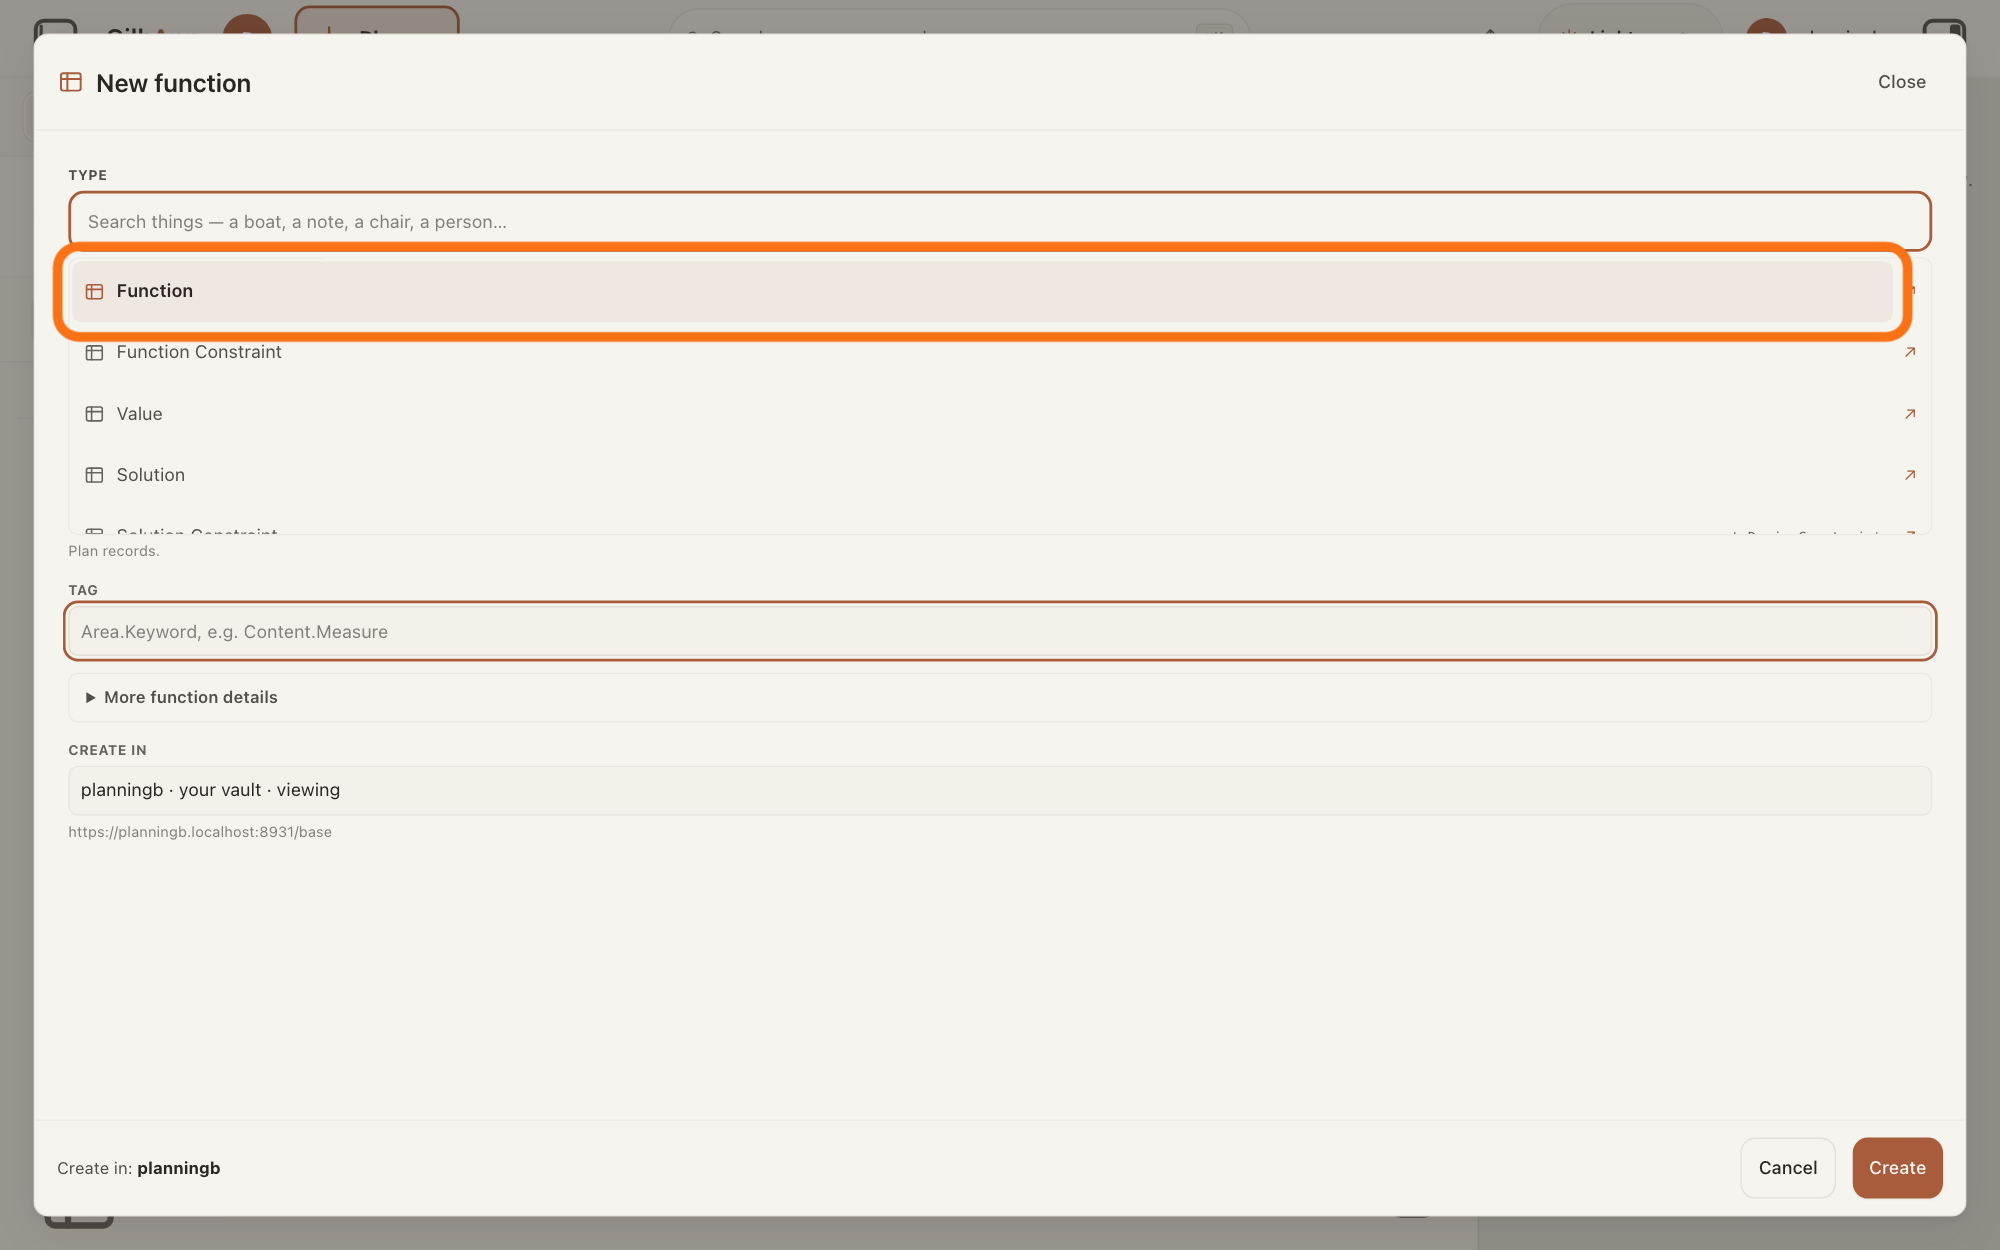
Under TYPE, choose Function.
In the list under TYPE, choose Function. A Function is what a system does, written as an action.
Show as text
In the dialog headed "New function", the list under "TYPE" starts with "Function", already highlighted. That first row is outlined; "Function Constraint" is the row below it. Keep "Function", or click it.
More about this
The dialog opens headed New function with Function already chosen, so you can leave it as it is. The chosen type then shows under TYPE with a DEFINITION read from GilbVeda, the shared list of terms; it can be long, and you need not read it. × beside the type brings the list back. ↗ at the end of a row shows what GilbVeda says about that type; you do not need it. The list also holds Function Constraint, Value, Solution, Solution Constraint and the other plan types. A Function Constraint is a Function that must be done because a named person requires it. A search box above the TYPE list narrows it as you type, and Close at the top of the dialog closes it like Cancel; you need neither. Cancel closes the dialog without making anything. Where it shows Back instead, Back returns you to the five choices.
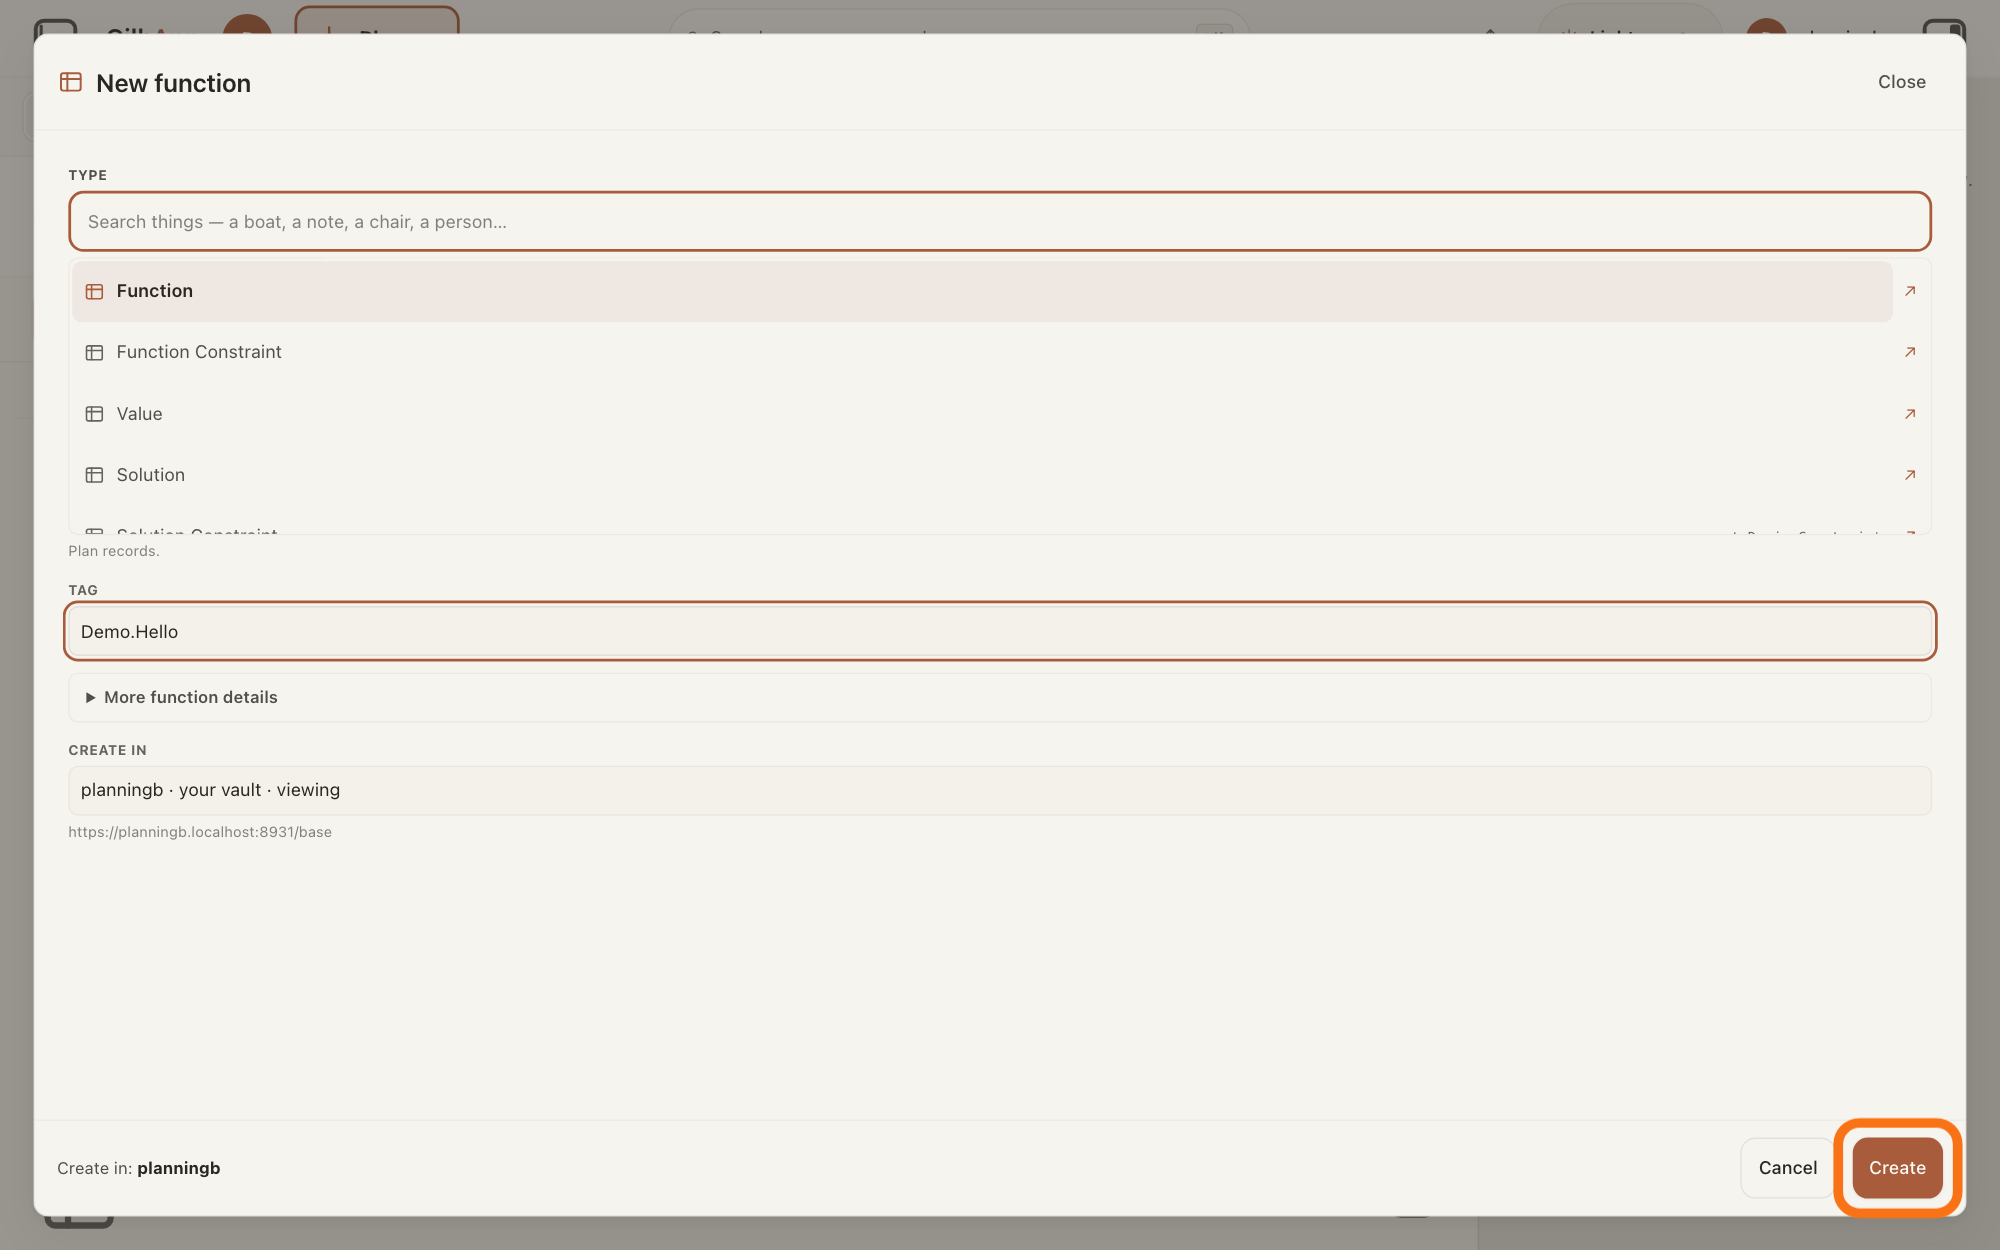
Type a tag in TAG and press Create.
Type a tag in TAG, check CREATE IN, and press Create. A tag is the short name of a plan record: an area, a dot and a keyword, such as Content.Measure.
Show as text
At the bottom right of the "New function" dialog, the outlined button is "Create". The "TAG" box holds your tag and "More function details" stays closed. Press "Create".
More about this
The box shows Area.Keyword, e.g. Content.Measure until you type. With the tag empty the screen says Give it a Tag first: a Plan card is named by its Tag. Under CREATE IN, choose the vault where it will live; vaults you can only read say read only, you cannot create there. If the tag is already used in that vault, the screen says is already used in this vault. Pick another. If the vault is not the one you are viewing, the dialog stays open and says the record was made there, not in the vault you are viewing. It is not drawn here., with an Open it button. Leave More function details closed: the card's own Description is written in parts (step 6).
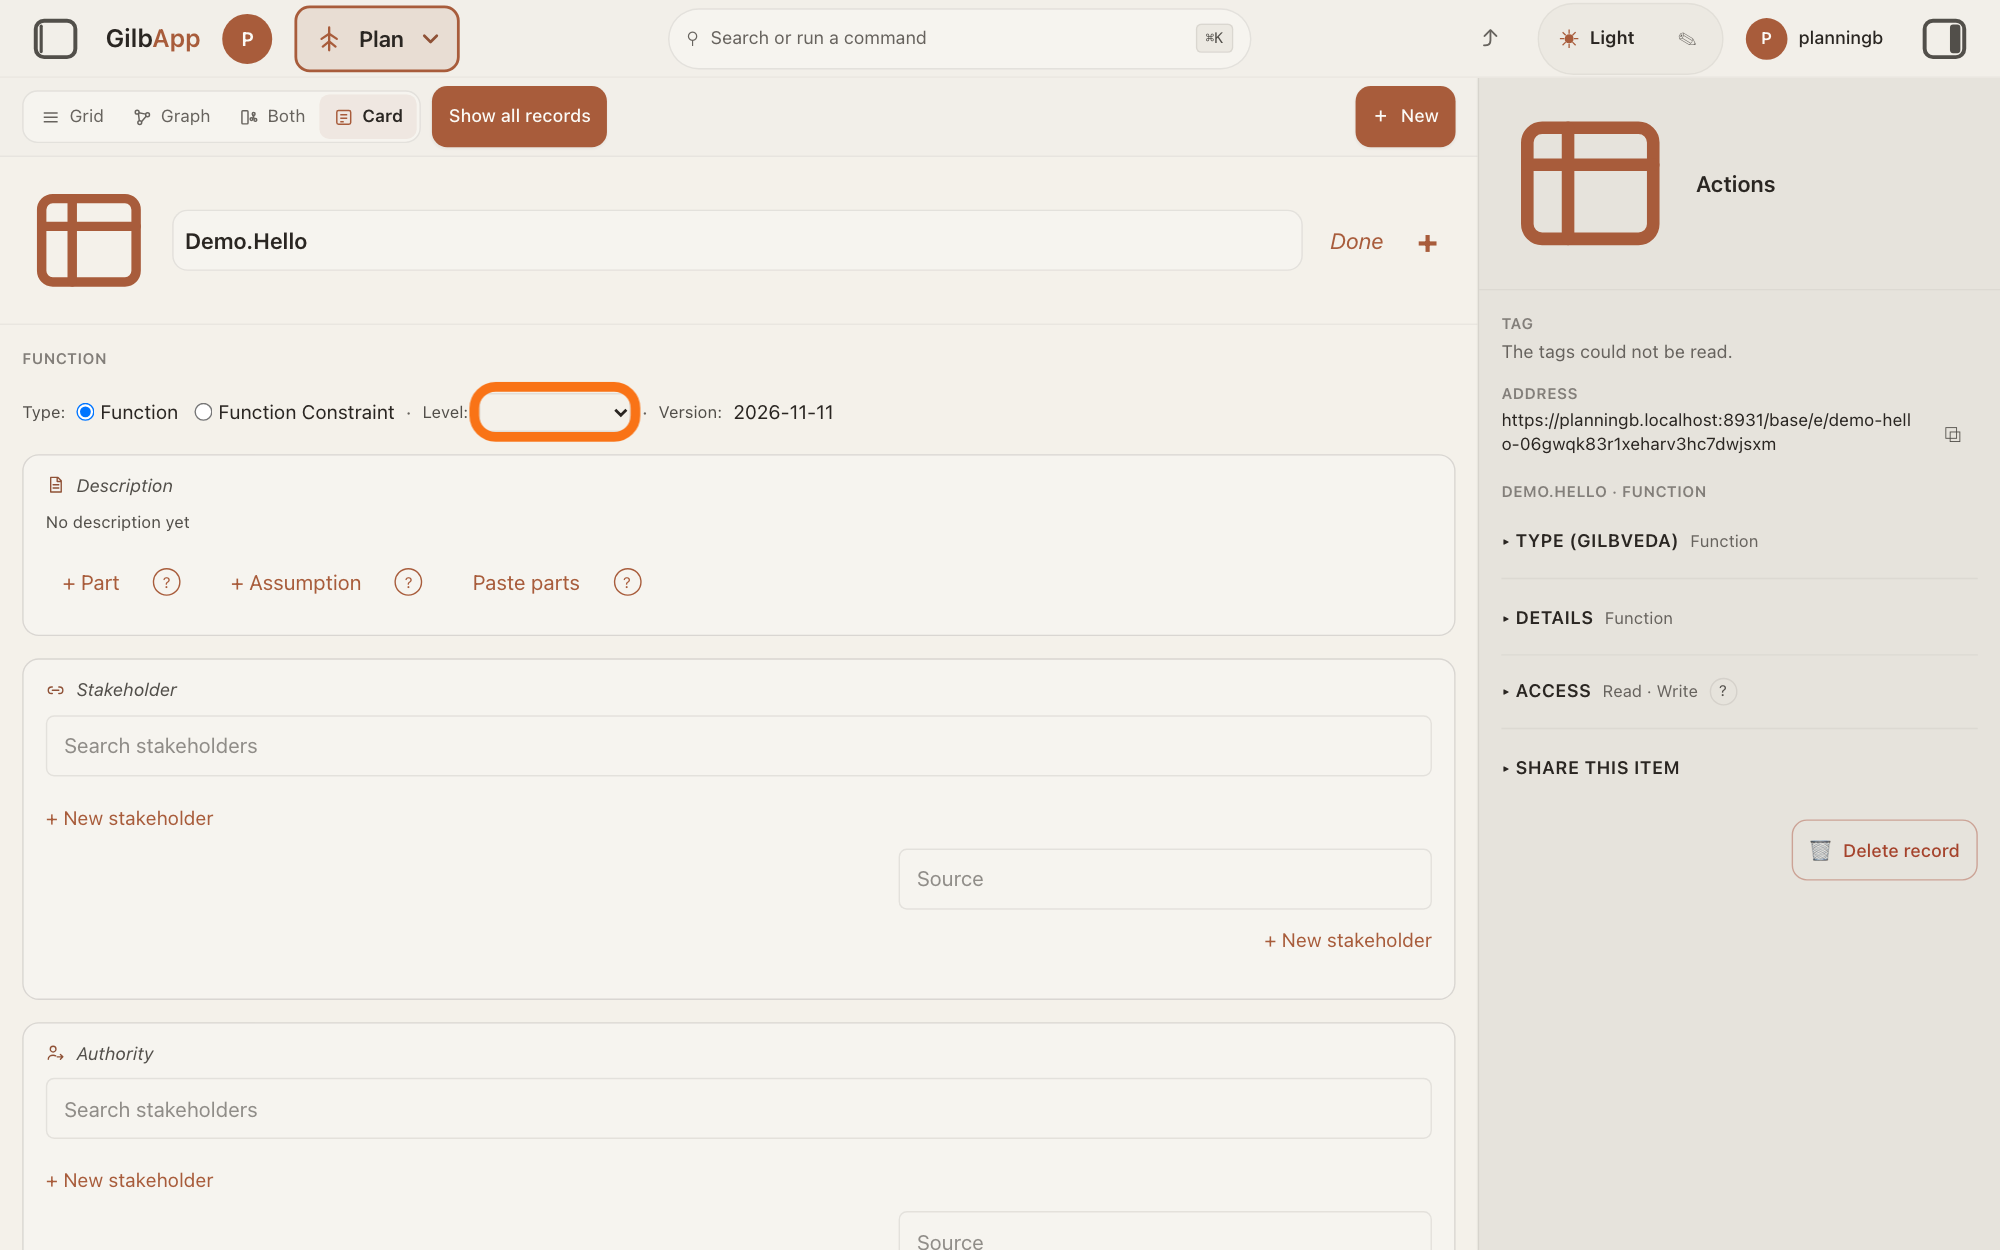
Under Level, choose Product.
On the line under the card's header, open the list next to Level and choose Product. A level says which part of the plan the Function belongs to.
Show as text
On the new Function's card, look at the line under "FUNCTION": "Type: Function / Function Constraint · Level: · Version:". The outlined list after "Level:" is still empty. Open it and choose "Product".
More about this
After Create, the new Function opens in edit mode: Done is at the top right of the card and the card says Editing. Changes save as you leave a field. There is no Save button. If you come back later, click the Function in the list and press Edit. The list holds Business, Stakeholder, Product and Solution by default, and + Add level… for one of your own. Functions usually sit at Product. The same line shows Type (two radio buttons, with your choice from step 3 marked) and Version (a date); you need neither. The level is not needed to save. Beside Done, a + does what + Add Information at the foot of the card does; you do not need it.
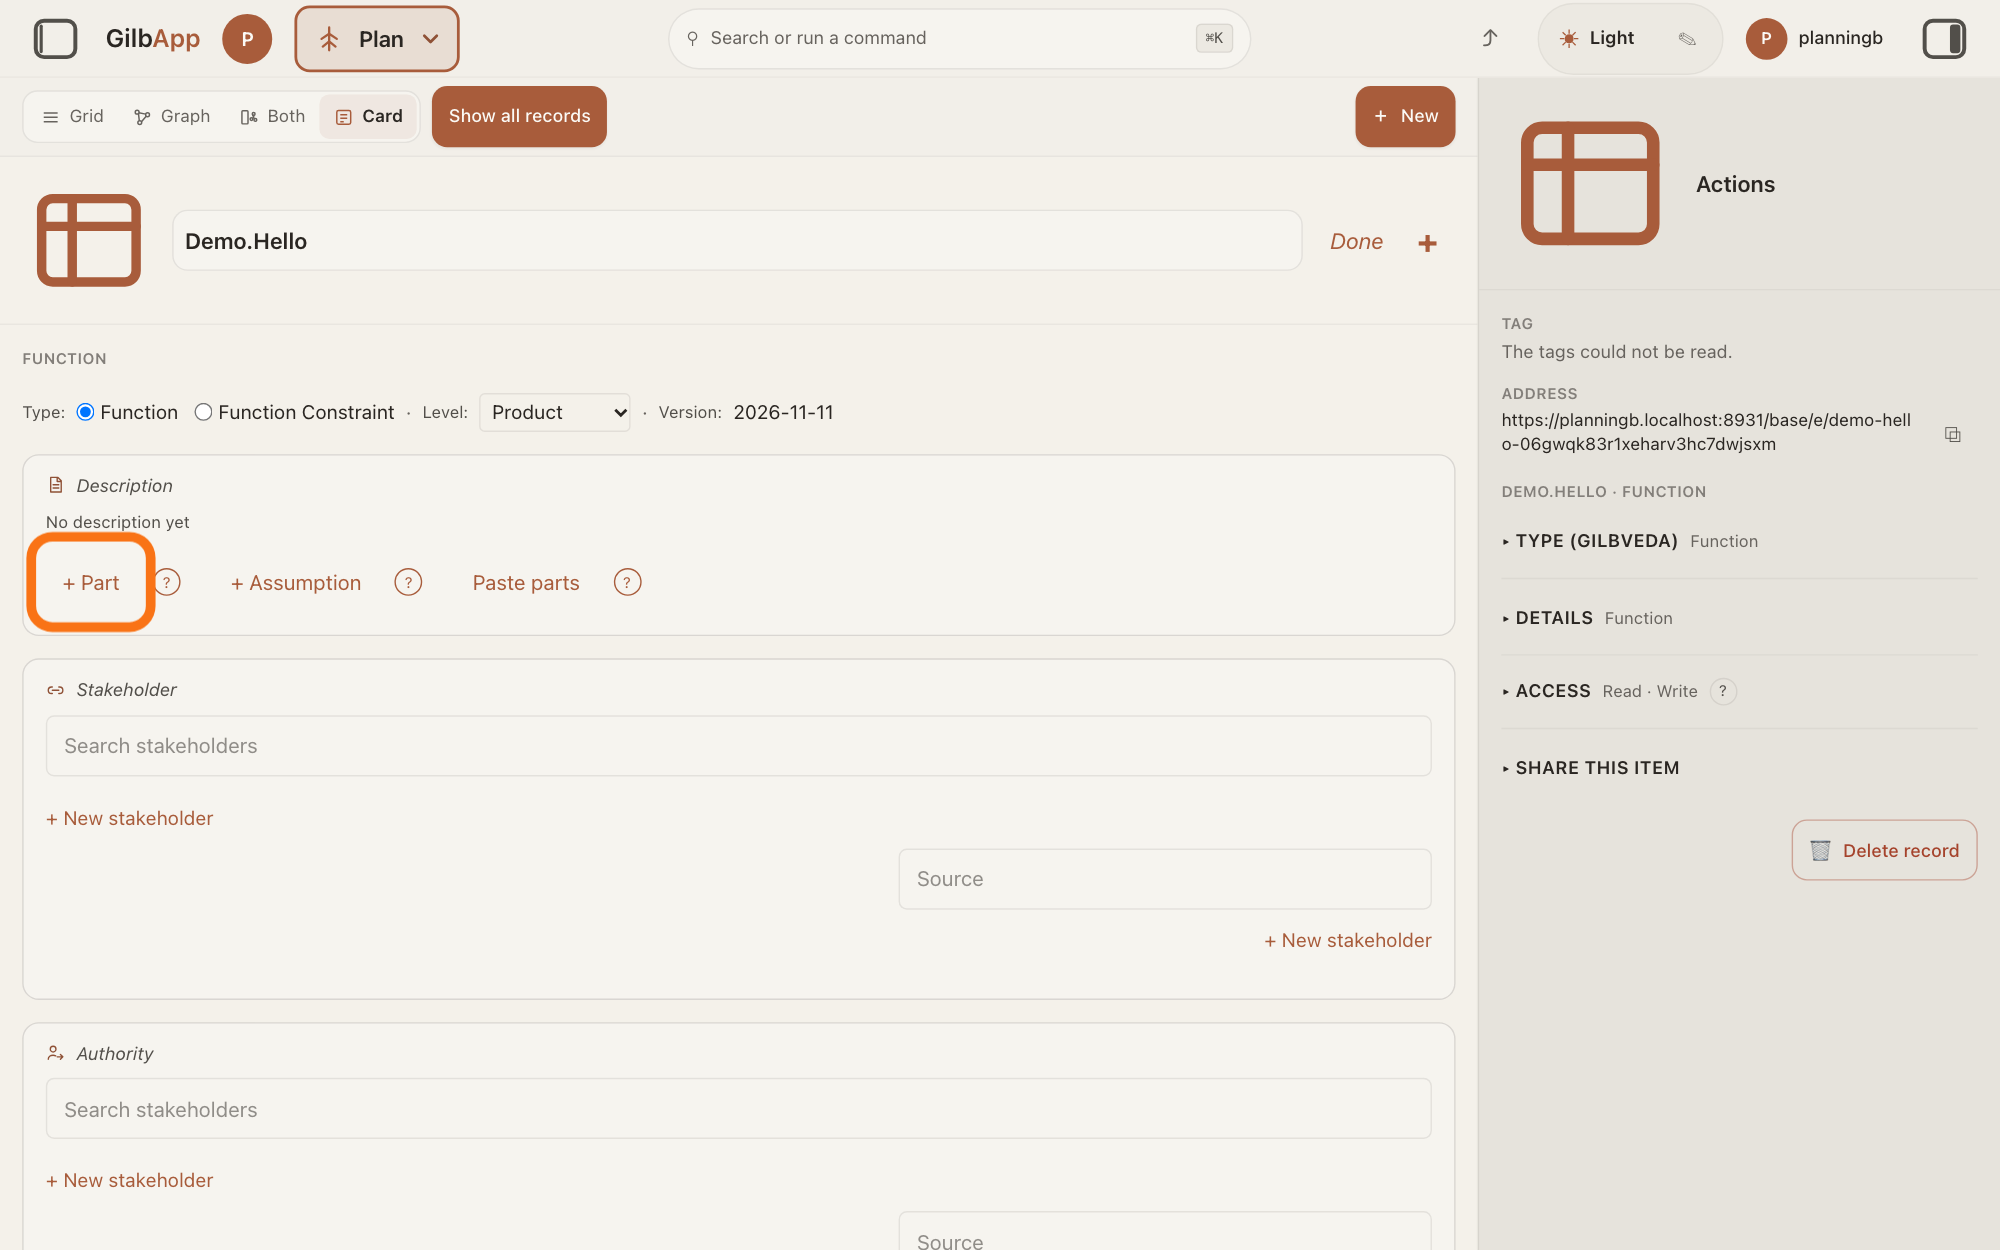
Under Description, press + Part, type a Keyword and Text, and press Add.
Under Description, press + Part, type a Keyword and the Text, and press Add. A Description says what the Function does, one short part at a time.
Show as text
With "Product" chosen, look at the "Description" part, which reads "No description yet". The outlined button is "+ Part", first of "+ Part", "+ Assumption" and "Paste parts". Press it, type a "Keyword" and "Text", and press "Add".
More about this
The Keyword is one word: letters only, starting with a capital, such as Signup; otherwise the screen says Keyword: letters only, starting with a capital, e.g. Sync. If you type the Text first, the box suggests its first word as the Keyword. Say what the system does, not how well and not how. Each part gets its own tag: the Function's tag, a dot, the Keyword. With nothing yet, the line reads No description yet. Discard throws away the part you typed (the screen then asks Discard what you typed? with Keep and Discard); you do not need it. It is not needed to save. + Assumption and Paste parts beside + Part are optional; Deeper, below the steps, says what they do.
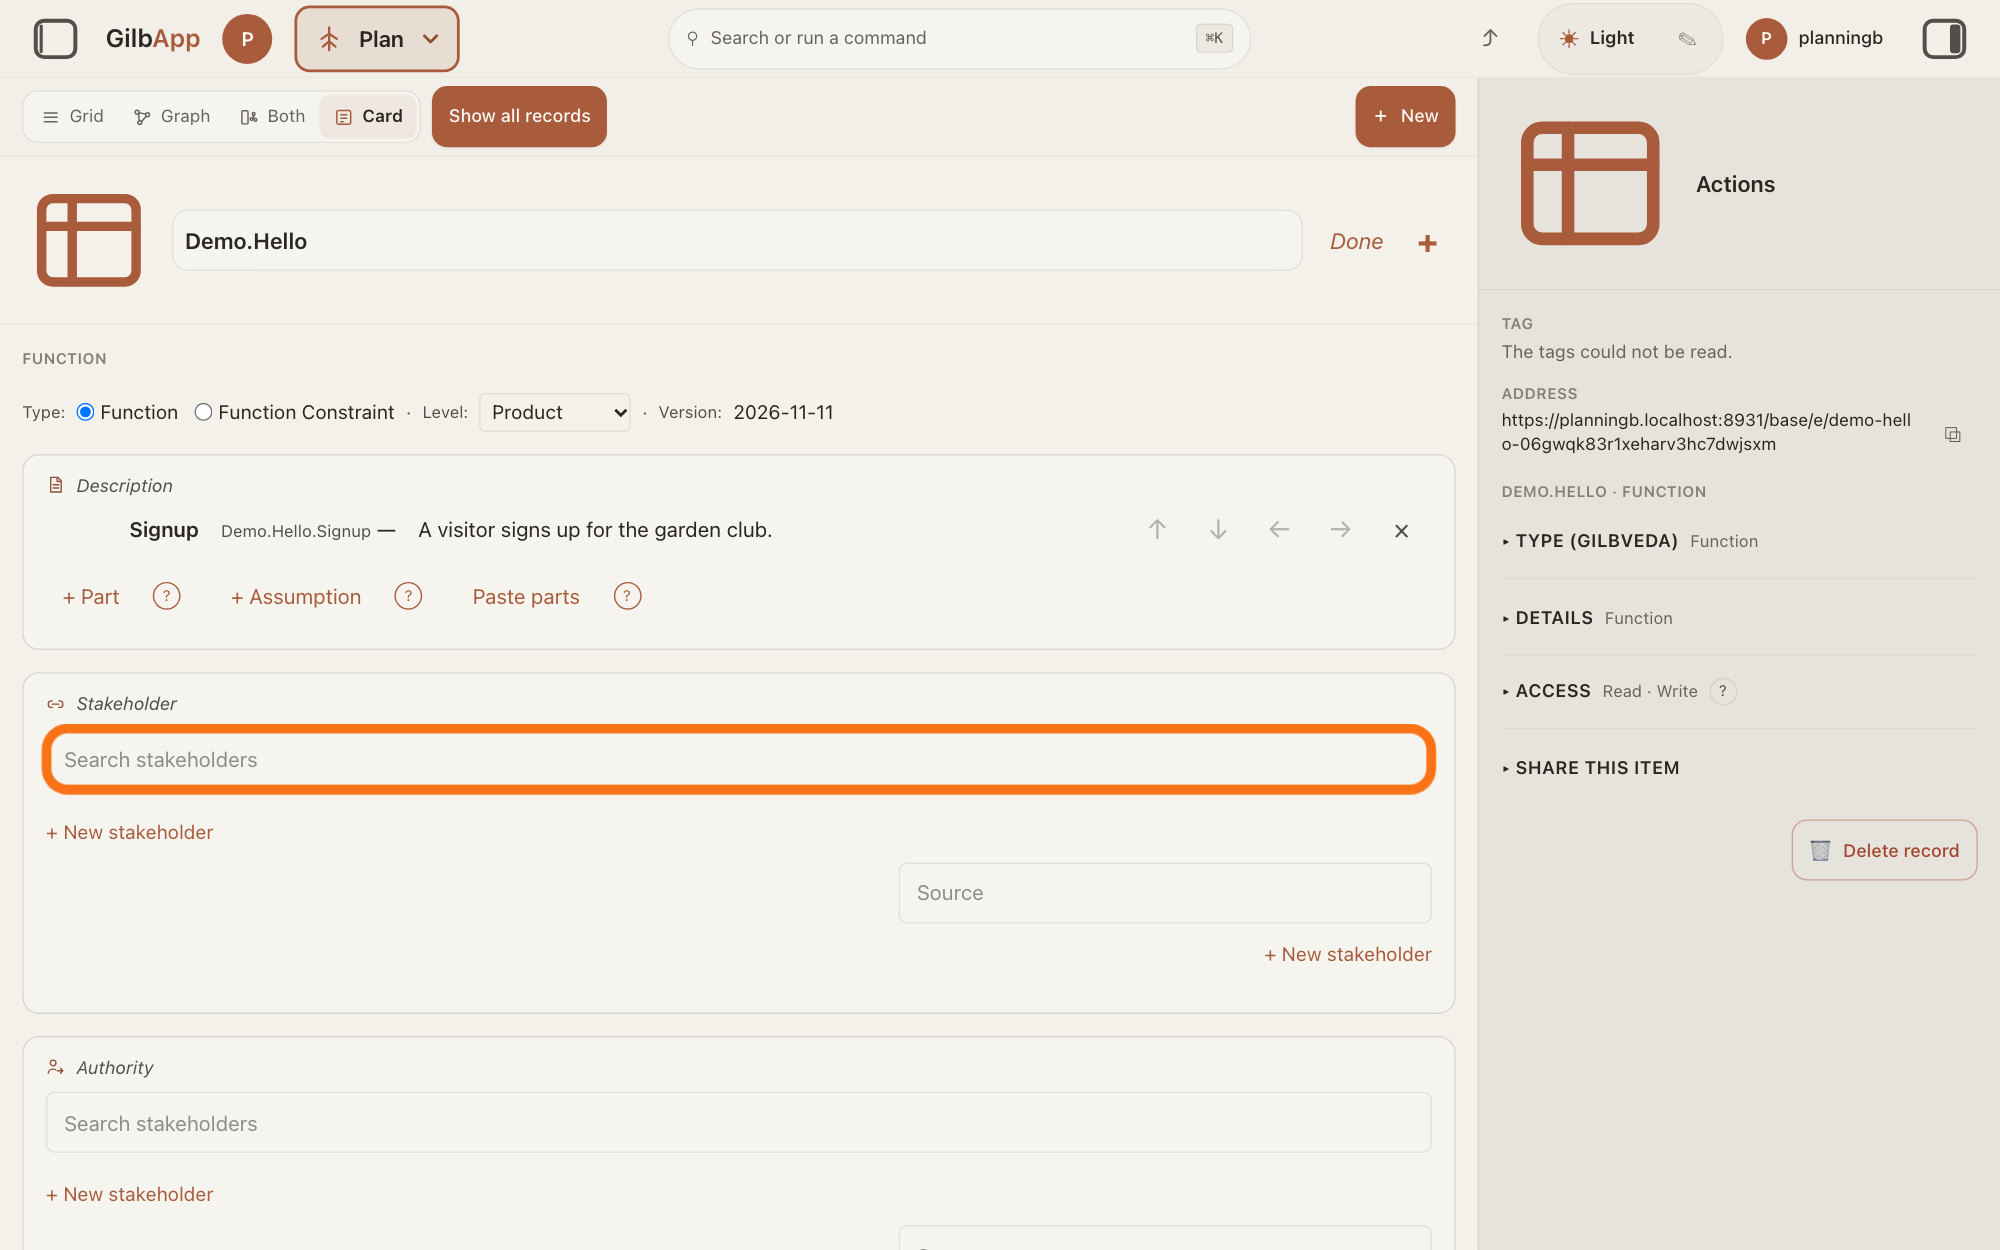
Under Stakeholder, search and select the stakeholder.
Under Stakeholder, type in the box that shows Search stakeholders and select a match. A stakeholder is a person, group or system that cares whether a Value goes up or down.
Show as text
The new part shows under "Description" with its keyword and text. Below it, under "Stakeholder", the outlined box reads "Search stakeholders". Type part of the stakeholder's name and select them; the box under "Authority" is a different one.
More about this
If none matches, the screen says No stakeholder record matches. Press + New stakeholder to make one without leaving the card. You can add more than one. Under the line, a Source box can name who said it; it is optional. The line is shown on every Function, but nothing forces you to fill it.
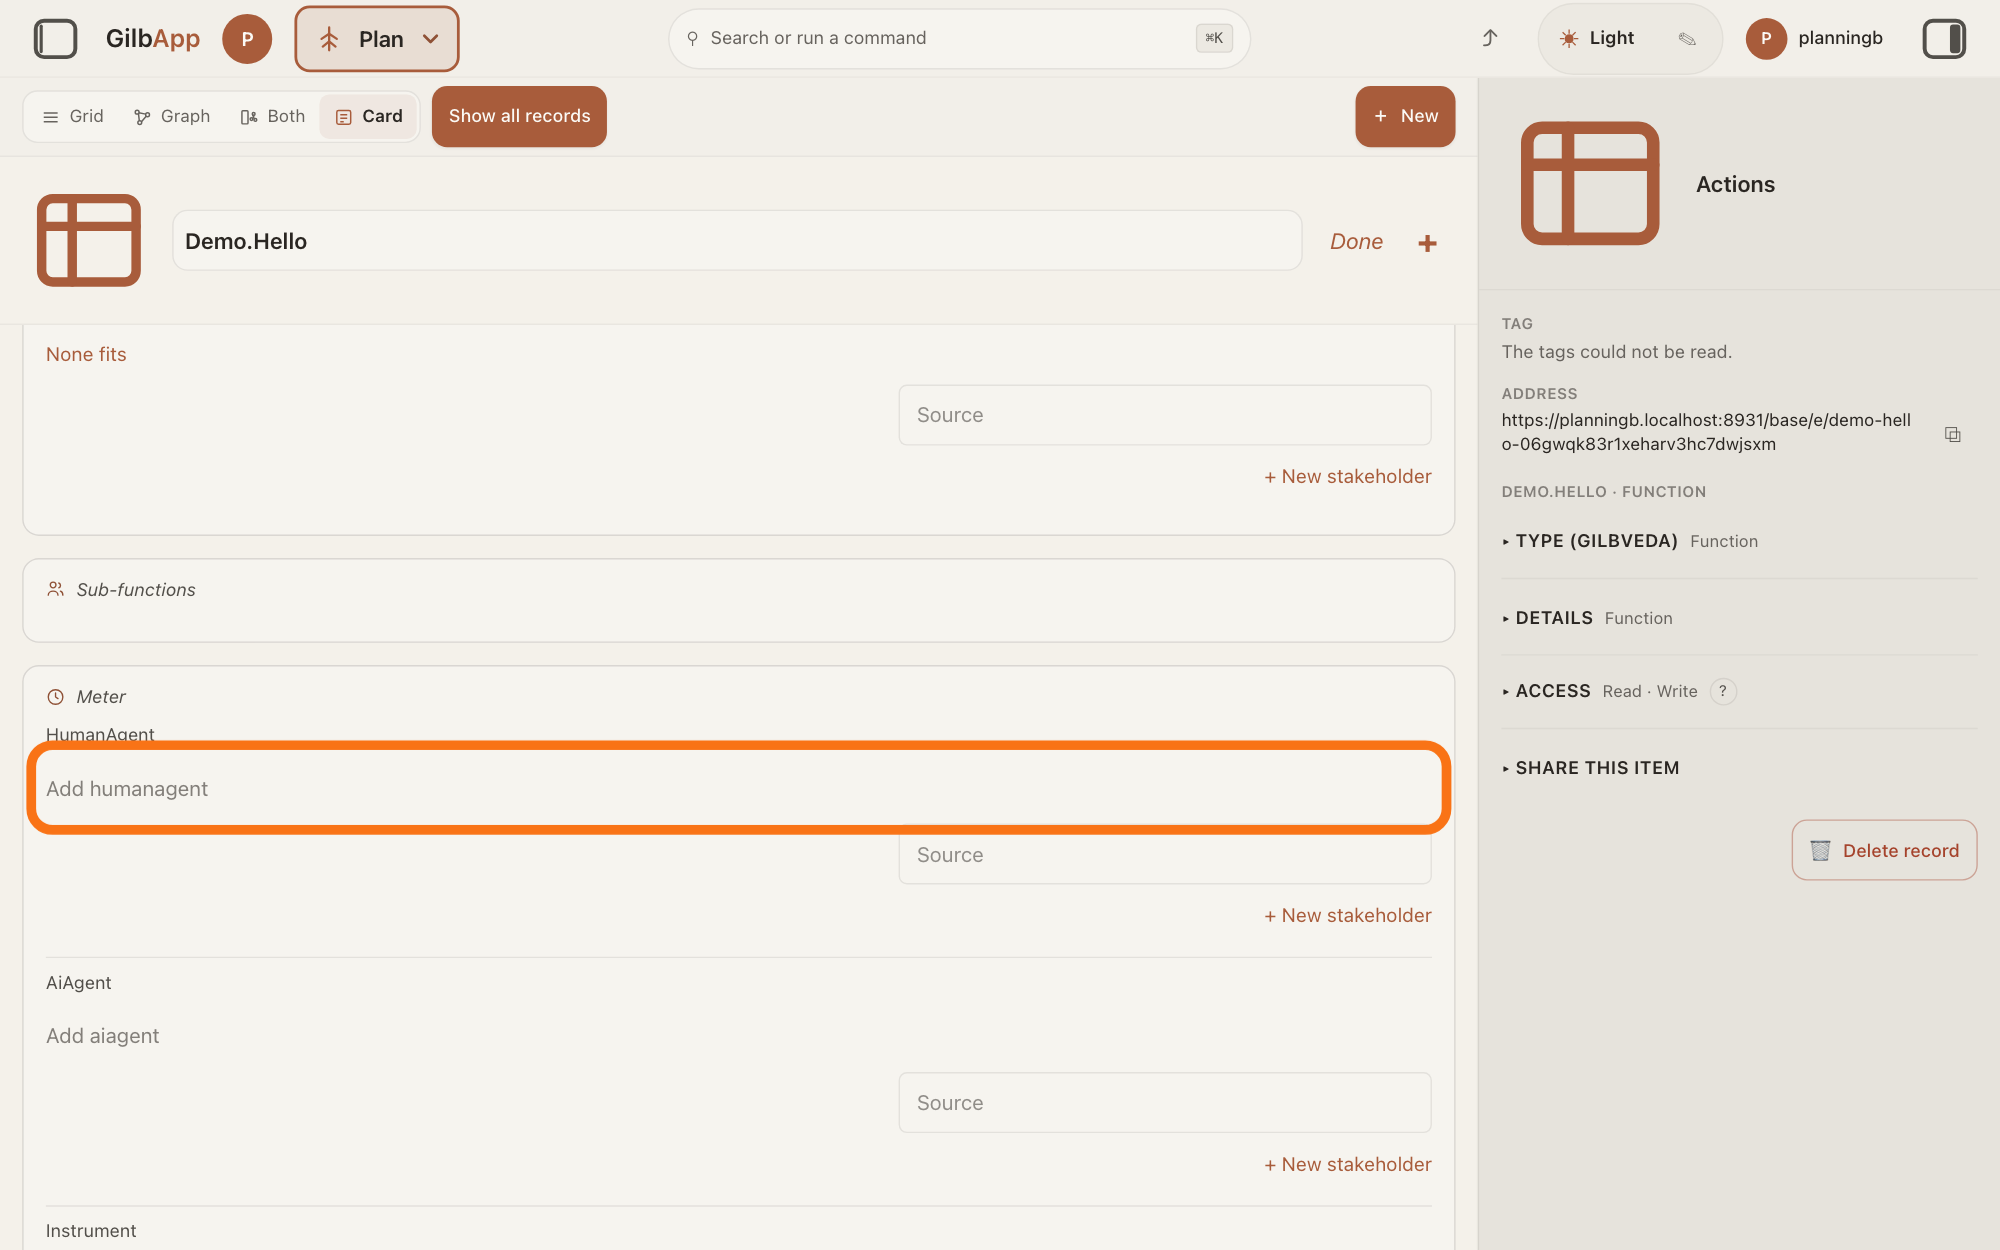
Under Meter, press Add humanagent and type how a person checks the Function.
Under Meter, press Add humanagent and type how a person checks the Function. A Meter is how you check where the Function stands.
Show as text
Scroll down to "Meter". Under "HumanAgent", the outlined line reads "Add humanagent". Click it and type how a person checks the Function; "Add aiagent" and "Add instrument" are further down.
More about this
The three lines start as Add humanagent, Add aiagent and Add instrument; a box appears when you press one. HumanAgent is for a person, AiAgent for an AI and Instrument for a test, counter or log. Press Enter or click away to save. Fill one or more; you do not need all three. Example: sign up as a visitor and check that a confirmation shows. A Source box under each can name who said it. None is needed to save.
Under Status, press + New status and choose the status.
Under Status, press + New status, then choose the status in the list. The status says where the Function stands: Planned, Building, Developed, Production or Retired.
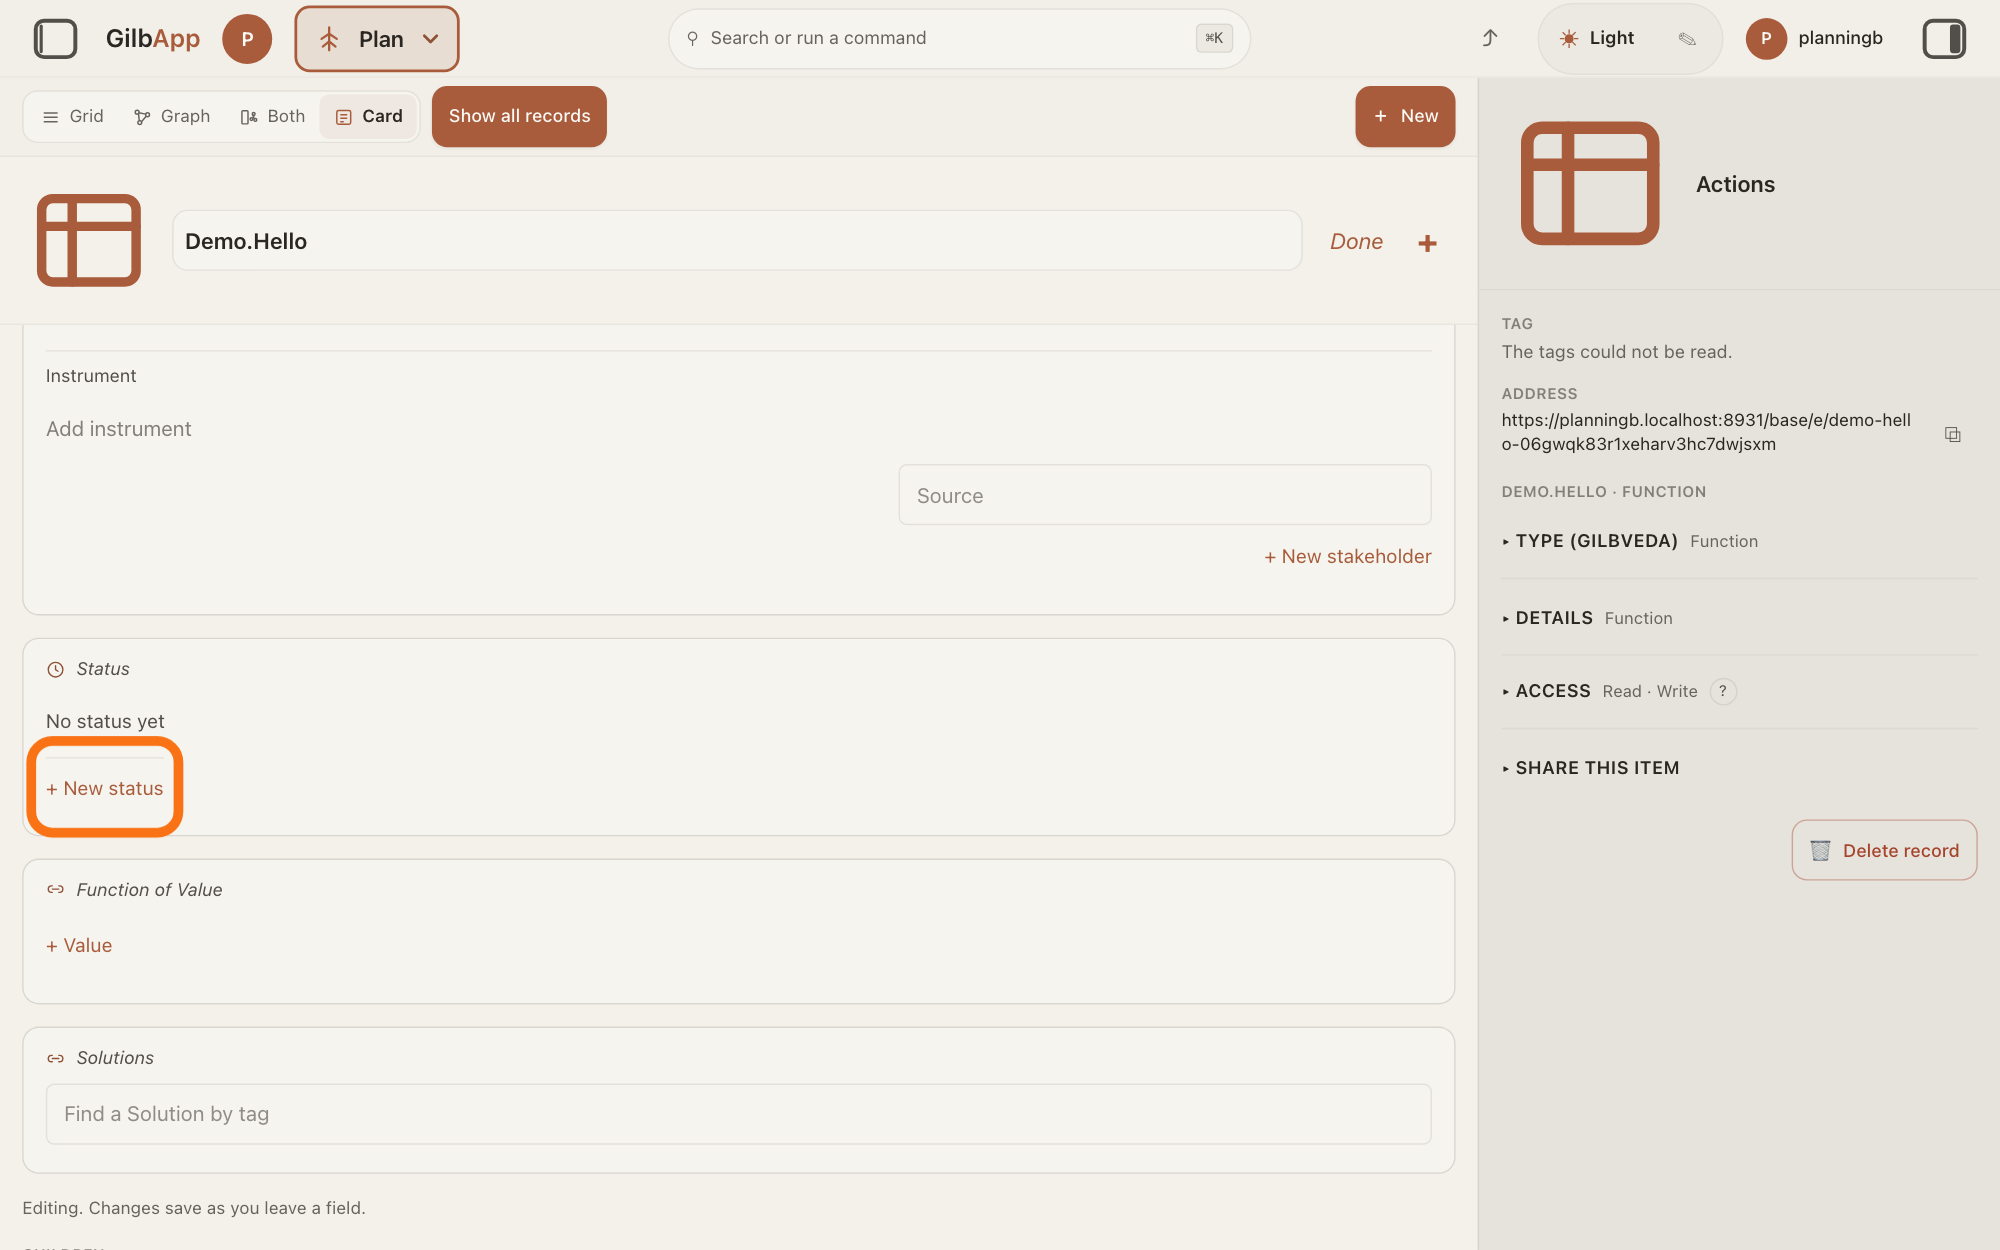
Show as text
Further down, the "Status" part reads "No status yet". The outlined button is "+ New status". Press it; a status line with today's date appears, set to "Planned", which you can change in its list.
More about this
The first new line is dated today and starts as Planned; a later one starts as the next word, and you can choose another; the date box under the status line changes the date. With nothing yet, the line reads No status yet. When the status changes, press + New status again and choose the new word: the older line stays as Past, so the history is kept. The same word on the same date is refused: That status is already recorded for that date. A × beside an older Past line deletes that line; you need it only to remove history. A Source box under the status line can name who said it; it is optional. None is needed to save.
Under Function of Value, press + Value, then search and select the Value.
Under Function of Value, press + Value, search in the box that shows Find a Value by tag and select the Value. A Value says how well the Function does its job, as a number.
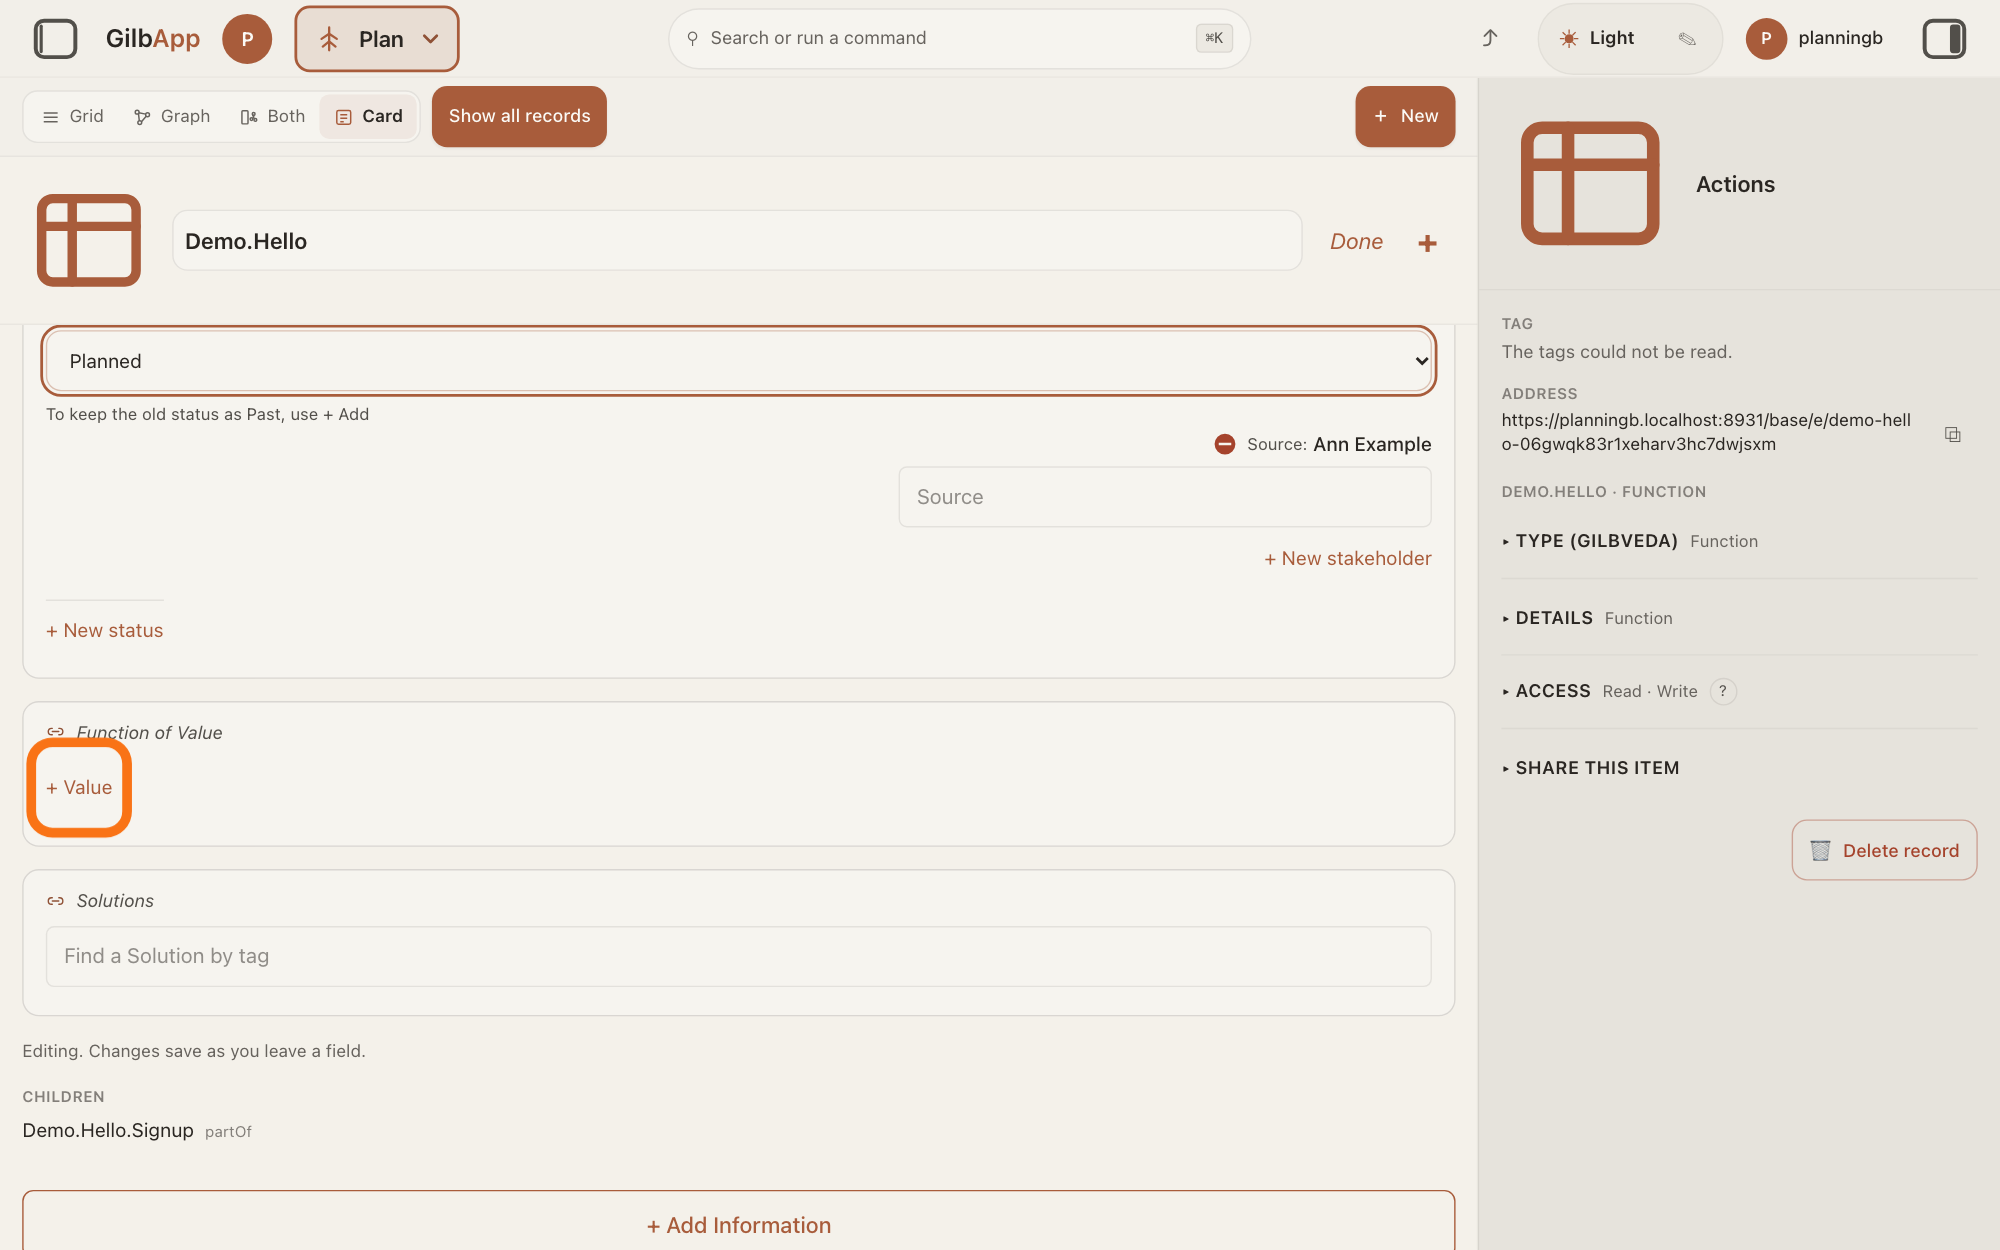
Show as text
The "Status" part now shows a list set to "Planned". Below it, under "Function of Value", the outlined button is "+ Value". Press it, then type part of the Value's tag and select the Value.
More about this
The Value then shows this Function under Value of Function. If no Value matches, press the button that starts with Create Value to make one with the text you typed. A Value can measure only one Function: if it already measures another, the screen says so, and nothing is linked. The line is optional for saving. When you have finished, press Done; what you typed is already saved.
Deeper
Also asked:
How do I write what my app must do? Write it as a Function, what a system does, written as an action: in Plan, press + New, choose Function, type a tag (its short name) and press Create.
What is Function of Value? The line on a Function that lists the Values that measure how well it is done; + Value adds one. A Value can measure only one Function, and its own card shows the link under Value of Function.
Only the tag is needed to create a Function. Every other line on the card is optional.
The tag is the Function's name. It cannot be left empty, and a tag already used in the same vault is refused.
A new Function has no level until you choose one on the Level in the line under the card's header. The levels you can choose are the project's own, Business, Stakeholder, Product and Solution by default.
A Function's Status is one of Planned, Building, Developed, Production or Retired, with a date. A Value's status is different: it is a number on its Scale, the ruler the Value is measured on.
A Value can measure only one Function. If it already measures another, the screen says so and nothing is linked.
Under Description, + Assumption adds something the Function counts on, and Paste parts adds many parts at once. An assumption is a plain claim a test can prove wrong: no may, might, could or expected to. In the Paste parts box, write one part per line as Keyword: text, then press the button that starts with Create; Discard under the box throws away what you pasted. A ? button next to + Part, + Assumption and Paste parts opens help about the Description. Once a part is added, its row has ↑ and ↓ to move it up or down, → and ← to move it under the part above or out one level, × to remove it, and a grip to drag it. None is needed to save.
Under Authority, you can search and select the named person who has the power to decide, influence or enforce something about the Function. If no one matches, the screen says No stakeholder record matches.; press + New stakeholder to make the person on the card. The method names a person, not a role or a group, and requires one on a Function Constraint; on a plain Function it is optional. A chosen person gets an optional acts for line with a Search records box. Part of (the bigger Function; None fits says none applies) and Solutions (how it is carried out) work the same way; Sub-functions fills itself. Authority, Part of and Type each have an optional Source box. Type (press + Add Information at the foot of the card, or the + beside Done) is the kind of thing the Function is about, from the types in GilbVeda, the shared list of terms.
A Function that must be done because a named person requires it is a Function Constraint, not a Function. Choose Function Constraint under TYPE in step 3; it needs that person under Authority. The answer on writing a Constraint in your plan shows how.
This answer is written for a computer screen.
Source: GilbApp af0f04ee838a4d55887d2ff1f72edd49a4ff7ca0 (https://gilb.com/app/version.json, built 2026-11-09, read 2026-11-09); plan, card, dialog and picker files unchanged since 70267705 except planValue.ts (Scale sentence dropped; no Function line). Lines as round 5 and its fixes 5b-5m: gilbAppMenuRows.ts:160-166; NewRecordButton.tsx:75, :89; CreateModeChooser.tsx:138; planKinds.ts:5-14, :114-125, :207-215; recordTypes.ts:379-389; TypeChooser.tsx:58, :247-262, :376-398 (DEFINITION = the chosen type's GilbVeda a:does, × back), :520 (↗); ConnectedCreateDialog.tsx:236, :319, :1417-1429, :1832-1846, :1986-1998, :2065-2091; planLinks.ts:208-213; cardMode.tsx:233-301; PlanTypeLevelVersion.tsx:56-145 (Type radio buttons in edit mode, Level list, + Add level…, Version); PlanFunctionForm.tsx:836-847, :1060-1081, :1587-1636, :1712, :1833-1869, :1875-2060, :2067; PlanDescriptionParts.tsx:1531-1580, :1597-1655, :1848-1893, :1929; planParts.ts:16-25, :92-97; PlanStakeholders.tsx:440-465, :553-572, :892, :911; PlanTagLinks.tsx:362, :441-465, :504-532, :621-660, :1179; AddInformation.tsx:33. Kai-Zen.FunctionRules (read 2026-11-09: What, PartOf, Meter, Status, Values, Constraint), Kai-Zen.FunctionTemplate, Kai-Zen.ConstraintRules (Authority, MustDo), Kai-Zen.ProductLevelRules.Contents. GilbVeda t:Function, t:Authority, t:Assumption, t:Description, t:FunctionConstraint (public read 2026-11-09). step 3, 4 (TYPE list, ↗ per row). Round 8c (DEFINITION panel, Type radio buttons). Live cap 10 pictures (brief).
Checked against GilbApp d529620.